This article will dive into different aspects of container security and walk through creating a secure container image. To do so, we will cover the following topics:
- Author secure
Dockerfilesaccording to best practices checked by dockle - Scanning and eliminating vulnerabilities in the inner- and outer-loop using container vulnerability scanning
Article Series
- Part 1: Code, Container, Cluster, Cloud: The 4C’s of Cloud-Native Security
- Part 2: Container Security: The 4C’s of Cloud-Native Security ⬅
- Part 3 Cluster Security: The 4C’s of Cloud-Native Security
- Part 4: Code Security: The 4C’s of Cloud-Native Security
- Part 5: Cloud Security: The 4C’s of Cloud-Native Security
That said, let’s briefly talk about the example application. We will containerize a simple web API build with Go for demonstration purposes. The API itself consists of three exposed HTTP endpoints:
POST: /echo– Responds the entire payload sent to the endpoint as the body of an HTTP 200 responseGET: /healthz/ready– Responds with an HTTP 200GET: /healthz/alive– Responds with an HTTP 200
Nothing fancy because it does not matter what happens inside the app as we’re dealing with container security for the sake of this article. Although I use Go here, you can use all concepts and tools no matter which programming language or framework you are using. You can find the source code of the application in the cloud-native-security repository (See container-security subfolder).
Containerizing the Sample application
Containerizing existing applications is super easy with Visual Studio Code (VSCode) and its Docker extension. If you have not yet installed the Docker extension, go ahead and install it now! To install the Docker extension for VSCode, you can search for Docker (published by Microsoft itself) using the extension browser (CMD-or-Ctrl+Shift+X) you execute code --install-extension ms-azuretools.vscode-docker in the terminal of your choice.
If you haven’t cloned the sample repository, it is now the time to do that:
					# move to the directory where you keep your repos
cd repos

# clone the repo
git clone git@github.com:thinktecture-labs/cloud-native-security.git

# move into the cloned repo
cd cloud-native-security/container-security

# fire up VSCode
code .
The Docker extension adds several commands to your VSCode installation. Execute the Docker: Add Docker Files to Workspace command now. This will guide you through the process of generating a tailored Dockerfile. When asked by VSCode, provide the following answers:
- Application Platform: Go
- Application Port: 3000
- Include optional Docker Compose files? No
By providing the answers above, VSCode can generate the following Dockerfile for you:
					#build stage
FROM golang:alpine AS builder
RUN apk add --no-cache git
WORKDIR /go/src/app
COPY . .
RUN go get -d -v ./...
RUN go build -o /go/bin/app -v ./...

#final stage
FROM alpine:latest
RUN apk --no-cache add ca-certificates
COPY --from=builder /go/bin/app /app
ENTRYPOINT /app
LABEL Name=containersecurity Version=0.0.1
EXPOSE 3000
Check Dockerfile with dockle
Having our container-security:0.0.1 image in place (you can check the list of all your container images using docker images), we can check if the Dockerfile meets best practices. To get our Dockerfile checked, we will use dockle. If you have not installed dockle on your machine, check the detailed installation instructions here on GitHub.
To get our image checked, invoke dockle container-security:0.0.1 and you should see the following incidents being displayed:
					WARN    - CIS-DI-0001: Create a user for the container
      * Last user should not be root
INFO    - CIS-DI-0005: Enable Content trust for Docker
      * export DOCKER_CONTENT_TRUST=1 before docker pull/build
INFO    - CIS-DI-0006: Add HEALTHCHECK instruction to the container image
        * not found HEALTHCHECK statement
For the scope of this article, we will fix CIS-DI-0001 and CIS-DI-0006. We will not enable content trust for Docker (DCT) in this article because not all managed services offerings for running containerized workloads support DCT as of today. This also applies for Azure Kubernetes Service (See corresponding discussion on GitHub).
CIS-DI-0001: Last user should not be root
The Dockerfile generated by VSCode does not add a custom, non-privileged user. This means our container will run as root, which should be prevented is possible. We can fix CIS-DI-0001 by adding a new user and switching to the user context with the USER command. So let’s quickly update our Dockerfile, add a dedicated user called bob, and switch in his context:
					#build stage
FROM golang:alpine AS builder
RUN apk add --no-cache git
WORKDIR /go/src/app
COPY . .
RUN go get -d -v ./...
RUN go build -o /go/bin/app -v ./...

#final stage
FROM alpine:latest
RUN apk --no-cache add ca-certificates
COPY --from=builder /go/bin/app /app

# non-root
RUN adduser -D bob && chown -R bob /app
USER bob
# end-non-root

ENTRYPOINT /app
LABEL Name=containersecurity Version=0.0.2
EXPOSE 3000
With those changes in place, let’s create a new image from the Dockerfile and 0.0.2 tag. When docker has finished the build, we can again invoke dockle to check the image:
					docker build . -t container-security:0.0.2
# ...
# => => naming to docker.io/library/container-security:0.0.2

dockle container-security:0.0.2

INFO  - CIS-DI-0005: Enable Content trust for Docker
    * export DOCKER_CONTENT_TRUST=1 before docker pull/build
INFO  - CIS-DI-0006: Add HEALTHCHECK instruction to the container image
    * not found HEALTHCHECK statement
As dockle reports, we’ve successfully optimized our Dockerfile and CIS-DI-0001 is gone.
CIS-DI-0006: Add health check instruction to the container image
To fix CIS-DI-0006, we have to provide instructions for Docker on how to perform health checks for this container. Luckily, our sample API exposes several HTTP endpoints. For continuously checking the health of the API, we want Docker to issue an HTTP request to /healthz/alive.
Consult the official Dockerfile reference here, to see which options and arguments can be used in combination with HEALTHCHECK.
Remember that health check commands are executed inside the container. Because our base image is tiny, we’ve to add a package to issue an HTTP request. For demonstration purposes, let’s take curl. Let’s update the Dockerfile to add curl and configure our custom health check:
					#build stage
FROM golang:alpine AS builder
RUN apk add --no-cache git
WORKDIR /go/src/app
COPY . .

RUN go get -d -v ./...
RUN go build -o /go/bin/app -v ./...

#final stage
FROM alpine:latest
## also install curl for healthcheck
RUN apk --no-cache add ca-certificates curl

COPY --from=builder /go/bin/app /app

# non-root
RUN adduser -D bob && chown -R bob /app
USER bob
# end-non-root

# healthcheck
HEALTHCHECK CMD curl --fail http://localhost:3000/healthz/alive || exit 1
# end healthcheck

ENTRYPOINT /app
LABEL Name=containersecurity Version=0.0.3
EXPOSE 3000
Although we used curl in this example, keep in mind that curl will impact the overall size of your container image, and the overall attack surface of your container image increases because of the added software. Sometimes it is wiser to write a small (self-contained) CLI for Docker health checks. Although this can be achieved with any programming language, I would prefer writing it in Rust because of robustness, safety, and the final size of the distributable.
Inner-loop vulnerability scanning with Snyk
Now that our Dockerfile meets best practices (except CIS-DI-0005), we must check our container images for known vulnerabilities. Vulnerability scanning checks all software inside the container (Software bill of materials SBOM) for known vulnerabilities. This means that all its dependencies and even Alpine Linux are scanned on top of our executable.
Plenty of tools are available for scanning container images in the inner loop. I decided to demonstrate vulnerability scanning using Snyk (snyk CLI). I’ve chosen Snyk because it is also integrated with Docker Desktop, which most developers use these days on Windows and macOS. If you want to use the standalone snyk CLI or scan your container images for vulnerabilities directly with docker scan, a Snyk account is required. For further information, check out the corresponding parts of the Snyk documentation. Once installed, you have to authenticate using snyk auth.
To scan our container image with snyk invoke sync container test container-security:0.0.3. Snyk finish the scan and report 0 vulnerabilities
					Testing container-security:0.0.3...

Organization:   thorsten-hans
Package manager:  apk
Project name:   docker-image|container-security
Docker image:   container-security:0.0.3
Platform:     linux/amd64
Base image:    alpine:3.15.0
Licenses:     enabled

✔ Tested 19 dependencies for known issues, no vulnerable paths found.

According to our scan, you are currently using the most secure version of the selected base image.
Awesome!
However, there may be situations where your vulnerability scanner will report a list of discovered vulnerabilities. If this happens, enough information is included to understand which dependency introduces the vulnerability, and links to detailed information about how to remediate it if a fix for that particular vulnerability is available:
					✗ Medium severity vulnerability found in glibc/libc-bin
 Description: NULL Pointer Dereference
 Info: https://snyk.io/vuln/SNYK-UBUNTU2004-GLIBC-1564900
 Introduced through: glibc/libc-bin@2.31-0ubuntu9.2, meta-common-packages@meta
 From: glibc/libc-bin@2.31-0ubuntu9.2
 From: meta-common-packages@meta > glibc/libc6@2.31-0ubuntu9.2
 Image layer: Introduced by your base image (ubuntu:20.04)
Outer-loop vulnerability scanning with Azure Container Registry and Azure Defender for Containers
Although we successfully scanned our image for vulnerabilities in the inner-loop using Snyk, we should always enforce vulnerability scanning in the outer-loop too. Popular container registries such as Azure Container Registry (ACR) provide seamless integration with vulnerability scanners. ACR is no exception here. By enabling Azure Defender for Containers, your container images will automatically scanned when pushed to your ACR instance.
Microsoft does not have its own vulnerability scanner. Instead, Azure Defender for Containers leverages the vulnerability scanner created and provided by Qualys. When writing this article, customers using Azure Defender for Containers are charged $0.29 per image scan.
To enable Azure Defender for Containers, Azure Defender for Cloud must be activated for the desired Azure subscription: You can enable Azure Defender for Cloud by navigating to Azure Defender for Cloud | Environment settings. From the list of subscriptions, select the desired Azure subscription and ensure Azure Defender for Cloud is activated.
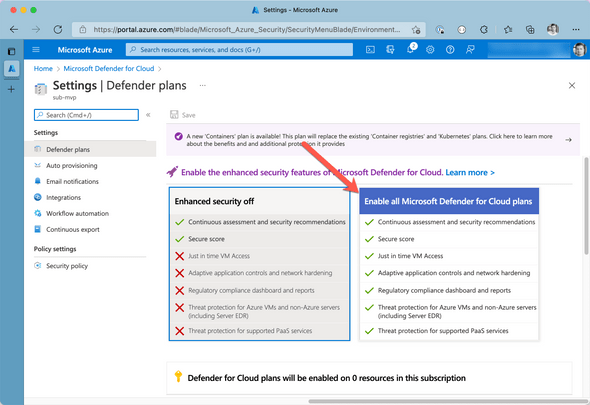
From the list of features, ensure Azure Defender for Containers is set to ON as shown in the following figure:
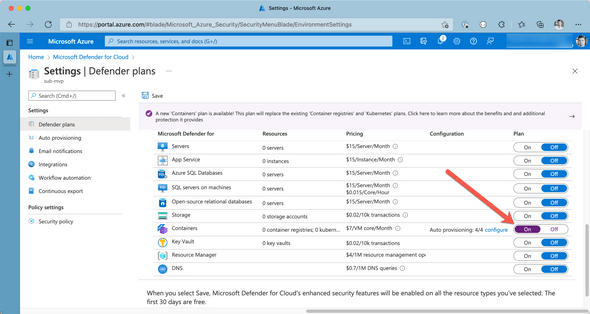
Once you’ve activated Azure Defender for Containers, Azure will scan container images in the following situations:
- new image / tag get pushed to ACR
- new images get imported to ACR
On top of that, all container images that are pulled from ACR during the last 30 days will be scanned once a week from Azure Defender for Containers for free.
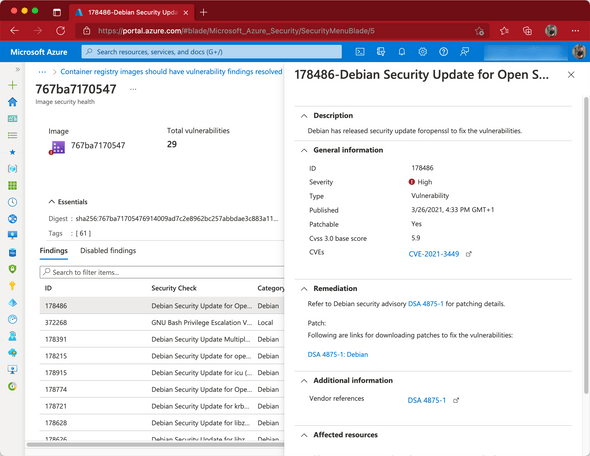
If the scanner detects vulnerabilities, all information about the vulnerabilities of an image will be aggregated and displayed in Azure Defender for Cloud, along with recommendations on how to remediate and further background information about each vulnerability.
Recap
Containers are perhaps the most popular distribution format of this time. Managed Kubernetes offerings such as Azure Kubernetes Service (AKS) and others drove container adoption to an even higher level in the past years. Every developer must have a common understanding of what containers are, how they work, and how they should be authored with security in mind.
In addition to authoring robust and secure Dockerfiles, development teams regularly have to check their custom container images for vulnerabilities. Fortunately, there are plenty of tools available to integrate our software development process seamlessly.