
Article Series
How to Use the Push API for Progressive Web Apps
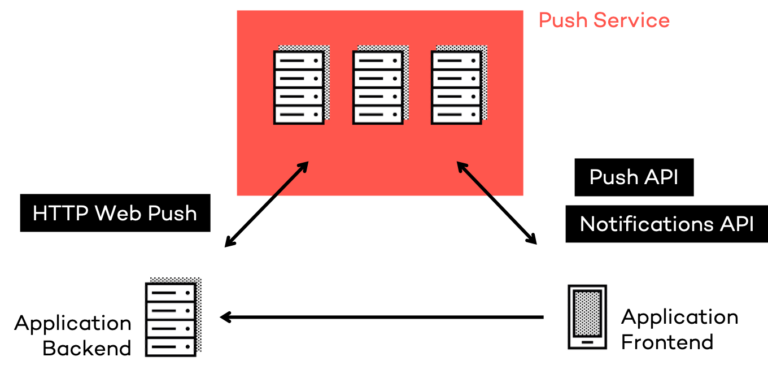
When implementing web-based push notifications, three parties are involved:
- The push service provided by the platform (e.g. Windows Notification Services for Microsoft Edge or Firebase Cloud Messaging for Google Chrome)
- Your client application running on the user’s device
- Your application server running in your data center or in the cloud which sends push messages to clients via the respective push service
The Push API takes care of requesting a push subscription at the push service and receiving push messages from it.
Push API, a Service Worker Extension
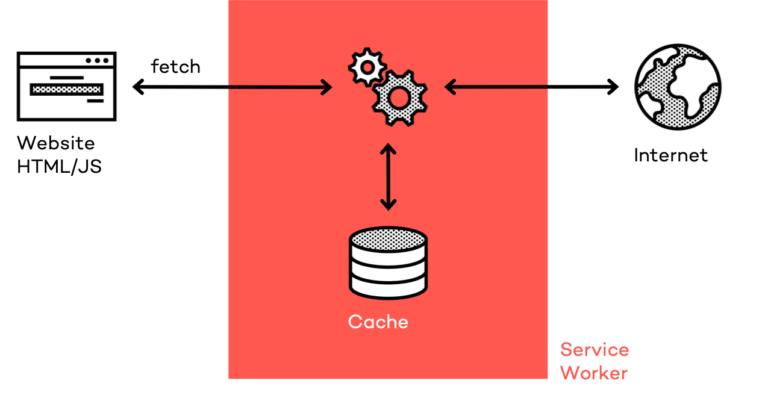
The Push API extends the Service Worker API, an important building block of Progressive Web Apps. Service Workers are a JavaScript snippet registered by a website, which then acts as a controller, proxy or interceptor: First of all, Service Workers can intercept any network traffic that originates from the given website. With the help of its cache, a Service Worker can persist server responses for given network requests and read them back in case the user is offline. Also, as the following sketch shows, the Service Worker is not running inside the website itself, but controlled by the browser instead. This way, the browser can decide to wake up the Service Worker script even if the application is closed—an important capability that is required for receiving push notifications.
Subscribe for Push Messages
In order to subscribe for push messages, an active Service Worker registration is required. As Service Workers and Push API are still comparatively new additions to the web platform, you should always check if those interfaces are actually available on the target system. If the API exists, use it, otherwise you can either disable the functionality or fall back to an alternative implementation. While Microsoft Internet Explorer neither supports Service Workers nor Push API, it would at least support WebSockets to receive push messages during runtime starting from version 10. Over time, more and more users should switch to more modern and powerful browser implementations and thus get access to real push notifications. This principle is called Progressive Enhancement, and in code, it’s typically expressed as an if statement.
As the following snippet shows, you can use the ready promise of the serviceWorker property on the navigator object to wait for a Service Worker registration. Not all browsers that support Service Workers also support Push API, so make sure to additionally check if the PushManager interface exists on the global window object.
					if ('serviceWorker' in navigator) {
  navigator.serviceWorker.register('sw.js');
  navigator.serviceWorker.ready.then(registration => {
    if ('PushManager' in window) {
      document.querySelector('button.subscribe-for-push')
        .addEventListener('click', () => registerForPush(registration.pushManager));
    }
  });
}
As discussed in the last article of this series, make sure to only subscribe for push message as a result of a user interaction such as a click or key press. Users will first have to allow push notifications in a permission prompt. In newer versions of Firefox, this prompt will only come up if it was opened as the result of a user interaction. Chrome currently (March 2020) experiments with automatically hiding the permission banner on sites with high rejection rates. So make sure to explain the benefits of your push notifications in your application’s UI and offer a button to then register for push notifications. In our sample, the registerForPush() method is then called and being passed the instance of the PushManager.
					async function registerForPush(pushManager) {
  try {
    const subscription = await pushManager.subscribe({ userVisibleOnly: true, applicationServerKey: new Uint8Array([/* … */]) });
    await fetch('https://example.com/push/subscribe', { method: 'POST', body: JSON.stringify(subscription.toJSON()) })
  } catch (error) {
    console.error(error);
  }
}
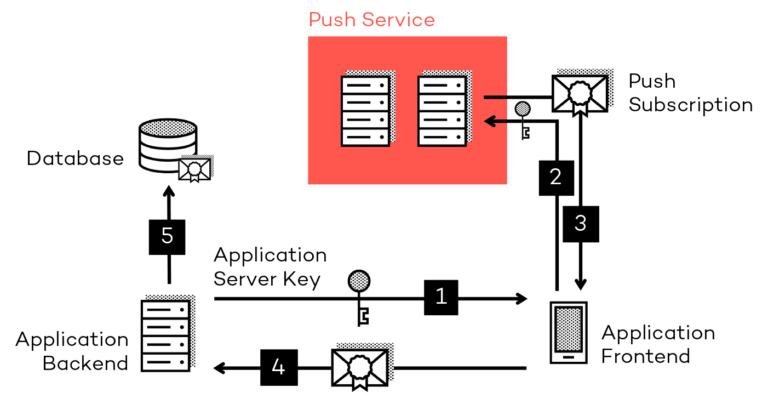
On the PushManager instance, you can now call the subscribe() method that will also bring up the permission prompt if the user hasn’t accepted it before. This method takes a configuration object that currently consists of two properties. userVisibleOnly indicates that the developer will always show a user-visible notification whenever a push message is received. This excludes silent push messages that may affect the user’s privacy. Passing in true for this property is currently mandatory. The applicationServerKey is a Uint8Array with public key information typically provided by the application server (1). This makes sure that only the application server will be able to send messages to the device. If the user accepts the permission prompt, the browser will next talk to its push service (2). Please note that you cannot choose a certain push service, instead it’s determined by the browser. Also note that you don’t need any API credentials whatsoever, the browser vendors provide the push service infrastructure completely for free. If the browser was able to subscribe for push messages, it will return the subscription (3). This subscription consists of a push service endpoint which the application server can use to talk to the right push service and cryptographic material to encrypt push messages for the current client:
					{
  "endpoint": "https://fcm.googleapis.com/fcm/send/dfu…AyI",
  "expirationTime": null,
  "keys": {
    "p256dh": "BOr…r_Y",
    "auth": "wI2…T8Q"
  }
}
The subscription is being sent to the application server (4) which stores the subscription in its database (5). Typically, the application server has already authenticated the user and can assign the push subscription to it. Remember to be allow more than one push subscription per user in your database scheme, as they may use more than one device or browser to receive push messages. In case there was an error while subscribing, it is logged to the console.
Frameworks like Angular abstract the Service Worker implementation for you. If you are using Angular’s PWA support, please check out the SwPush service to subscribe for push notifications.
Respond to Incoming Push Messages
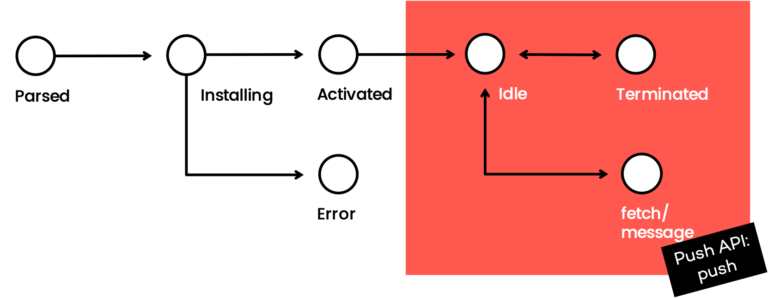
Service Worker scripts follow a certain lifecycle. After registration, installation and activation they enter their main working phase. Most of the time, Service Workers will be idle and waiting for instructions. The browser will then call functional events such as fetch when the application requests a resource over the network. The Push API introduces a new functional event called push which is being raised in case the browser receives a push message. The push message’s data is made available on the event arguments. If necessary, the browser will wake up the corresponding Service Worker first.
This is where the job of Push API ends already, as it only deals with the infrastructure. Next, the Notifications API is used for showing the actual notification. The Notifications API also extends the Service Worker API by providing the showNotification() method on the Service Worker’s registration. This method takes a notification title, which is required, and an optional configuration object for additional properties such as an image, vibration pattern, body text or additional actions.
In order to receive push messages, your Service Worker needs to listen for the push functional event. In the following sample, the Service Worker parses the push message’s data as JSON and uses the deserialized object to show a notification:
					self.addEventListener('push', event => {
  const notification = event.data.json();
  self.registration.showNotification(notification.title, notification);
});
As discussed in the last article of this series, notifications created by a Service Worker are considered persistent and will not automatically disappear from the operating system’s notification center.
Respond to Notification Clicks or Closes
The Notifications API defines two additional functional events on the Service Worker: notificationclick and notificationclose. The notificationclick event is invoked when the user clicks a persistent notification banner or chooses an action. In the corresponding event handler, developers should first close the notification. Next, it’s up to their discretion which actions they want to take. Typically, a client window of the application should be opened or brought to the foreground. The Service Worker’s Clients API is of help in this case.
					self.addEventListener('notificationclick', event => {
  event.notification.close();
  if (event.action === 'ok') {
    event.waitUntil(
      client.openWindow(event.notification.data.url)
    );
  }
});
In case you are using Angular’s PWA support, the framework handles notification clicks for you. You can optionally register for click events using the notificationClicks observable provided by the SwPush service.
Furthermore, the Notifications API provides a notificationclose event that is called when the user closes a notification. This can be used to collect analytical data, for instance.
					self.addEventListener('notificationclose', () => {
  // Log analytical data
});
Push Notifications Debugging
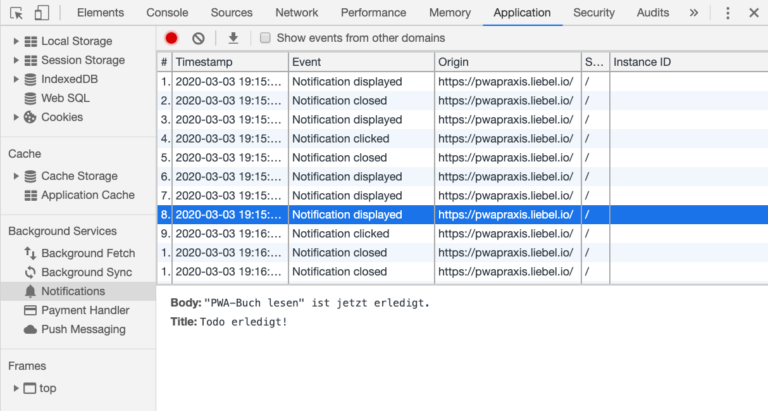
To debug push notifications, you can use the Chrome DevTools. In the Sources tab, you can simply place a breakpoint in those lines where you request a push subscription, receive a push message or notification event. You can also simulate a push event with the help of the Service Worker panel of the Application tab. There, you can enter a string which is being passed to the push event handler. You can also monitor notification clicks and closes in the Notifications panel in the Background Services section: When clicking the record button on the upper left part of the panel, DevTools records any notification events and metadata for up to three days. Neither DevTools nor the website need to be open for recording the events.
Push API Browser Support
Push API is supported from Google Chrome 42, Mozilla Firefox 44 and Microsoft Edge 17 onwards. In particular, the Push API is not supported by Microsoft Internet Explorer and Apple Safari on macOS, iOS and iPadOS. As all browsers on iOS and iPadOS are forced to use Apple’s WebKit engine, the Push API is ultimately not supported on the iOS and iPadOS platforms. There is no information whether Apple will ever support Push API. Developers can join the discussion in this ticket in the WebKit bug tracker.
On iOS and iPadOS, there are some hacks to still show some sort of notifications, for instance by sending in a text message or a Wallet notification instead. Text messages are subject to additional costs and will open the Messages app when being clicked on, not the actual website. Also, the notification banners can’t show a custom app title or icon. Interestingly, web-based notifications are supported for Wallet passes and even support a custom title and icon. However, this approach requires registering a pass first. When the user clicks the notifciation, the pass will open instead of the website. The only real solution here is to wrap your application source files in a native wrapper such as Apache Cordova and deploy it via the App Store.
For a complete list of supported browsers and versions, check the PushManager compatibility table at caniuse.com.
Conclusion
The Push API nicely teams up with the Notifications API to re-engage your users, which is great for messengers, social networks or games. However, bear in mind that web-based push notifications are not supported by every platform. In the next part, we’ll have a look at the HTTP Web Push protocol that is used to send in notifications from your application server and helpful third-party services.