
Article Series
- Notifications API
- Push API
- HTTP Web Push ⬅
- Additional Approaches
Delivering Push Messages via HTTP Web Push
The third specification we want to discuss is HTTP Web Push, an infrastructure protocol standardized by the Internet Engineering Task Force (IETF) in RFC 8030. Web Push is a single abstract protocol that can be used in combination with any push service supporting Push API. Among others, it specifies the HTTP endpoints called by application servers to deliver push messages or request delivery receipts. When sending a push message, developers can determine the urgency of the notification. For instance, incoming phone calls are urgent compared to an advertising message sent by a free-to-play game. Also, they can specify a Time to live (TTL) for messages with a limited life span, such as daily offers. Furthermore, push messages can also be updated or deleted, for example, when users edit an instant message or remove it.
Keeping Your Push Messages Secure
Guaranteeing security and privacy was one of the main goals when web-based push notifications where specified: Nobody should be able to intercept or tamper with the push messages sent from your backend to the client. Hence, push messages should be signed and encrypted. Web Push message encryption is based on a public/private key procedure and allows for end-to-end encryption of push messages (RFC 8291). At least Google Chrome requires developers to encrypt the contents of their push messages. As a result, not even the platform’s push service (which may or may not be trustworthy) can read the contents of your push messages; they can merely see the traffic data like the amount and size of your messages.
Voluntarily Identify Your Application Server
As mentioned in the first part of this series, each platform uses its own push service: On desktop systems, Firefox uses the Mozilla Push Service, Edge relies on the Windows Notification Services, and Chrome uses Firebase Cloud Messaging. Other browser vendors may implement their push services. As the Web Push protocol is entirely abstract, developers cannot know in advance which push services their application server will need to connect to. Consequently, developers can’t authenticate their application server at the push service using API keys or logins, and using the push infrastructure is completely free. Developers can send in as many push messages as they like. However, push services could stop accepting messages from the application server in case of abuse or misconfiguration. To prevent disruptions, developers can voluntarily identify themselves so that the push service operator could contact them.
This is where the Voluntary Application Server Identification (VAPID, RFC 8292) comes in. VAPID allows developers to specify contact information, such as their email address or website, and provides a corresponding authentication scheme for communication between the application server and the push service. Fortunately, developers do not have to implement the VAPID authentication scheme or communicate with push services themselves. There are ready-to-use libraries for a wide range of server platforms such as Node.js, .NET, Java, or Python. The complete list of web push libraries can be found at GitHub.
Generating VAPID Key Pairs
To send messages to subscribed clients, the developer first needs a pair of VAPID keys. The following code snippet shows how to create a key pair in Node.js.
					const webpush = require('web-push');
const vapidKeys = webpush.generateVAPIDKeys(); // do this only once!
The resulting object in vapidKeys contains the publicKey and the privateKey. Please note that the application server should only generate VAPID keys once and then keep using the same pair, as it shares its public key with the client application. The web-push package for Node.js can also be used as a command-line tool to generate keys:
					npm i -g web-push
web-push generate-vapid-keys
If you want to play around with HTTP Web Push, you can also make use of https://pwapraxis-push.glitch.me/, which generates valid VAPID keys. Internally, this website uses the same web-push package.
The application server must then make its public key available to the client application, for instance, by providing an HTTPS endpoint to request it.
Using The Public VAPID Key
In the second part of the series, we demonstrated the web push flow between the client application on the user’s device and the platform’s push service. Let’s take another look at the registerForPush() method implemented in the client application:
					async function registerForPush(pushManager) {
  try {
    const subscription = await pushManager.subscribe({
      userVisibleOnly: true,
      applicationServerKey: new Uint8Array([/* Public VAPID key */])
    });
    await fetch('https://example.com/push/subscribe', { method: 'POST', body: JSON.stringify(subscription.toJSON()) })
  } catch (error) {
    console.error(error);
  }
}
When subscribing for push messages, the client application needs to specify an applicationServerKey. This is the generated public VAPID key from above. The key can either be hard-coded or, more elegantly, retrieved from the application server via an HTTPS endpoint. If subscribing was successful, the browser returns the push subscription for this very client application. The push subscription then has to be sent to the application server.
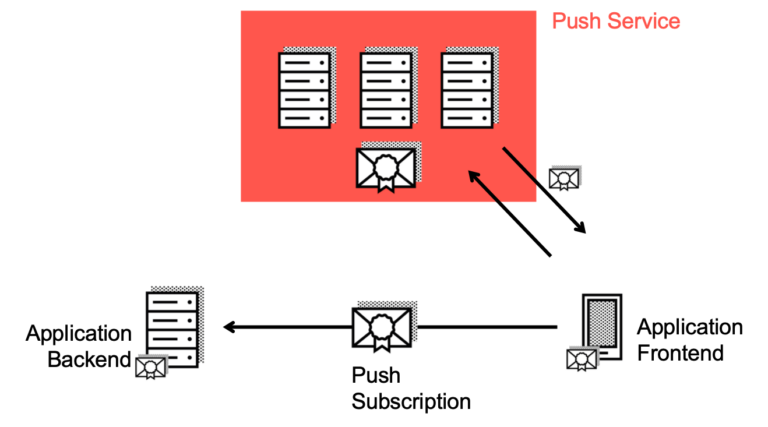
In the listing from above, the application server implements an endpoint, where the subscription will be sent to. The subscription can then be stored in a database. Typically, the user authenticates with the application server so that it can assign the push subscription to the respective user. Please bear in mind that a user can have more than one device and thus more than one active push subscription.
Sending Push Messages to Your Users
Back on the application server, we now want to send push messages to our subscribed users. Therefore, the web-push library from above needs to be configured first.
webpush.setVapidDetails('mailto:example@yourdomain.org', vapidKeys.publicKey, vapidKeys.privateKey);
As shown in the listing, this is also the point where developers can voluntarily identify themselves. Furthermore, the public and private VAPID keys have to be specified.
With the library configured, and the push subscription transferred to the application server, developers can send push messages to clients. The application server typically delivers push messages after a change of data (e.g., a new instant message or a price update) to the affected users. With the help of the web-push package, this is as simple as follows:
webpush.sendNotification(pushSubscription, { title: 'Hello' });
Developers simply call the sendNotification() method with the push subscription they want to send the push message to. Remember that even a single user can have more than one push subscription, so make sure to call this method for all affected subscriptions. Furthermore, the method takes the payload that should be sent to the subscription. The library then takes care of encrypting the content and sending it to the push service specified by the subscription. As described in the previous part, the service worker of the client application should now wake up and present the push notification to the user.
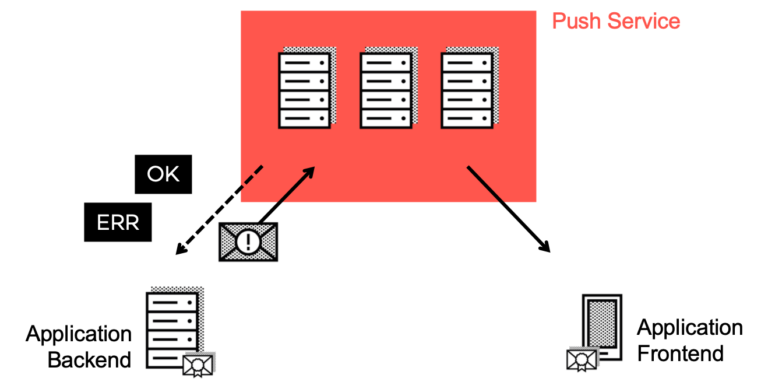
The application server will be notified if the push message could be delivered, or an error has occurred. In case the push subscription is not valid (anymore), the server should remove it from its store of push subscriptions.
Web Push Limitations
Currently, there are some limitations when dealing with web-based push notifications: For instance, no silent pushes are allowed. Each push message must lead to a push notification banner visible to the user. The Chrome team experiments with a Budget API that allows a few silent pushes per day. An inline reply functionality is not (yet) a part of the Notification API. Finally, Apple Safari does not support Push API—neither on desktop nor mobile. While there is an alternative for the desktop platform, Safari Push Notifications, it is cumbersome to implement and operate. Unfortunately, there is no information available if Apple will ever support Push API on Safari.
The WebKit Team is collecting use cases for push notification via their bug tracker for Progressive Web Apps, to consider supporting them. So feel free to add your use case and help to prove the relevance of push notifications.
Conclusion
HTTP Web Push is the missing piece to complete the puzzle of web-based push notifications: Secure, privacy-preserving, free to use, and, with the help of web push libraries, simple to implement. In the next and final part of this series, we’ll have a look at some more aspects, such as alternative approaches for Safari, and what Project Fugu has in store for notifications on the web.