What is KEDA
KEDA stands for Kubernetes Event-driven Autoscaling. It is a thin layer built on top of Kubernetes to scale applications dynamically based on metrics from external systems. Although it comes with first-class support for Azure Functions, it is not limited to Azure Functions. KEDA can scale different Kubernetes deployments according to actual load. Powered by Microsoft, RedHat and others, KEDA is vendor-agnostic and can be deployed to any Kubernetes cluster.
Why should you care?
KEDA fills two gaps which you will face while building distributed, cloud-native application at massive scale.
First, KEDA gives you more control. More control over your Azure Functions in contrast to running them in the public cloud. You can leverage existing Kubernetes cluster and run your Azure Functions right next to other application building blocks of your overall architecture. KEDA allows you to specify custom boundaries for scaling behavior.
On the other hand, KEDA lets you scale deployments in Kubernetes based on external events or metrics. In Kubernetes, you can use Horizontal Pod Autoscaler (HPA) to scale Deployments based on metrics generated inside of the cluster. Especially when running Kubernetes in combination with external, cloud-based services such as Azure Service Bus, your application artifacts have to scale on those external metrics.
KEDA provides a structured, streamlined strategy of how to address those needs without adding much complexity to your overall architecture.
KEDA Architecture
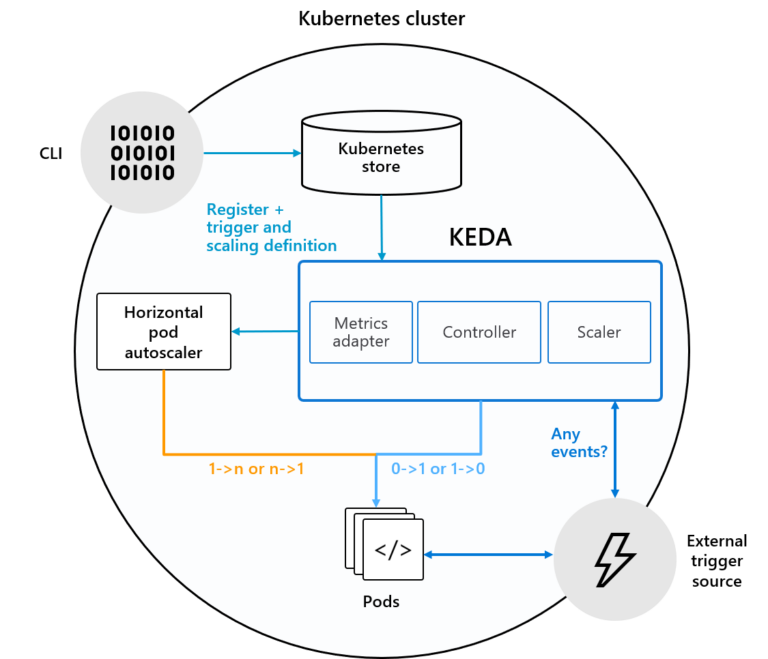
KEDA is not only built for Kubernetes, it is also built on top of Kubernetes using standard, well-known building blocks.

As you can see from the architectural diagram, KEDA leverages Horizontal Pod Autoscaling (HPA) mechanism from Kubernetes to scale your deployments. A KEDA-internal Kubernetes Controller is responsible for examining external events (so-called scalers) and instructing the metrics adapter to feed HPA with corresponding scale requests for the individual deployments.
KEDA Scalers
Now that you know how KEDA’s architecture looks like, we can move over and take a look at the so-called Scalers. Scalers are the glue in KEDA. They connect deployments inside of your cluster to the outer world.
Currently, KEDA supports 18 different scalers. Among others you can use
- Azure Service Bus Queues
- Azure EventHub
- Azure Blob Storage
- AWS Cloudwatch
- AWS Kinesis Streams
- Apache Kafka Topics
- RabbitMQ Queues
- Redis Lists
Consult the curated list of KEDA scalers and find the Scaler you are looking for. Also, on this page, you can easily spot the author of the scaler. Besides Microsoft and Amazon, other organizations and even communities keep on publishing, extending, and maintaining KEDA scalers.
Installing KEDA on Kubernetes
KEDA can be deployed to any Kubernetes cluster. At the point of writing this article, KEDA can either be installed using:
- the stable Helm 3 chart
- Azure Functions Core Tools
kubectldirectly
The following snippet installs KEDA on the currently selected Kubernetes cluster using Helm 3.
					# add KEDA repo
helm repo add kedacore https://kedacore.github.io/charts

# update the repo
helm repo update

# install keda to the keda namespace
kubectl create namespace keda
helm install keda kedacore/keda --namespace keda
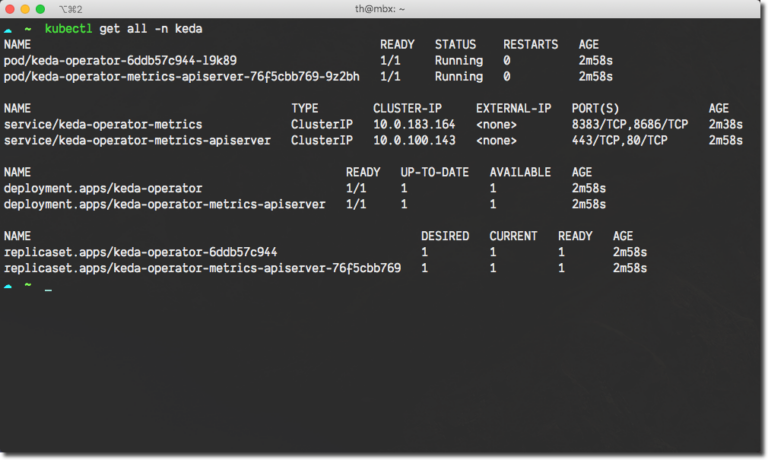
Once Helm 3 finished installing KEDA, you can use kubectl to verify installation. Within your Namespace, you should find the following resources (Pod names will differ) using the kubectl get all -n keda command.

If you are not using Helm 3, or want to know how you can install KEDA using kubectl, see the official KEDA deployment page.
Demo: KEDA with Azure Service Bus
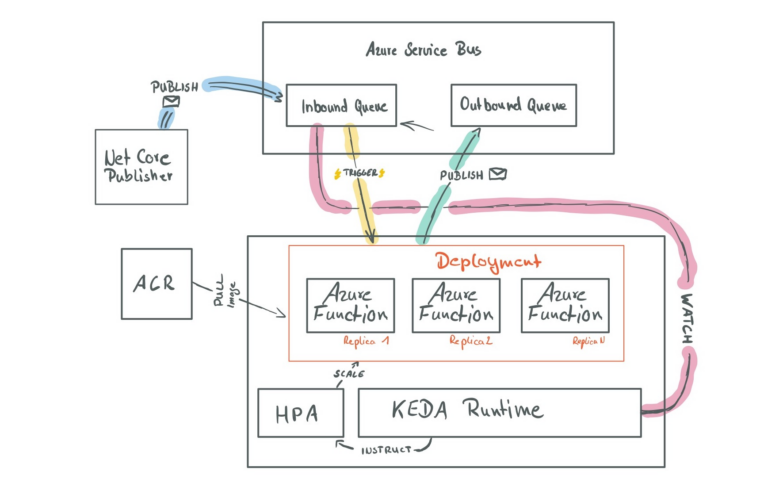
For demonstrating purposes, we create an Azure Functions project that receives messages from an Azure Service Bus Queue, transforms the message, and writes it back to another, dedicated Azure Service Bus Queue. Additionally, we create a small .NET Core application that feeds our inbound queue with messages to see KEDA scaling our deployment.
The underlying Azure Functions project is deployed to a managed instance of Azure Kubernetes Service (AKS) using a Docker Image, which we also build, and publish in a protected instance of Azure Container Registry (ACR) as part of this walkthrough.
See the following diagram outlining the architecture and message flow of our demo application:

The diagram is also highlighting connections to the Azure Service Bus Queues, which indicates that we use different connection strings for each communication, each with the least privileges necessary.
Spinning up Azure Resources
The demo application consists of several Azure resources. The demo repository contains a folder called scripts. Within that folder, Shell scripts can be found to spin up and configure all required Azure resources for this demo application. Once you executed the scripts, you end up with having the following resources deployed to your Azure Subscription:
- 1 Azure Resource Group (
thinktecture-keda-sample) - 1 Azure Service Bus Namespace (
sbn-thinktecture-keda) - 2 Azure Service Bus Queues (
inboundandoutbound) - 1 Azure Service Principal (
thinktecture-keda-sample) - 1 Azure Container Registry (
ttkedasample123where123is a random integer) - 1 Azure Kubernetes Service (
aks-tt-keda-demowith two Linux worker nodes)
The scripts create tailored authorization rules in Azure Service Bus. Our demo application requires four different authorization rules:
- KEDA requires
Managepermissions for theinboundqueue - The Azure Functions runtime requires
Listenpermissions for theinboundqueue - The Azure Functions runtime requires
Sendpermissions for theoutboundqueue - The .NET Core console app requires
Sendpermissions for theinboundqueue
All scripts rely on Azure CLI 2.0. If you have not installed Azure CLI 2.0 on your system. You can either use the Azure Portal to spin up and configure all resources correctly, or you follow the official Azure CLI 2.0 Installation Guide.
Create the Azure Functions project
An Azure Function acts at the center of our demo application. Although the actual task performed by the function is rather simple, it gives you an understanding of how things are tied together and how KEDA may help you when dealing with expected or unexpected load. To create a new Azure Functions project, you can either utilize Visual Studio 2019 or – as shown below – Azure Functions Core Tools in Version 3. See the Azure Functions Core Tools Installation Guide for further details on how to install Version 3.
					mkdir Thinktecture.MessageTransformer && cd Thinktecture.MessageTransformer

# verify using Azure Functions Core Tools 3.x
func version
3.0.2106

# Create a new Azure Functions Project
func init --worker-runtime dotnet --docker

# Create a new Function using the ServiceBusQueueTrigger template
func new -n MessageTransformer -l csharp -t ServiceBusQueueTrigger
Now that Azure Functions Core Tools has created a basic template, we can change it to meet our requirements. First, we take care of the function definition itself. We want our function to trigger messages waiting in the inbound queue. Additionally, our function should return the transformed message, which gets stored in the outbound queue. Change the generated method definition to match the following:
					[FunctionName("TransformMessage")]
[return: ServiceBus("outbound", Connection = "OutboundQueue")]
public static string Run([ServiceBusTrigger("inbound", Connection = "InboundQueue")]string message, ILogger log)
{

}
The implementation of the function is simple; we grab the incoming message and reverse it. Finally, we return the transformed message. Notice the [return: ServiceBus()] attribute, it instructs the Azure Functions Host to create a new message in the specified Azure Service Bus Queue.
					using System;
using Microsoft.Azure.WebJobs;
using Microsoft.Extensions.Logging;

namespace Thinktecture.MessageTransformer
{
    public static class MessageTransformer
    {
        [FunctionName("TransformMessage")]
        [return: ServiceBus("outbound", Connection = "OutboundQueue")]
        public static string Run([ServiceBusTrigger("inbound", Connection = "InboundQueue")]string message, ILogger log)
        {
            if (string.IsNullOrWhiteSpace(message))
            {
                log.LogWarning($"Bad Request: received NULL or empty message");
                throw new InvalidOperationException("Received invalid Message");
            }
            log.LogInformation($"Received Message '{message}' for transformation)");

            var chars = message.ToCharArray();
            Array.Reverse(chars);
            var result = new string(chars);

            log.LogInformation($"Transformed Message to '{result}'");
            return result;
        }
    }
}
Building and Publishing the Docker Image
Before deploying the Azure Functions project to KEDA, we have to package it as Docker Image and publish the image to Azure Container Registry. Either you can use your local docker installation or you can leverage ACR Container Build and offload the process of building and pushing the Docker Image directly to ACR. Keep in mind, when using ACR Container Build all files and folders in the current folder will be uploaded to Azure Container Registry to execute the build (respecting potential .dockerignore in the current folder).
If you have docker installed, you can build and push the Docker Image like this:
					docker build . -t $ACR_NAME.azurecr.io/message-transformer:0.0.1 \
  -t $ACR_NAME.azurecr.io/message-transformer:latest

az acr login -n $ACR_NAME

docker push $ACR_NAME.azurecr.io/message-transformer:0.0.1
docker push $ACR_NAME.azurecr.io/message-transformer:latest
If you have not installed docker, you can use ACR Container Build like this:
					az acr build -t $ACR_NAME.azurecr.io/message-transformer:0.0.1 \
  -t $ACR_NAME.azurecr.io/message-transformer:latest \
  -r $ACR_NAME .
Independent from the chosen path, you will end up having a Docker Image named message-transformer with tags 0.0.1 and latest in your ACR instance. This can be verified using az acr repository show-tags:
					az acr repository show-tags -n $ACR_NAME --repository message-transformer
Result
--------
0.0.1
latest
Attach ACR to AKS
Without manual interaction, Azure Kubernetes Service is not able to pull Docker Images from Azure Container Registry instances. Even if both services are grouped in the same Azure Resource Group, you have to connect both services manually. Kubernetes and AKS provide different strategies to achieve this. The easiest way how to integrate AKS with ACR is to attach the ACR instance to your AKS.
If you have created the Azure Resources using the script mentioned before, AKS and ACR are already connected, and you are good to go.
					AKS_NAME=your_aks_name
AKS_RG_NAME=your_aks_rg_name

az aks update --attach-acr $(az acr show -n $ACR_NAME --query "id" -o tsv) \
  -n $AKS_NAME \
  -g $AKS_RG_NAME
Store connection strings in Kubernetes Secrets
Recalling the diagram of the demo application, several communication paths are shown; each of them has to have its own connection string. However, things become a bit more complex at this point. Our KEDA scaler requires a connection string including the EntityPath specification, which turns out to be the default format provided by Azure CLI. In contrast, Azure Functions Runtime requires connection strings for Azure Service Bus without the EntityPath specification, because this is handled by a dedicated property on ServiceBusTriggerAttribute and ServiceBusAttribute which is used for the output binding in our demo function.
First, let’s take care of the connection string for the KEDA scaler. We grab the connection string from Azure using az servicebus queue authorization-rule keys list before we hand it over to kubectl to create the Secret in our demo Namespace:
					# create the k8s demo namespace
kubectl create namespace tt

# grab connection string from Azure Service Bus
KEDA_SCALER_CONNECTION_STRING=$(az servicebus queue authorization-rule keys list \
  -g $RG_NAME \
  --namespace-name $SBN_NAME \
  --queue-name inbound \
  -n keda-scaler \
  --query "primaryConnectionString" \
  -o tsv)

# create the kubernetes secret
kubectl create secret generic tt-keda-auth \
  --from-literal KedaScaler=$KEDA_SCALER_CONNECTION_STRING \
  --namespace tt
The connection strings for the Azure Function require some more processing, before persisting them in a Kubernetes Secret, the EntityPath=... part has to be removed:
					AZFN_TRIGGER_CONNECTION_STRING=$(az servicebus queue authorization-rule keys list \
  -g $RG_NAME \
  --namespace-name $SBN_NAME \
  --queue-name inbound \
  -n azfn-trigger \
  --query "primaryConnectionString" \
  -o tsv)

AZFN_OUTPUT_BINDING_CONNECTION_STRING=$(az servicebus queue authorization-rule keys list \
  -g $RG_NAME \
  --namespace-name $SBN_NAME \
  --queue-name outbound \
  -n azfn-binding \
  --query "primaryConnectionString" \
  -o tsv)

# create the secret
kubectl create secret generic tt-func-auth \
  --from-literal InboundQueue=${AZFN_TRIGGER_CONNECTION_STRING%EntityPath*} \
  --from-literal OutboundQueue=${AZFN_OUTPUT_BINDING_CONNECTION_STRING%EntityPath*} \
  --namespace tt
Deploy Azure Functions to Kubernetes
Although Azure Functions Core Tools provides several commands to bring Azure Functions projects to Kubernetes when using KEDA, we can’t use those commands directly.
The commands are designed for simple scenarios and don’t meet all our requirements. To be more precise, they don’t offer a way to specify separate connection strings for KEDA scalers and Azure Functions. That said, we can still use the commands to split out all Kubernetes definitions (yaml), but then manual modifications are required.
					func kubernetes deploy --namespace tt \
  --name transformer-fn \
  --image-name $ACR_NAME.azurecr.io/message-transformer:0.0.1 \
  --polling-interval 5 \
  --cooldown-interval 10 \
  --min-replicas 0 \
  --max-replicas 50 \
  --secret-name tt-func-auth \
  --dry-run > keda-deployment.yaml
The func kubernetes deploy command has several attributes that directly control how our app scales, once it is deployed to Kubernetes. For example, --min-replicas can be used to specify how many instances of our Docker Image will be running on the cluster (independently from the load). On the opposite,--max-replicas can be set to control the upper boundary and instruct Kubernetes’ HPA to scale the deployment up to a certain amount of Pods. With --polling-interval, we can control the interval used by KEDA to check Azure Service Bus Queue for messages. The --cooldown-interval is used to specify how long Pods will kept running without actual load. You can also invoke func kubernetes deploy --help and see all arguments and their responsibility directly in the terminal.
Once executed, we can find all deployment artifacts in keda-deployment.yaml. We have to modify two things in the generated file. First, we have to add a new resource of type TriggerAuthentication, which we use to connect the KEDA scaler directly to our Kubernetes Secret tt-keda-auth.
Go ahead and add the following yaml at the beginning of the file:
					apiVersion: keda.k8s.io/v1alpha1
kind: TriggerAuthentication
metadata:
    name: trigger-auth-servicebus
    namespace: tt
spec:
    secretTargetRef:
        - parameter: connection
          name: tt-keda-auth
          key: KedaScaler
---
Next, look for the ScaledObject and alter its definition to match the following:
					apiVersion: keda.k8s.io/v1alpha1
kind: ScaledObject
metadata:
    name: transformer-fn
    namespace: tt
    labels:
        deploymentName: transformer-fn
spec:
    scaleTargetRef:
        deploymentName: transformer-fn
    pollingInterval: 5
    minReplicaCount: 0
    maxReplicaCount: 100
    triggers:
        - type: azure-servicebus
          metadata:
              queueName: inbound
          authenticationRef:
              name: trigger-auth-servicebus
Deploy all artifacts to kubernetes using kubectl apply -f keda-deployment.yaml.
Put load on Azure Service Bus
To populate messages in our inbound queue, we create a small .NET Core application. The application uses the official Azure Service Bus SDK to send messages to the queue. Use the dotnet CLI to spin up and configure the .NET Core console application:
					# create a new NetCore Console App
dotnet new console -n Thinktecture.Samples.KEDA.Publisher -o ./Publisher

cd Publisher

# Add NuGet dependencies
dotnet add package Microsoft.Azure.ServiceBus
dotnet add package Microsoft.Extensions.Configuration
dotnet add package Microsoft.Extensions.Configuration.Binder
dotnet add package Microsoft.Extensions.Configuration.EnvironmentVariables
Our application should continuously publish messages to the inbound queue. The app uses .NET Core Configuration stack to pull the connection string at runtime from environment variables before initializing the QueueClient.
					static async Task Main(string[] args)
{
    var config = new ConfigurationBuilder()
        .AddEnvironmentVariables().Build();

    var connectionString = config.GetValue<string>("AzureServiceBus");
    var builder = new ServiceBusConnectionStringBuilder(connectionString);
    var client = new QueueClient(builder, ReceiveMode.PeekLock);
    while (true)
    {
        await PublishMessageAsync(client);
        System.Threading.Thread.Sleep(1000);
    }
}

static async Task PublishMessageAsync(QueueClient client)
{
    var message = $"Thinktecture Sample Message generated at {DateTime.Now.ToLongTimeString()}";
    await client.SendAsync(new Message(System.Text.Encoding.UTF8.GetBytes(message)));
    Console.WriteLine("Message published to Azure Service Bus Queue");
}
Before running the app, the corresponding connection string has to be stored in an environment variable. Again, grab the connection string using Azure CLI:
					az servicebus queue authorization-rule keys list \
  -g $RG_NAME \
  --namespace-name $SBN_NAME \
  --queue-name inbound \
  -n publisher-app \
  --query "primaryConnectionString" \
  -o tsv
Both VisualStudio Code and VisualStudio 2019 support you in specifying them. I use VisualStudio Code for smaller apps like this one. I changed the local .vscode/launch.json and added the connection string as environment variable using the env object:
					// truncated
{
    "env": {
        "AzureServiceBus": "<connection string>"
    }
}
The publisher app can now be started at any point in time using F5.
Testing the Azure Function locally
At this point, you may want to test your Azure Function, before deploying it to Kubernetes. Visual Studio 2019, Visual Studio Code, or Azure Functions Core Tools support this. To connect the Azure Function directly to both Queues in Azure Service Bus, verify that both connection strings InboundQueue and OutboundQueue are specified in local.settings.json. You can set them with Azure CLI, as shown below:
					# Add connection string to local.settings.json
AZFN_TRIGGER_CONNECTION_STRING=$(az servicebus queue authorization-rule keys list \
  -g $RG_NAME \
  --namespace-name $SBN_NAME \
  --queue-name inbound \
  -n azfn-trigger \
  --query "primaryConnectionString" \
  -o tsv)

AZFN_OUTPUT_BINDING_CONNECTION_STRING=$(az servicebus queue authorization-rule keys list \
  -g $RG_NAME \
  --namespace-name $SBN_NAME \
  --queue-name outbound \
  -n azfn-binding \
  --query "primaryConnectionString" \
  -o tsv)

func settings add InboundQueue ${AZFN_TRIGGER_CONNECTION_STRING%EntityPath*}
func settings add OutboundQueue ${AZFN_OUTPUT_BINDING_CONNECTION_STRING%EntityPath*}
Having both connection strings specified, you can start the Azure Functions project on your local system.
Verify KEDA scaling
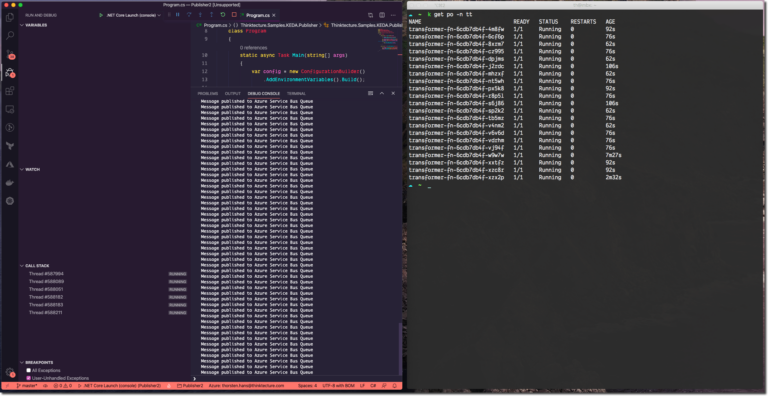
It was a long way. However, you made it. Now it is the time to lay back and see KEDA scaling your Azure Functions in Kubernetes while putting some load on the Azure Service Bus Queue. First, start the Publisher, you should spot log messages appearing in the console. Using a second terminal instance, see the Azure Functions deployment on Kubernetes scaling by invoking kubectl get po -n tt -w (you can cancel the watch operation using Ctrl+C at any point in time).
After a couple of seconds, you will see some more replicas appearing. However, if you stop publishing messages to Azure Service Bus, you will see KEDA terminating the Pods concerning the specified cooldown-interval.

Long-Running Tasks in KEDA
For this article, I choose a fast and straightforward Azure Functions, which performs a simple string operation to transform incoming messages from Azure Service Bus. Sometimes, your code runs longer and – hopefully – does more complex processing.
For those scenarios, KEDA can be configured to use Kubernetes Jobs as a deployment vehicle. Using KEDA to scale long-running processes is definitely worth another article.
Recap
KEDA is a thin layer built on top of Kubernetes to allow scalable message processing using Azure Functions and other development models. It gives you more fine-granular control over scale-in and scale-out operations, which generally happen behind the scenes when running Azure Functions directly in Azure.
Although KEDA has first-class Azure Functions support built-in, it is not limited to Azure Functions. The concept works for all kind of message-driven applications that has to be scaled based on metrics such as messages in an Azure Service Bus.


