Azure API Management Features
Azure APIM provides essential features to run scalable, mission-critical APIs such as:
- Authentication by relying on industry standards such as OAuth 2.0 and OpenID Connect
- Usage quotas and rate limits can be enforced
- Response caching to optimize API performance
- Request transformation can be configured per API using a domain-specific language
- Gather metrics for further analysis using services such as Azure Monitor
On top of those features, Azure APIM exposes a customizable developer portal, which API consumers use to:
- read the API documentation and browse through API operations and products
- try out APIs using the interactive API console
- Onboard themselves to receive API subscription keys
Azure API Management Terminology
Azure APIM introduces several terms that every user should know and be aware of to unleash the full potential offered by Azure API Management.
- APIM Product – An APIM Product contains one or multiple APIs. It can specify customizations like rate limiting, quotas, and dedicated terms of use. Developers can browse through different products using the APIM developer portal.
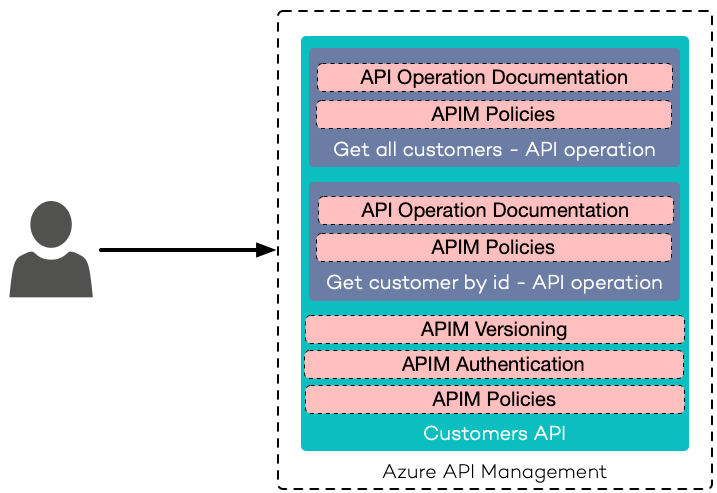
- APIM API (Frontend API) – An API facade that sits in front of a backend API. It allows customization of request and response, without modifying existing backend APIs.
- APIM API Operation – An APIM API Operation represents a unique API endpoint exposed by Azure APIM. In addition to acting as a facade for existing backend services, an APIM API Operation can also return mock responses. This is especially useful while designing the API and negotiating public API contracts with API consumers.
- APIM Subscription – Subscriptions are an easy way to add basic authentication using subscription keys to exposed APIs. After registering for APIM Products and/or APIs, users receive subscription keys, which they have to include into API requests when interacting with the API.
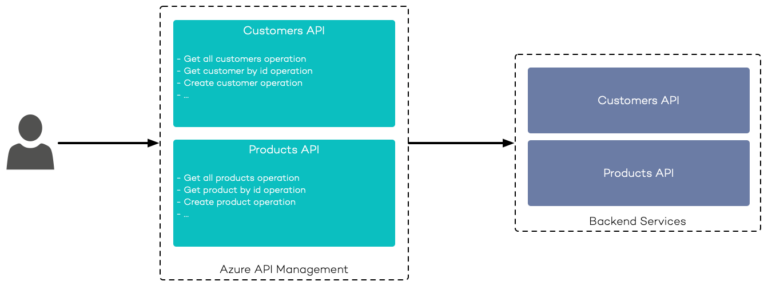
- Backend Service – A Backend Service exposes some API used to solve a business requirement.
- APIM Policy – An APIM Policy is used to control, tune, and mutate both requests and responses.
- Version – APIs evolve over time, with APIM users can create, publish and remove versions; API consumers can browse through different API versions using the developer portal.
Azure API Management Architecture
Having a basic understanding of Azure APIM terminology, it is crucial to know how the different entities work together. Typically, external users or services want to consume APIs. Once backend services have been onboarded to Azure API Management, the corresponding APIM APIs (or Frontend APIs) are created inside your APIM instance. APIM creates corresponding APIM API Operations for API endpoints exposed from the backend services.
Both APIM APIs and APIM API Operations can be used to specify APIM Policies, which you can use to intercept and transform requests and responses. APIM APIs are also used to track changes over time by applying revisions and versions, and to enforce authentication using OAuth 2.0, OpenID Connect, or authentication based on Azure Active Directory (AAD).
Administrators can define APIM Products to group underlying backend services. Backend services can be assigned to multiple APIM Products, which makes APIM Products super flexible.
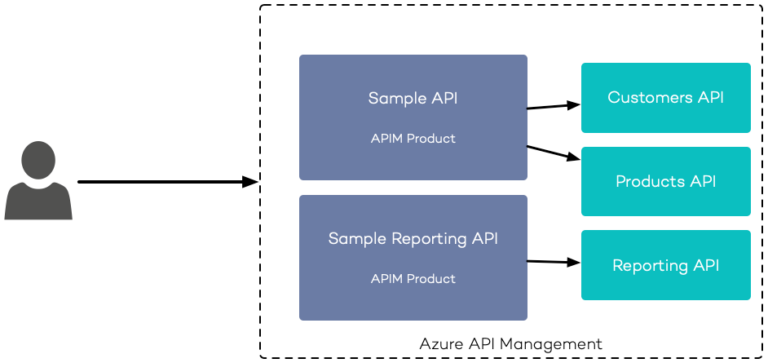
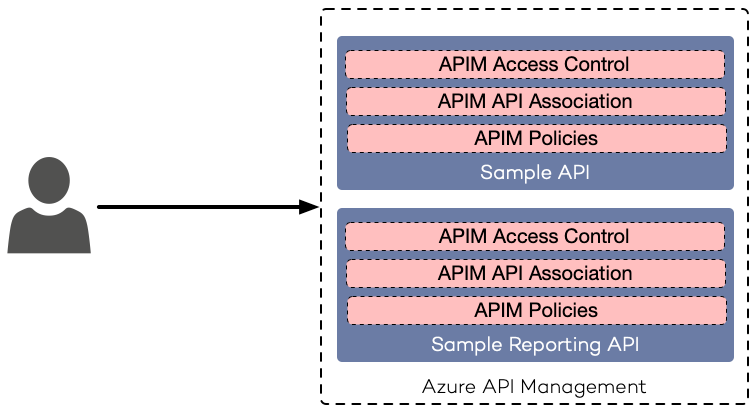
On the scope of an APIM Product, you can specify APIM Policies, and access control, which will be applied to all assigned APIM APIs. Using rate limits or usage quotas on a set of APIM APIs is a great example where APIM Products shine.
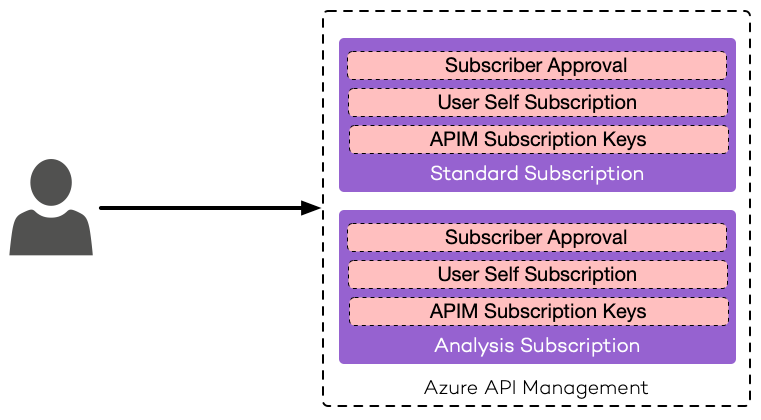
APIM Subscriptions provide a transparent process of onboarding external API consumers and giving them access to APIM Products.
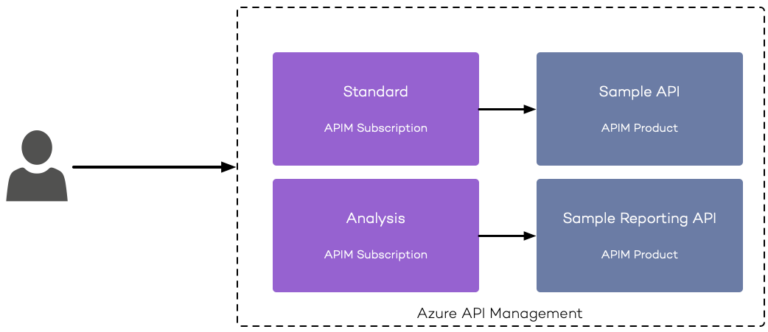
The individual APIM Product and APIM API configuration, APIM Subscriptions is also used to prevent anonymous API calls. Users with an active subscription can obtain subscription keys, which they have to send to APIM as part of every API call (using an HTTP header or a query string parameter). On the scope of the underlying APIM Product, administrators can configure things like rate limits and/or quotas using APIM Policies. Additionally, you can configure subscriptions to require manual approval, which could be used to hook up individual workflows while onboarding new API consumers.
Now that you know how the fundamental components of Azure API Management work together, you can dive deeper and see how to perform everyday tasks in Azure APIM.
Provision Azure API Management with Azure CLI
Azure offers different management interfaces used by customers to create and maintain services like Azure API Management. All infrastructure-related operations in this article are done via Azure CLI. Resources in Azure are deployed into an Azure Resource Group, and Azure API Management is no exception. The following script creates a new Azure Resource Group and deploys an instance of Azure API Management into it. Please keep in mind that provisioning new instances of Azure API Management could take quite some time. We have seen APIM deployments taking 30+ minutes, depending on the chosen Azure region and the chosen [APIM pricing tier] (https://docs.microsoft.com/en-us/azure/api-management/api-management-features).
					# select the desired Azure subscription
## get a list of all available Azure subscriptions for the current user
az account list

# change active Azure subscription
az account set --subscription <SUBSCRIPTION_ID>

RG_NAME=rg-apim-sample
AZ_REGION=westeurope
# create a new Azure Resource Group
az group create -n $RG_NAME -l $AZ_REGION \
  --tags app='Azure API Management Sample'

APIM_NAME=apim-sample-2020

# check availability of the name for the desired Azure API Management instance
az apim check-name -n $APIM_NAME

# create a new Azure API Management instance
az apim create -n $APIM_NAME \
  -g $RG_NAME \
  -l $AZ_REGION \
  --publisher-name "Thinktecture AG" \
  --publisher-email office@thinktecture.com \
  --sku-name Developer \
  --sku-capacity 1 \
  --tags app='Azure API Management Sample'
Provision Sample Backends to Azure App Services With Azure CLI
To demonstrate the onboarding of backend services, we will use two simple ASP.NET Core APIs deployed to Azure App Services. See the following Azure CLI script, responsible for provisioning both Azure App Services and the mandatory Azure App Service Plan. Once provisioning has finished, sample API projects will be deployed to the corresponding Azure App Services using ZIP package deployment:
					# create an Azure App Service Plan
AZ_REGION=westeurope
RG_NAME=rg-apim-sample
APP_SERVICE_PLAN_NAME=asp-apim-sample-2020

az appservice plan create -n $APP_SERVICE_PLAN_NAME \
  -g $RG_NAME \
  -l $AZ_REGION \
  --sku B1 \
  --tags app='Azure API Management Sample'


APP_SERVICE_CUSTOMERS_NAME=as-apim-2020-customers
APP_SERVICE_PRODUCTS_NAME=as-apim-2020-products

# create an Azure App Service for the CustomerAPI
az webapp create -n $APP_SERVICE_CUSTOMERS_NAME \
  -p $APP_SERVICE_PLAN_NAME \
  -g $RG_NAME

# create an Azure App Service for the ProductsAPI
az webapp create -n $APP_SERVICE_PRODUCTS_NAME \
  -p $APP_SERVICE_PLAN_NAME \
  -g $RG_NAME

# enable 'run from package' by setting the corresponding app setting on Azure App Services
az webapp config appsettings set -name $APP_SERVICE_CUSTOMERS_NAME \
  -g $RG_NAME \
  --settings WEBSITE_RUN_FROM_PACKAGE="1"

az webapp config appsettings set -name $APP_SERVICE_PRODUCTS_NAME \
  -g $RG_NAME \
  --settings WEBSITE_RUN_FROM_PACKAGE="1"

# download zips from GitHub
wget https://github.com/thinktecture/azure-api-management-sample/releases/download/v0.0.1/CustomersAPI.zip
wget https://github.com/thinktecture/azure-api-management-sample/releases/download/v0.0.1/ProductsAPI.zip

# configure zip release on GitHub
az webapp deployment source config-zip -n $APP_SERVICE_CUSTOMERS_NAME \
  -g $RG_NAME \
  --src CustomresAPI.zip

az webapp deployment source config-zip -n $APP_SERVICE_PRODUCTS_NAME \
  -g $RG_NAME \
  --src ProductsAPI.zip
Onboard Backend APIs in Azure API Management
First, both backend APIs have to be onboarded to Azure API Management. APIM supports a couple of different specifications; you can use to import existing backend services including:
The sample backend services expose an Open API specification, which has been created using the popular Swashbuckle package for .NET Core. This allows us to import all operations from the backend services quickly using Azure CLI:
					APIM_NAME=apim-sample-2020
RG_NAME=rg-apim-sample

# import CustomersAPI
az apim api import -n $APIM_NAME -g $RG_NAME \
  --specification-format OpenApi \
  --specification-url https://as-apim-2020-customers.azurewebsites.net/swagger/v1/swagger.json \
  --path customers \
  --api-id customers \
  --display-name "Customers API" \
  --api-type http \
  --service-url https://as-apim-2020-customers.azurewebsites.net/

# import ProductsAPI
az apim api import -n $APIM_NAME -g $RG_NAME \
  --specification-format OpenApi \
  --specification-url https://as-apim-2020-products.azurewebsites.net/swagger/v1/swagger.json \
  --path products \
  --api-id products \
  --display-name "Products API" \
  --api-type http \
  --service-url https://as-apim-2020-products.azurewebsites.net/
Now that the onboarding process is completed, you can throw in additional APIM concepts such as APIM Products to group underlying APIs logically, customize their representation in the API documentation, control access, and modify overall request/response behavior.
As of August 2020, not all aspects of Azure APIM can be scripted using Azure CLI. APIM Products, for example, can not be managed using Azure CLI. However, you can still use Azure Portal to create and manage APIM Products. When using the Azure Portal, you also get integrity checks when applying custom policies on APIM Products, APIM APIs, or APIM API Operations.
With every Azure APIM instance, sample APIM Products where provisioned automatically. Although they are a good starting point, I would recommend deleting them and creating your own APIM Products from scratch. Creating and managing APIM Products is straight forward, the Azure Portal gives you a great experience, as shown below.

Having your first APIM Product created, you can move on and configure API behavior. The upcoming sections explain several common use cases when exposing APIs to a broader audience.
Common Scenarios when Exposing APIs
The following sections outline common scenarios that you may face when exposing multiple backend services as a unified API.
Configure Rate Limits in Azure API Management
By adding a rate limit configuration to your Azure APIM instance, users can prevent callers from issuing too many API calls in a configurable time interval. Azure APIM supports configuring rate limiting either on the subscription or on a given value in the request (e.g., a given header value).
You can only apply a single rate-limit configuration per policy document when limiting in the context of a subscription. The following policy configuration allows 50 API calls per subscription within 90 seconds. If a subscriber exceeds the limit of 50 calls, a response with status code 429 (Too Many Requests) will be issued.
					<inbound>
  <base />
  <rate-limit calls="50" renewal-period="90" />
</inbound>
As an alternative, you can configure a rate-limiting based on information within a request. This is handy if you want to limit API requests based on contextual information, such as the users subject provided within a JWT. Azure APIM provides useful expressions and helper functions to achieve this within a few lines of configuration code:
					<inbound>
  <base />
  <rate-limit-by-key calls="50" renewal-period="90"
    counter-key="@(context.Request.Headers.GetValueOrDefault("Authorization","").AsJwt()?.Subject)" />
</inbound>
Configuration of rate limits based on keys is not supported in the Consumption plan of Azure APIM.
Configure Usage Quotas in Azure API Management
You can use a quota in Azure APIM to control the maximum number of API calls and/or the transferred bandwidth. As with rate limits, quotas can be specified either on the subscription scope or a configurable key using the quota and quota-by-key policies. The following policy defines a quota of 5000 calls and 1GB traffic, which will renew every three hours. If the API subscriber exceeds one of the specified maximum values, APIM will automatically respond with status code 403 (Quota Exceeded) until renewal happens.
					<inbound>
  <base />
  <quota calls="5000" bandwidth="1048576" renewal-period="10800" />
</inbound>
Create Aggregation APIs in Azure API Management
An aggregation API combines several requests to underlying, backend services and exposes them using a single frontend endpoint. Creating aggregation APIs is a fairly common scenario when exposing APIs. The overall consumer experience can often be improved when providing use-case optimized APIs.
Both sample backend services (ProductsAPI and CustomersAPI) expose an endpoint used to query the total number of entities. Based on usage analytics, you may recognize that most API consumers call both APIs in a sequence. That said, exposing responses from both underlying APIs on a single URI would minimize the API surface and merely using the public API.
Starting in Azure Portal, create a new APIM API using the Blank API template and provide some necessary information about it:
Now that the APIM API has been created, go ahead and create a new APIM API Operation.
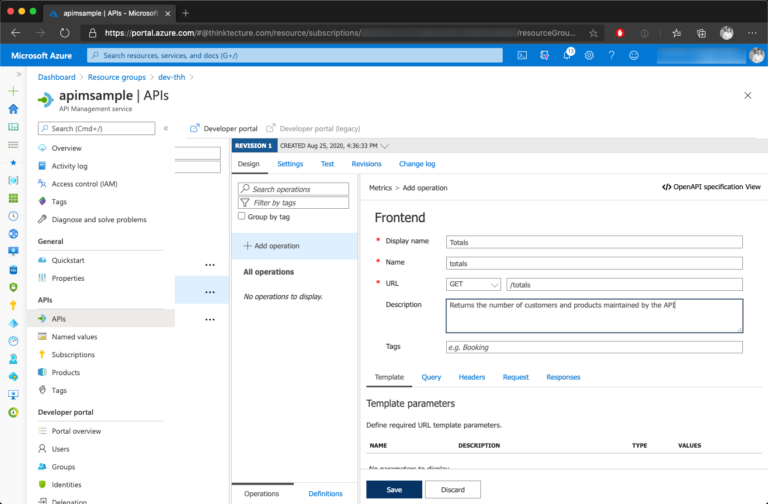
Having the APIM API Operation created, open the code editor for Inbound processing. You have full control, and you can define what should happen during an API call. Let’s use send-request and return-response policies to build our custom aggregation API:
					<inbound>
  <base />
  <send-request mode="new" response-variable-name="customers" timeout="20" ignore-error="true">
    <set-url>https://as-apim-2020-customers.azurewebsites.net/customers/count</set-url>
    <set-method>GET</set-method>
    <set-header name="Content-Type" exists-action="override">
      <value>application/json</value>
    </set-header>
  </send-request>

  <send-request mode="new" response-variable-name="products" timeout="20" ignore-error="true">
    <set-url>https://as-apim-2020-products.azurewebsites.net/products/totalcount</set-url>
    <set-method>GET</set-method>
    <set-header name="Content-Type" exists-action="override">
      <value>application/json</value>
    </set-header>
  </send-request>

  <return-response>
    <set-status code="200" reason="OK" />
    <set-header name="Content-Type" exists-action="override">
      <value>application/json</value>
    </set-header>
    <set-body>@(new JObject(
        new JProperty("customers",((IResponse)context.Variables["customers"]).Body.As<JObject>()),
        new JProperty("products",((IResponse)context.Variables["products"]).Body.As<JObject>())
    ).ToString())</set-body>
  </return-response>

</inbound>
Once you have saved and published the aggregation API, consumers can interact with the aggregation API, as shown here:
					curl -i -X GET https://apim-sample-2020.azure-api.net/metrics/totals

HTTP/1.1 200 OK
Content-Length: 82
Content-Type: application/json
Date: Tue, 25 Aug 2020 14:53:01 GMT

{
  "customers": {
    "count": 4
  },
  "products": {
    "count": 1
  }
}
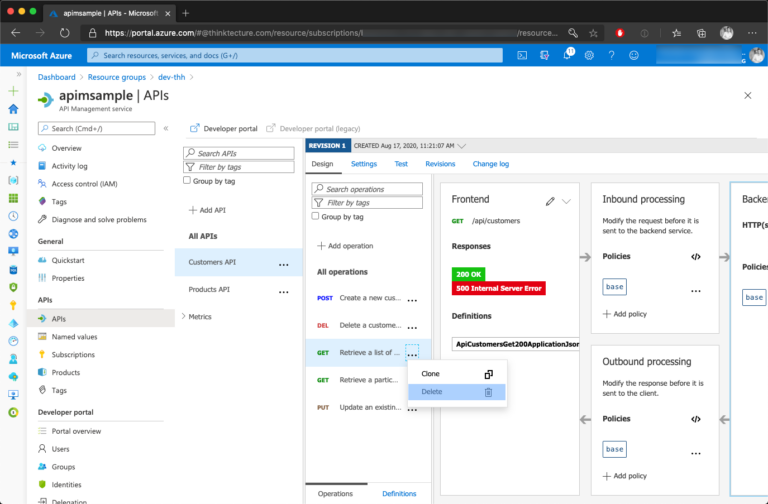
Hide API Operations Exposed by Backend Services
Backend services may expose API endpoints that you want to hide from the public API surface. You can hide any APIM API Operation by removing the operation from its APIM API using the Azure Portal. Removing the entire APIM API Operation also results in removing the corresponding documentation in the APIM developer portal.
Transform HTTP Headers Set by Backend APIs
Depending on the backend service implementation, APIs may expose absolute URIs pointing to resources. For example, consider creating a new customer using the CustomerAPI. When a new customer object is created using an HTTP POST operation, the response will container a location header pointing to the URI of the particular customer instance, as shown below:
					curl -i -X POST \
  -H "Content-Type: application/json" \
  --data '{"firstName": "John", "lastName": "Doe", "city": "Berlin", "zip": "12345", "country": "Germany" }' \
  https://apim-sample-2020.azure-api.net/customers

HTTP/1.1 201 Created
Content-Length: 174
Content-Type: application/json; charset=utf-8
Location: https://as-apim-sample-customers.azurewebsites.net/customers/e7487a7d-eb22-4ff9-af21-912c9a1e7bb6
Date: Mon, 24 Aug 2020 10:41:15 GMT

{
  "id":"e7487a7d-eb22-4ff9-af21-912c9a1e7bb6",
  "firstName":"John",
  "lastName":"Doe",
  "city":"Berlin",
  "zip":"12345",
  "country":"Germany",
  "createdAt":"2020-08-24T08:41:15.0356338Z"
}
In Azure APIM, you can use the set-header policy to transform any HTTP header. The following policy will overwrite the value to the location header by taking its original value and replacing the backend API origin with the origin of the request using the Replace function:
					<outbound>
  <set-header name="location" exists-action="override">
    <value>@(context.Response.Headers.GetValueOrDefault("location", "")
       .Replace(context.Request.Url.Host, context.Request.OriginalUrl.Host))</value>
  </set-header>
  <base />
</outbound>
Having the set-header policy applied, you can quickly re-issue the previous HTTP request to verify receiving the desired value as part of the location header:
					curl -i -X POST \
  -H "Content-Type: application/json" \
  --data '{"firstName": "John", "lastName": "Doe", "city": "Berlin", "zip": "12345", "country": "Germany" }' \
  https://apim-sample-2020.azure-api.net/customers

HTTP/1.1 201 Created
Content-Length: 174
Content-Type: application/json; charset=utf-8
Location: https://apim-sample-2020.azure-api.net/customers/e7487a7d-eb22-4ff9-af21-912c9a1e7bb6
Date: Mon, 24 Aug 2020 10:47:15 GMT

{
  "id":"e7487a7d-eb22-4ff9-af21-912c9a1e7bb6",
  "firstName":"John",
  "lastName":"Doe",
  "city":"Berlin",
  "zip":"12345",
  "country":"Germany",
  "createdAt":"2020-08-24T08:47:15.0356338Z"
}
Hide Technology Insights Exposed From Backend APIs
With Azure API Management, you can control every incoming request and every outgoing response. When exposing APIs, developers and operators should try to provide as few insights about implementation and technology insights as possible in order to minimize the attack surface.
By default, many application frameworks include a reference to itself in every HTTP response by setting the X-Powered-By header. Take a look at the currently exposed HTTP headers using curl:
					curl -I -X GET https://apim-sample-2020.azure-api.net/customers

HTTP/1.1 200 OK
Content-Length: 91
Content-Type: application/json; charset=utf-8
X-Powered-By: ASP.NET
Date: Mon, 24 Aug 2020 11:54:33 GMT
It is a good practice to remove this HTTP header for all responses sent through Azure APIM. You can remove the X-Powered-By header by adding a set-header operation to the outbound pipeline:
					<outbound>
  <set-header name="X-Powered-By" exists-action="delete" />
  <base />
</outbound>
Although this could be configured on the level of an APIM product, you should implement this for each APIM API directly. Ensure that the response modification will be applied to all operations, by selecting the corresponding node in the API browser.

After saving the policies, you can verify that X-Powered-By header is removed from any API call by issuing a request via curl:
					curl -I -X GET https://apim-sample-2020.azure-api.net/customers

HTTP/1.1 200 OK
Content-Length: 91
Content-Type: application/json; charset=utf-8
Date: Mon, 24 Aug 2020 11:52:19 GMT
Verify Existence of Mandatory HTTP Headers and Their Values
Many APIs require contextual information attached to every incoming request being specified as HTTP Header. In Azure APIM, you can use the check-header policy in the inbound pipeline to the existence of a certain HTTP header and to validated the provided value of the HTTP header.
For example, imagine an API relying on a custom HTTP header called X-Application-Context which has to be part of every incoming request. You can verify the header’s existence and cancel all incoming requests that miss this header before any computing happens on the backend services:
					<inbound>
  <check-header name="X-Application-Context" failed-check-httpcode="400"
    failed-check-error-message="Bad Request" ignore-case="true" />
  <base />
</inbound>
Another common use-case is to verify an HTTP header’s existence and verify the provided value is valid. Again, we use check-header to achieve this. However, this time, we provide a list of value nodes and the check-header node itself. If the incoming request has any of the specified values, the request-processing continues. Otherwise, an HTTP 400 will be returned
					<inbound>
  <check-header name="X-Application-Context" failed-check-httpcode="400"
    failed-check-error-message="Bad Request" ignore-case="true">
    <value>ContextA</value>
    <value>ContextC</value>
  </check-header>
</inbound>
Specify Unified CORS Policy Across Multiple Backend APIs
APIs are often consumed from client-side code running on origins different than the API itself. Again we can leverage the power of Azure APIM policies to unify the cross-origin resource sharing (CORS) configuration across all of your backend services.
The cors policy is quite flexible and allows tailored CORS configuration. The following snippet shows a CORS configuration that allows client-side code (severed from https://app.domain.com and https://localhost:4000) to consume the APIs exposed via Azure APIM. Additionally, the following configuration limits accepted HTTP methods, incoming and outgoing HTTP headers:
					<inbound>
  <base />
  <cors allow-credentials="true">
    <allowed-origins>

      <origin>https://app.domain.com/</origin>
      <origin>https://localhost:4000/</origin>
    </allowed-origins>
    <allowed-methods preflight-result-max-age="300">
      <method>GET</method>
      <method>POST</method>
      <method>PUT</method>

    </allowed-methods>
    <allowed-headers>
      <header>x-application-context</header>
      <header>Content-Type</header>
      <header>Accept</header>
    </allowed-headers>
    <expose-headers>
      <header>x-application-context</header>
    </expose-headers>
  </cors>
</inbound>
More APIM Policies and APIM Policy Expressions
At this point, you have seen several common use-cases that you may face when exposing APIs. Azure APIM provides many different APIM Policies you can use to control all aspects of requests being routed through your APIM instance. Many policies can be used in combination with APIM Policy Expressions. Consult the APIM Policy reference and the APIM Policy Expression reference, to make Azure API Management your own.
Conclusion
As you have seen, getting started with Azure API Management is straight forward. However, many upfront-thinking and layering different segments of the public API surface are required to build unified, homogeneous APIs that consumers love. Beyond the features demonstrated in this article, Azure APIM provides seamless integration into other Azure services like Azure Application Insights and Azure Monitor, which makes analyzing and acting based on real usage metrics easy.
Bottom line, developers, and administrators who found themselves in the process of exposing APIs or building API gateways should consider diving deeper into Azure API Management to get most out of Microsoft’s fully-managed service offering.
All source code used within this article is published on GitHub.