
Article Series
- Overview, Web Components & Architecture ⬅
- Canvas & Input
- Copy & Paste Images
- Accessing Files & File Handler
- Dark Mode Support
- Summary
New Possibilities: An Overview of the Project
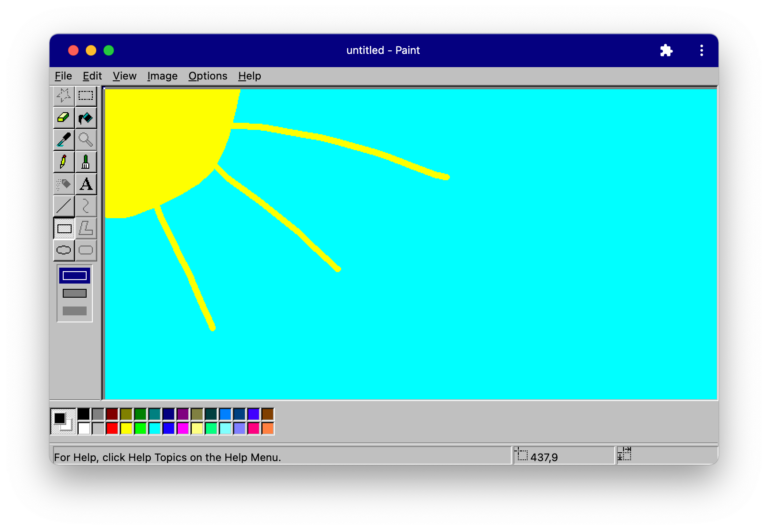
Everyone knows and loves the good old Microsoft Paint. This app is a productivity app dinosaur: You can paint a new drawing using various tools and colors and save it to the disk. Double-clicking the very file opens Paint again. Also, you can select a portion of the image and copy it over to another application, and paste images from the clipboard (such as screenshots) back to Paint. This is the well-known workflow that traditional desktop applications make use of.
Until recently, web applications could not (fully) integrate into this workflow. The classic clipboard API is synchronous, blocking the main thread for long-running tasks, and only operates on the DOM level. And while you can open files from the local file system and write files to the Downloads folder, you can’t overwrite particular files you have loaded before.
This has changed over the last couple of months: With the advent of Async Clipboard API in Chromium-based browsers and Safari, you can now programmatically access the clipboard. The File System Access API shipped with Chromium 86, allowing to read files from the local file system, change and overwrite them afterward. Apart from that, several more APIs shipped as a part of Project Fugu, a cross-vendor effort by Google, Intel, Microsoft, and others to make the web a more powerful platform.
With these good prospects, the author of this article decided to implement a web-based clone of Microsoft Paint: paint.js.org. Being a web application, it runs on all platforms supporting a reasonably recent browser.
This clone is a Progressive Web App: Thanks to a local copy of the application files, it opens super fast and also runs offline. Furthermore, the application gets an own icon in the programs list and runs in its own window when started from there (see screenshot above). Instead of using a single-page application framework such as Angular or Vue.js, this clone is using pure Web Components backed by small library, lit-element.
More than that, it also makes use of modern web capabilities provided by Project Fugu:
- It allows you to read images from the disk and save them back.
- When installed, it registers with the operating system as a file handler for PNG image files, so it will appear in the list of compatible programs for editing image files.
- You can write and read images to and from the clipboard and send your drawing with other compatible applications using the native share mechanism.
- Finally, if you have dark mode enabled, paint.js.org will automatically switch to a dark color scheme.
This project’s inspiration is the more complete clone JSPaint, which isn’t PWA-enabled, based on jQuery, and copyrighted. The source code of paint.js.org is completely open-source, licensed under an OSS license, and can be found on GitHub. Not all tools and actions are implemented yet, so you can contribute if you like.
In this six-part article series, you will see the critical aspects of implementing this clone. Let’s begin with the choice of Web Components as UI technology and the application architecture.
Web Components & Architecture
Web Components are a relatively new addition to the web platform. They are based on three different specifications: The Custom Elements API allows you to create new HTML elements. You can interact with them by setting DOM attributes or JavaScript properties, and the components can talk to the outside world by sending (custom) events. If you’re using Angular, you may know this principle from Inputs and Outputs. The Shadow DOM is an encapsulated part of the DOM that per se isn’t affected by outer style definitions (although there are some exceptions, such as the text color or CSS custom properties), allowing you to write isolated components. The third specification is HTML templates, but we won’t use them here due to our library choice.
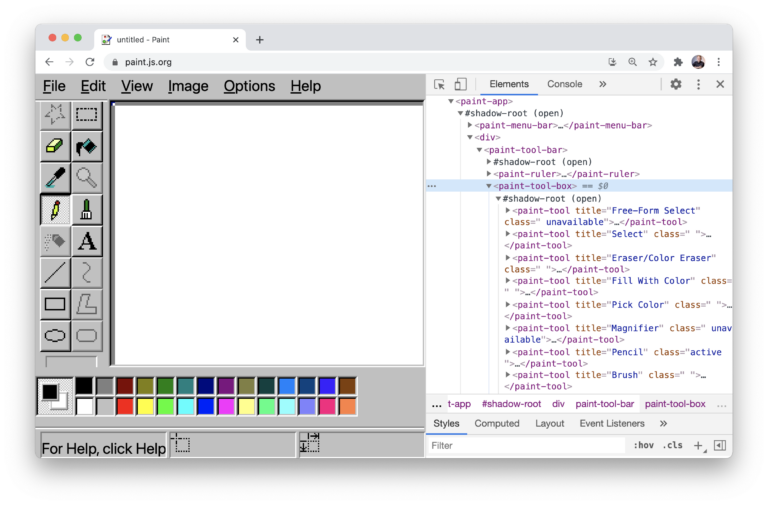
In the screenshot above, you can see the internal structure of the Paint application: The paint-app node bootstraps the application, which consists of many other custom elements, such as the paint-tool-box.
Plain Web Components vs. SPA
Single-page apps (SPA) are a great application model: Instead of reloading the page for every action, the user navigates entirely on the client-side, only sending HTTP(S) requests for retrieving or modifying data. When the SPA source files are cached for offline use, the application will even run if there’s no Internet connection. SPA frameworks such as Angular accelerate development by providing different building blocks. Even large-scale business applications can be built effortlessly. However, this framework also (more or less) assumes that it’s the only framework on the entire website.
As the name suggests, Web Components are not necessarily about application development. Without a framework or library, you don’t get any building blocks here. However, Web Components are highly interoperable. They can be embedded into any website and SPA written in any framework. A Web Component can be as simple as a button or table on your website. But you can also combine different Web Components to form a real-world productivity application such as Paint.
For this experiment, I chose Web Components over traditional single-page app frameworks for three main reasons:
- I didn’t want to tie this implementation to a specific framework, being understandable by as many web developers as possible.
- Web Components are the web’s native component model, allowing for easy interop scenarios.
- Web Components can be significantly smaller than even a basic app built with Angular or Vue.js (framework overhead). A simple Web Component can be as small as a few kilobytes in size. My goal is to stay smaller than the original binary size of Microsoft Paint on Windows of 320 K.
On the other hand, Web Components are also very basic. For example, they don’t implement Data Binding or easy means of including or excluding or repeating DOM nodes like *ngIf or *ngFor. You would have to implement all of that yourself with the help of the DOM API, which can be tedious. After all, there are good reasons why the Angular compiler and JSX/TSX exist. Personally, I have become so accustomed to data binding that I don’t want to work without it. Thus, I decided to add LitElement, a small open-source library for Web Components provided by Google’s Polymer team.
This library introduces a custom lifecycle on top of Web Components, offers a render() method to define the component template, and handy html and css tagged template literals that both prevent you from XSS attacks and allow easy handling of DOM nodes. Component-based software engineering is something that we do for decades now. Thus, I split up the application into different components: The toolbox is a component, the single tools are a component, the color picker, or menu bars. The following excerpt shows how to define a custom element with LitElement and to create a new paint-tool node for all existing tools:
					@customElement('paint-tool-box')
export class ToolBox {
  render(): TemplateResult {
    return html`
      ${tools.map(
        (tool) => html`<paint-tool .tool=${tool} title="${tool.tooltip}"
          class="${this.drawingContext?.tool === tool ? 'active' : ''} ${tool.instance ? '' : 'unavailable'}"
          @pointerup="${() => this.selectTool(tool)}"
        ></paint-tool>`,
      )}
    `;
  }
}
Furthermore, LitElement takes care of creating the shadow root for you and attaching the component stylesheet to it (see screenshot above). In contrast to SPA frameworks, LitElement does not include a build process, compiler, or router. You could add these dependencies yourself if you need them. This project uses TypeScript, so I need to compile the files first. Therefore, I added Snowpack to the project, a very fast build system. Fortunately, Paint does not make use of internal routing, so we can skip that here.
Code Splitting
The project makes use of regular code-splitting provided by ECMAScript modules. In JavaScript and TypeScript, each file is a module. By using the export statement, you can make functions, constants, or classes available to other modules. And by using the import statement, you can retrieve them from other modules. This should sound familiar if you are using SPA frameworks such as Angular, React, or Vue.js.
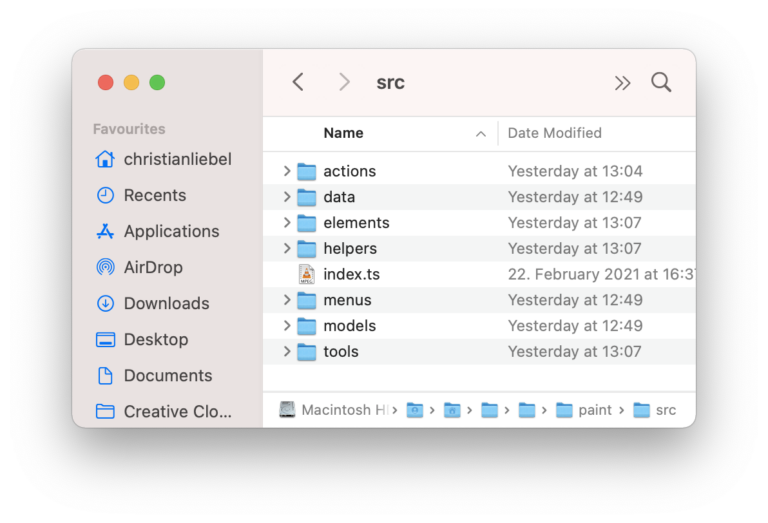
With the help of modules, you can split your codebase into different files and folders. I decided to split up the application into actions, which are the operations that you can invoke from the application menu. The data folder contains the default drawing context with the predefined color palette, font, brush sizes, and so on. The elements folder contains the custom elements, such as the canvas, menu, tool or color box—essentially all the parts of the user interface. Helpers contain commonly used functionality. Menus contain the menu definitions, like the File, Edit, and View menu. The models folder contains TypeScript interfaces, for example, for actions, menu definitions, or tools. Tools contain the definitions of what to do when you draw on the canvas when a specific tool was selected from the toolbox.
Communciation Across Component Boundaries
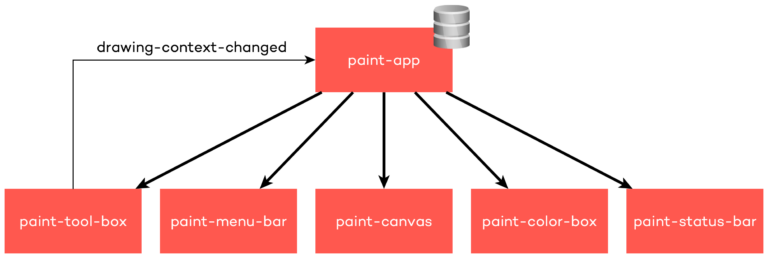
The application root (paint-app) itself is a web component, so it could also be embedded within other websites or applications. This element also manages the application’s state with the help of the so-called DrawingContext. This is a large object that contains the entire state of the application, such as the selected color, tool, or font size. The root element passes the context instance to its subcomponents via a property, and they pass the context further down to their subcomponents. This way, all elements refer to the same state. If a subcomponent needs to update a property, it does so by dispatching a custom event. This event is caught by the application root, which will then send out a new instance of the DrawingContext to all the subcomponents to update them. Basically, this is the same behavior that stores offer you.
What neither Web Components nor LitElement offers out of the box is support for Dependency Injection (DI), another important principle of modern application development. Fortunately, this principle can be emulated by sending a custom event and specifying the dependencies you want to have injected on its event arguments. The event listener (DI container) can modify the event arguments synchronously and return you the requested dependencies. However, due to the lack of library support, I decided to stick with the traditional communication approach using component properties and events.
Roughly, these are the main architectural choices for paint.js.org:
- Web Components allow embedding our paint clone into other applications, while the code should remain readable for most web developers.
- LitElement allows us to keep the file size comparatively small while maintaining a certain level of comfort.
- Snowpack is a frontend build system compiling the TypeScript very quickly.
- In version 3, LitElement aims to add server-side rendering (SSR) support, so we could even embed the DOM structure of our Web Components into the HTML file delivered to the user.
- Code splitting via ECMAScript modules ensures that our codebase remains manageable.
- And by using DOM attributes and events, we can communicate effortlessly across component boundaries.