Please note that with the on-going development of the standards, some flaws discussed here by the time of writing this may not exist anymore – which would be good news!
Article Series
Versioning
Take a look at the following picture. Assume we are working with two teams. Both teams develop a library, A and B. The final application includes both libraries. Both teams decide to use a third party Web Component library in version 1.0. With more and more on-going development, one team decides to use the next version of the third party library.
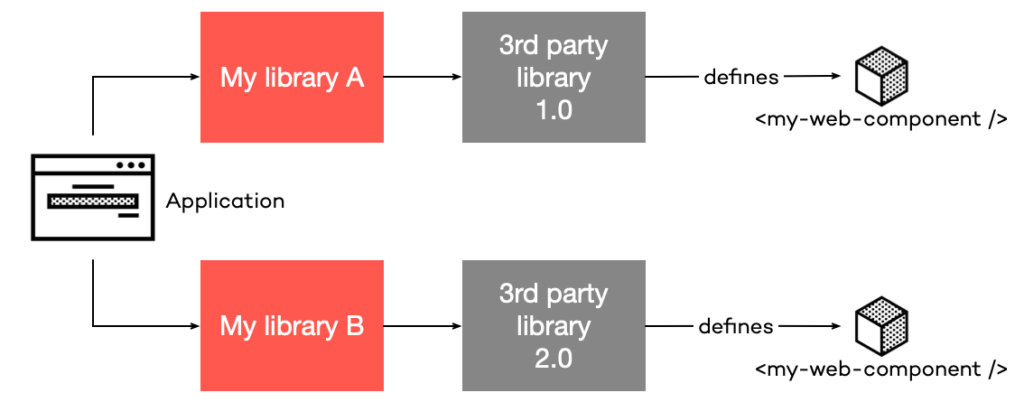
That’s a pretty common scenario, e.g., the team wants to use a new feature or needs a bug fix. Since both teams include the library in a different version, both teams are shipping the third party library with their developed library. By doing so, both libraries now define the same Web Components due to the usage of the same third party library. At runtime, your application crashes with the following message:
Uncaught DOMException: Failed to execute ‘define’ on ‘CustomElementRegistry’: the name “my-web-component” has already been used with this registry.
The problem is that CustomElementRegistry is a global window object. Once a Web Component has registered a custom HTML tag, you can not register the same tag again. Furthermore, your application will likely not work now because some of the components can not be loaded.
A Solution
The W3C is currently discussing a Scoped Custom Element Registry, which would define at what place in the DOM, which Custom Element Registry is used for registering HTML tags and where they are valid. It is interesting what they are discussing and how to implement it. I would highly recommend reading through the comments.
Additionally, if you need to solve the problem right now, you can do several things:
- Version your HTML tags
<my-custom-element-v1></my-custom-element-v1>– as long as you use semantic versioning, your v1 will never break any existing application using that version. Be aware that this is quite uncommon for HTML tags and should only be used if there is no other way to solve it. - Libraries never load other custom Web Components, but the host application does. In this case, a library can use Web Components but does not load the code itself. It may suggest to the host application which library to load, but it’s the host application’s decision which Web Components to load. It could be that different libraries expect a specific version of a Web Component, which could break if a newer or older version is loaded.
- You develop your Web Components in a way that they are backward compatible all the time within their lifetime. That sounds a bit impossible to achieve, but if you think of small, very specific Web Components, it may not be that hard to do so.
- Last but not least, you can conditionally register a Web Component, by checking if another with the same name is registered or not using
window.customElements.get(). But you still could have the problem, that the wrong version of your expected Web Component version is loaded.
					if (!window.customElements.get('my-web-component')) {
    window.customElements.define('my-web-component', MyWebComponent);
}
Attributes vs. Properties
This problem is not new due to Web Components. It has been around all the time. Maybe it has been forgotten thanks to current Single Page Application frameworks. Let’s take a look at the following pieces of code.
					input = document.createElement('input');

console.log(input.getAttribute('value'));
input.value = 'one';
console.log(input.getAttribute('value'));

input.setAttribute('value', 'two');
console.log(input.value);
Without executing this beauty in your browser’s console – can you tell what the output of the three console.log() will be? Here is the answer:
					null
null
one
I guess that some of you expected that output and others did not, especially if you do not have a web development background. Let’s see what is exactly happening here.
At line 1, we are creating a new <input> element. Then we query its attribute at line 3, which is, obviously, null, since we did not set the value of the input. However, with line 4, we are setting an input value, and after that, it is still null. It is simple we are setting the property of the input element, and not its attribute.
The same is true with the two last lines. At first, we set the attribute to two, and then we access the property, which is still one.
Every Web Component (or in this case HTML element) has a JavaScript state (the properties) and its DOM representation (the attributes). Depending on how you are going to use your Web Components, it is excellent that they do not reflect each others state.
A “Solution”
I am not calling this the real solution and would not recommend doing that every time since it depends on your Web Component if the following makes sense.
“The solution” is called Reflecting properties to attributes or sometimes called Reflected DOM attributes. The implementation is rather easy for the example above:
					class HTMLInputElement extends HTMLElement {
    constructor() {
        super();
    }

    set value(v) {
        this.setAttribute('value', v);
    }

    get value() {
        this.getAttribute('value');
    }
}
Easy, right? But take care that an HTML attribute only supports strings while a JavaScript property supports anything you assign to it. By that, if you want your component to always reflect its state to HTML attributes, you may need to JSON.stringify and JSON.parse them. Take care if you assign complex data structures to your properties then, since parsing and stringifying them could have a serious performance impact!
Be careful what kind of data you are going to reflect on DOM attributes and what data should stay in properties only. In the end, document your Web Component, so your users know which attribute and properties are usable.
Additionally, if you are implementing attributeChangedCallback make sure, you are not setting the property in there, which then will set an attribute again. That will trigger attributeChangedCallback once more, leading to an infinite loop.
Global Scope
The Shadow DOM of a Web Components helps to encapsulate CSS and HTML, but not JavaScript. Whenever you assign something to the global window object, anyone has access to it.
On the one hand, you can use a global object to your advantage, like if you need to share component library-wide settings. On the other hand, it may lead to errors, for example, if you build Angular Elements with zone.js. zone.js monkey-patches global functions like setTimeout or requestAnimationFrame. Every Angular Element tries to patch via zone.js, but zone.js recognizes if a function has already been patched and throws an error.
A Solution
If you need real JavaScript encapsulation, your only solution is an <iframe> tag. Only an iFrame provides a real second DOM in your browser, without the possibility of directly accessing other DOMs. To communicate, you need to use the window.postMessage API or Channel Messaging.
Often, you do not need a real second DOM, but just a possibility to bundle your JavaScript in a way it does not interfere with other scripts. If that is the case, one of the modern JavaScript bundlers will help you and create CommonJS or AMD modules from your code.
If you are in the world of Angular building Web Components with Angular Elements, make sure your components use OnPush change detection. That way, you can remove zone.js for your element.
Boilerplate & Render Loop
This problem is arising if you build Web Components from scratch, without any framework or other underlying foundations. It is basically plain HTML, CSS, and JavaScript. You find yourself attaching and removing event listeners via addEventListener and removeEventListener, implement the lifecycle callbacks, react to attribute changes, or decide when and how to update the DOM. Those things are normally handled by a modern framework having change detection and virtual DOM.
For smaller components that may manageable, but if you think of writing bigger components or whole component libraries, you are going to repeat a lot of things. This may not be bad if you do not want to have a dependency to other frameworks. But, it could increase your development and review time of components to check, if everything was implemented properly.
A Solution
For your own component libraries, you can build your own core foundation framework, which is used by all other Web Components to share basic functionality. That could be a bigger task, but in the end, you will not have any dependency on other frameworks. This way, you may have the smallest possible output – file-size-wise.
If you are going that way, Constructable Stylesheets could help you to share common CSS amongst your Web Components. But take care! Constructible Stylesheets are currently a collection of ideas, no standard, not even a draft. It currently works in Chrome, but there is no guarantee it will stay there or work in other browsers as well. Your best option for sharing CSS is handling it via SCSS in a build process or using CSS variables.
If you do not want to develop your own core foundation framework, you may take a look at a Web Component oriented frameworks, like Stencil.js, which help to solve building a strong foundation for your Web Components. It already takes care of the things mentioned above.
Template Engine
A template engine helps to define placeholders or add and remove event handlers for certain events. Behind the scenes, a template engine generates the needed code to replace the placeholder with actual content or call addEventListener/removeEventListener for your event handlers.
But in native Web Components, there is no template engine build in. By that, you have to utilize the standard JavaScript functions for adding and removing event handlers. For placeholders, you may have to define a span element with a certain ID or class, which you can fill via textContent or innerHTML.
A Solution
For example, the LitElement component I developed for Palaver looks like this:

					get previewTemplate() {
  return html`
  <div @click="${this.clickHandler}" class="preview">
    ${this.preview.image
      ? html`<img decoding="async" src="data:image/svg+xml,%3Csvg%20xmlns='http://www.w3.org/2000/svg'%20viewBox='0%200%200%200'%3E%3C/svg%3E" alt="Preview" data-lazy-src="${this.preview.image}" /><noscript><img decoding="async" src="${this.preview.image}" alt="Preview" /></noscript>`
      : html``
    }

    <div>
      <header>${this.preview.title}</header>
        ${this.preview.description
          ? html`<p>${this.preview.description}</p>`
          : html``
        }
    </div>
  </div>
  `;
}
It is kind of ok to read thanks to the template strings and LitElement also does some magic for setting event listeners with its @click syntax.
Another example is the Stencil.js component from Palaver:
					export class MessageComposerComponent {
  @Event() messageComposed: EventEmitter<string>;
  @State() value: string;
  @State() isInvalid: boolean = true;

  private messageComposedHandler() {
    if (this.isInvalid) {
      return;
    }

    this.messageComposed.emit(this.value);
    this.value = '';
    this.isInvalid = true;
  }

  textInputChange(value: string) {
    this.value = value;
    this.isInvalid = !this.value;
  }

  render() {
    return <form>
      <native-web-component-text-field onValueChange={e => this.textInputChange(e.detail)} value={this.value} />
      <native-web-component-button onClick={() => this.messageComposedHandler()} disabled={this.isInvalid}>
        <slot name="button">Send</slot>
      </native-web-component-button>
    </form>;
  }
}
Editor Support
Having a good IDE support is the foundation of building software. Which IDE or editor you use, is a matter of taste. I (personally) love the JetBrain’s IDEs WebStorm, Rider, etc.
When it comes to code completion support for Web Components there is none. Your IDE will not know which properties or attributes your Web Component supports. There is no type definition or something else.
If you are importing your Web Components from a 3rd party source, you can only take a look at the code or at the documentation to know which properties and attributes are supported.
A Solution
Currently, Stencil.js is creating Type Definitions for your Web Components (along with an auto-generated documentation), which is pretty neat. Additionally, the W3C is discussing how to do general editor support with a metadata json file. Stencil and Visual Studio Code are implementing proof-of-concepts to support that and gain first insights about the proposed solution.
In the future, that metadata json file will also be read by other IDEs to significantly improve the editor support. In the meantime, consult the documentation of your Web Components.
Build Pipelines
When you are developing with the latest and greatest technology, there is often a drawback when it comes to the build pipelines. I remember playing around with Angular 2 alpha 41, which was one of the first public releases for Angular 2. There was no CLI or something, you had to write your own scripts to compile everything together. As you can imagine, that was not so easy to do, because all tooling around Angular, event TypeScript, was pretty new.
Having a working and flexible build pipeline is an improvement to any project. A build pipeline takes over tasks like
- asset management (copy referenced assets to the correct output folder),
- transpile source file (like TypeScript, SCSS, etc.),
- post-process CSS and/or
- uglify/obfuscate code
Without any framework involved, there is simply no build pipeline for Web Components. Everything you need, you need to do yourself!
A Solution
Since Web Components are not a new technology, you can use tools you know from web development, like webpack or Parcel.js. They help tremendously packing your Web Components, transpiling languages, post-process CSS and to have a possibility to split your Web Components into several files and let the packager load CSS/HTML into your Web Component.
But, you still have to write the scripts for that, maybe for a debug mode with source maps and a production mode without source maps and code uglifying. Again, I have to mention StencilJS, which already has a working build pipeline for you to use.
Forms
Most web applications require a form for the user to input some data. For example, a little login dialog:
					<form>
    <label for="username">Username</label>
    <input id="username" type="text" />
    <label for="password">Password</label>
    <input id="password" type="password" />
    <button type="submit">Login!</button>
</form>
You typically have an input for a username and a password. Additionally, there is a button to submit the form. In that case, the form data is populated and you can use it in JavaScript. As you can see, we have to repeat some elements, so let us craft that into a more Web Component’ish approach:
					<form>
    <my-input type="text" name="username">Username</my-input>
    <my-input type="password" name="password">Password</my-input>
    <my-button type="submit">Login</my-button>
</form>
Now we have saved some keystrokes, it looks cleaner, and we are good to go. Within each Web Component, there’s a real <input> and <button type="submit"> element. Basically, the browser will render the following DOM:
					- form
    - my-input
        - Shadow DOM
            - label
            - input
    - my-input
        - Shadow DOM
            - label
            - input
    - my-button
        - Shadow DOM
            - button
If you would try out the form, nothing will work anymore. We encounter two problems here.
The first problem is that whenever an input element is put into a Web Component, it will not populate its enclosing forms data. Whatever you type into your input, the form data will never have any content.
The second problem is, that whenever a submit button is put into a Web Component, it will not submit its enclosing form. You can press the button, but nothing is working.
A Solution
Currently, there are three solutions to overcome that problem.
1. Form Participation API
If you have some patience, you can wait until the APIs have been discussed by WhatWG/W3C and will be implemented into the browsers. The API is called Form Participation API (or sometimes referred to Form Attached Control).
There are a lot of interesting issues about that:
- Implicit submission
- Being a submit button
- Missing features for form-associated custom elements
- Activation behavior
- Very interesting is also the discussion about focusable elements and tabindex
2. Use Shadow DOM Slots
If your Web Component architecture allows it, you can use the Shadow DOM Slots.
Imagine, you have the following Web Component:
					const template = document.createElement('template');
template.innerHTML = `
  <input name="my-input-element" />
`;

class MyCounter extends HTMLElement {
  constructor() {
    super();

    this.shadow = this.attachShadow({ mode: 'open' });
    this.shadow.appendChild(template.content.cloneNode(true));
  }
}

window.customElements.define('my-input', MyCounter);
As mentioned, the problem is that the <input> is within the Web Component itself, but the <form> element is outside of it. If you are using slots, the Web Component will look like this:
					const template = document.createElement('template');
template.innerHTML = `
  <slot></slot>
`;

class MyCounter extends HTMLElement {
  constructor() {
    super();

    this.shadow = this.attachShadow({ mode: 'open' });
    this.shadow.appendChild(template.content.cloneNode(true));
  }
}

window.customElements.define('my-input', MyCounter);
The usage will be:
					<form>
  <my-input>
    <input name="my-input-element" />
  </my-input>
</form>
The difference is that the <input> elements do not belong to the Shadow DOM of your Web Component but to the Main DOM. In that case, the FormData of your form will be correctly populated. If you need to style your input field, you can easily use the ::slotted CSS pseudo-element. For sure, you will need some JavaScript in your Web Component to get the name, maybe set the id attribute for creating a label. Do that with all your form elements (even the submit button) and the form will work as expected and taking advantage of Web Components.
3. Wire manually
Assign event listeners to the button and to the input field, raise a custom event, and react to it in the enclosing form to rebuild the wished behavior. As you can imagine, this is only a workaround and not a real solution. But, a part of that has been implemented in the Palaver demo application.
Stacking UI
Most of our application needs to stack UI on top of another. Think of modal dialogs, tooltips, select boxes, menus, context menus, and so on. But, depending on how your Web Component is used and transformed, you may not be able to come to the top layer:
					<body>
    <my-web-component-a style="width: 100px; height: 100px; position: absolute; transform: rotate(90deg)">

        <my-modal-dialog></my-modal-dialog>
    </my-web-component-a>

    <my-web-component-b></my-web-component-b>
<script>var rocket_lcp_data = {"ajax_url":"https:\/\/www.thinktecture.com\/wp-admin\/admin-ajax.php","nonce":"5e712243e5","url":"https:\/\/www.thinktecture.com\/web-components\/web-components-flaws","is_mobile":false,"elements":"img, video, picture, p, main, div, li, svg","width_threshold":1600,"height_threshold":700,"debug":null}</script><script data-name="wpr-lcp-beacon" src='https://www.thinktecture.com/modules/ffee7df689/assets/js/lcp-beacon.min.js' async></script><script src="https://www.thinktecture.com/core/cache/min/1/ccc81e0be143694a5592de11ec15ae99.js" data-minify="1"></script></body>
In that sample, the modal dialog will never be able to span the whole application and grab the user’s attention.
The Solution
On the one hand, there is the <dialog>-element which tries to help in solving that problem. However, it has some flaws, like it can not be used for things like tooltips, and it is not implemented in all browsers yet. There is a nice cite from the last W3C Meeting Minutes regarding the <dialog> element:
Domenic: … in my experience <dialog> is very tailored for dialog-like things, it does not work for right-click menus, etc.
Domenic: … spec used to say you got tab trapping for all dialogs, but it was not implemented, so we took it out
Domenic: … but it is unclear how that would work for right-click menus
Domenic: … in general I do not think <dialog> was well designed, and we could improve it, but there is only one impl
Domenic works at Google and is contributing heavily to today’s Web Standards. And with this thought about the <dialog> element, he is absolutely right.
On the other hand, it would be possible to implement some kind of API in the host application, which then would open the dialog for you.
Another workaround is, because we are in a JavaScript world, using document.body.appendChild(myModalDialog). I would highly recommend not doing it, because it violates the idea of Shadow DOM. Additionally, your CSS will not work, because you append the dialog to an element outside of your Web Component’s Shadow DOM.
Conclusion
Web Components already offer a nice and clean API for creating native components in the browser, as I mentioned in the previous article about the perks. In this article, you have read about the flaws, where to watch out and have seen use cases, which are simply not possible yet. Keep that in mind when you are creating your first Web Components!
In the upcoming article, we are going to talk about how we can share data, services, and the role of frameworks in the world of Web Components.