In this article, I will walk you through the process of acquiring valid SSL certificates from Let’s Encrypt in a Kubernetes environment using a popular open-source project called cert-manager.
What is Cert-Manager
Cert-manager is an open-source certificate management controller for Kubernetes. It is used to acquire and manage certificates from different external sources such as Let’s Encrypt, Venafi, and HashiCorp Vault. Additionally, cert-manager can also create and manage certificates using in-cluster issuers such as CA or SelfSigned. See the full list of all cert-manager issuers to see what is supported.
Once cert-manager is installed and configured to your Kubernetes cluster, you can request certificates from it. Cert-manager ensures that certificates are existing and valid. Meaning it renews SSL certificates for you.
Sample Scenario: Transport Encryption for a REST API
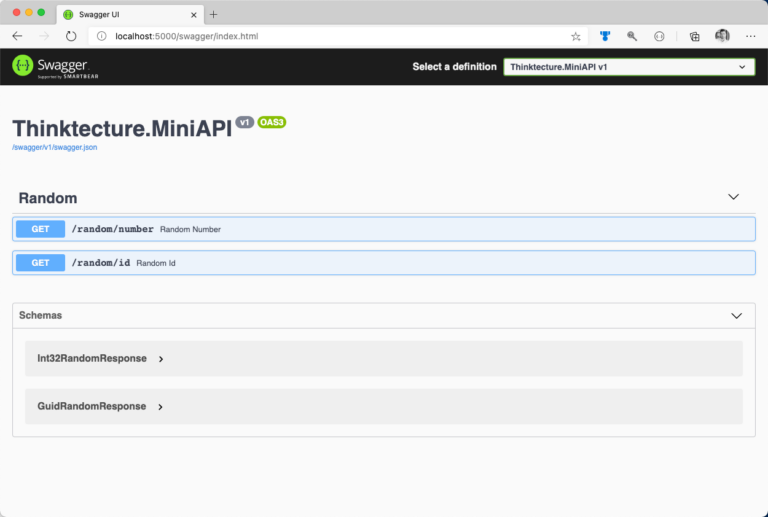
For demonstration purposes, we will go through the process of providing proper transport-level encryption for an existing REST API. The API consists of two public endpoints. Additionally, the API exposes fundamental documentation via Swagger as shown in figure 1.

Overall Architecture
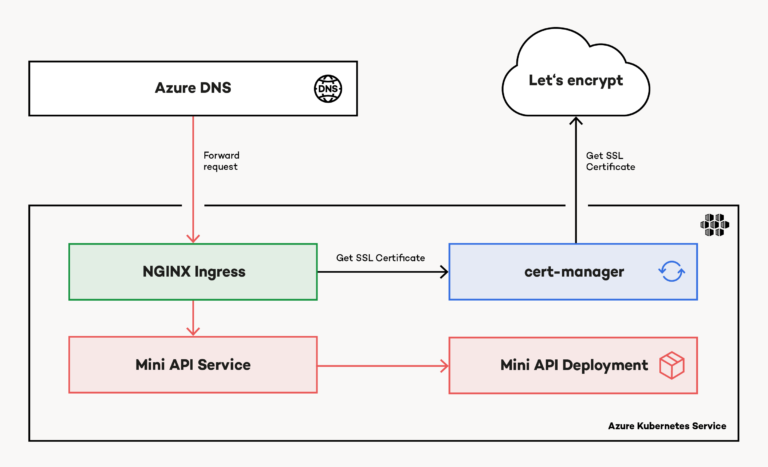
From an architectural perspective, the demo application is fairly easy. The previously shown API runs in a Kubernetes cluster. NGINX Ingress exposes it to the internet. Additionally, a custom domain name ensures, users can access the API using a valid domain name. As shown in figure 2, this sample was built on top of Microsoft Azure, leveraging popular services like Azure Kubernetes Service (AKS) and Azure DNS. However, Microsoft Azure is not required at this point. Everything mentioned and explained in this article is cloud-agnostic. It does not matter where you run your containerized workloads. It is up to you (or your IT department).

Azure DNS routes requests to the public IP address associated with the service created by NGINX Ingress (Ingress) inside AKS. Based on a custom Ingress manifest, cert-manager acquires an SSL certificate from Let’s Encrypt. Again, Ingress takes the SSL certificate and attaches it to the response.
Provisioning Azure DNS, setting up AKS, and installing Ingress are pretty well documented and not in the scope of this article.
Install Cert-Manager on Kubernetes
You can install cert-manager either by installing required Kubernetes artifacts using kubectl as described in the official cert-manager documentation or you use the Kubernetes package manager Helm to get everything up and running in seconds.
If you haven’t used Helm before, consult the official Helm 3 documentation for detailed installation instructions. Helm can install packages from different sources (those sources are referred to as repositories). Once Helm 3 is installed on your local system, you can use the CLI to add the official cert-manager repository and install cert-manager on Kubernetes. To ensure proper in-cluster isolation, you should consider installing cert-manager into a dedicated Kubernetes namespace, as shown in the following code snippet:
					# Create a dedicated Kubernetes namespace for cert-manager
kubectl create namespace cert-manager

# Add official cert-manager repository to helm CLI
helm repo add jetstack https://charts.jetstack.io

# Update Helm repository cache (think of apt update)
helm repo update

# Install cert-manager on Kubernetes
## cert-manager relies on several Custom Resource Definitions (CRDs)
## Helm can install CRDs in Kubernetes (version >= 1.15) starting with Helm version 3.2
helm install certmgr jetstack/cert-manager \
    --set installCRDs=true \
    --version v1.0.4 \
    --namespace cert-manager
Cert-Manager Building Blocks
Cert-manager unifies the certificate acquisition process across different certificate authorities, as mentioned earlier in the article. To achieve this, cert-manager uses a small set of building blocks to acquire SSL certificates and integrate them with existing ingress deployments like NGINX Ingress.
The (Cluster) Issuer
The Issuer is responsible for issuing certificates. It is the signing authority and based on its configuration. The issuer knows how certificate requests are handled. You can create either namespaced or cluster-wide issuers. Namespaced issuers are created using the Issuer specification. In contrast, you create a cluster-wide issuer by using the ClusterIssuer specification.
The Certificate
A Certificate resource is a readable representation of a certificate request. Certificate resources are linked to an Issuer (or a ClusterIssuer) who is responsible for requesting and renewing the certificate.
Additional Resources
Cert-manager creates several objects using different specifications such as CertificateRequest, Order, or Challenges while requesting certificates. It is important to understand how those objects play together. Especially when troubleshooting issues. Fortunately, there is great documentation on general troubleshooting and troubleshooting in the context of ACME certificates.
Request Let's Encrypt SSL Certificate Using Staging API
First, create the Issuer. This sample uses a namespaced issuer. Let’s encrypt offers a staging API that you should use during initial configuration. Modifying in-cluster resources such as the Issuer or the Certificate may lead to hitting API rate limits with Let’s Encrypt. Once the configuration is valid, you should switch from staging to production API using a dedicated Issuer. You specify the desired API using the server property of the spec. Provide a valid email as part of the Issuer resource when interacting with the production API. Let’s Encrypt will use this mail also for notifying you about upcoming certificate expirations.
					apiVersion: cert-manager.io/v1
kind: Issuer
metadata:
  name: letsencrypt-staging
  namespace: mini-api
spec:
  acme:
    # Staging API
    server: https://acme-staging-v02.api.letsencrypt.org/directory
    email: yourname@email.com
    privateKeySecretRef:
      name: account-key-staging
    solvers:
    - http01:
       ingress:
         class: nginx
Have you noticed the privateKeySecretRef property? It is a reference to a Kubernetes secret. Again, cert-manager creates and manages the secret for you. It contains private key material for the ACME account. Next is the Certificate. It is linked to the Issuer using the issuerRef, and instructs cert-manager to store the certificate in the miniapi-staging-certificate secret. Cert-manager automatically creates the secret for you as part of the certificate acquisition.
					apiVersion: cert-manager.io/v1
kind: Certificate
metadata:
  name: miniapi-staging
  namespace: mini-api
spec:
  secretName: miniapi-staging-certificate
  issuerRef:
    name: letsencrypt-staging
  dnsNames:
  - miniapi.thinktecture-demos.com
Last but not least, update the Ingress resource. Instruct NGINX ingress to force SSL redirection (see corresponding annotations). The Ingress resource has to be linked to the Issuer too. Because we use a namespaced issuer, the name of the annotation is cert-manager.io/issuer. For a cluster-wide issuer, use cert-manager.io/cluster-issuer. Also, configure the reference to the secret (which contains the SSL certificate) in spec.tls.hosts is valid.
					apiVersion: extensions/v1beta1
kind: Ingress
metadata:
  name: ingressrule
  namespace: mini-api
  annotations:
    kubernetes.io/ingress.class: "nginx"
    nginx.ingress.kubernetes.io/ssl-redirect: "true"
    nginx.ingress.kubernetes.io/force-ssl-redirect: "true"
    cert-manager.io/issuer: "letsencrypt-staging"
spec:
  tls:
  - hosts:
    - miniapi.thinktecture-demos.com
    secretName: miniapi-staging-certificate
  rules:
    - host: miniapi.thinktecture-demos.com
      http:
        paths:
          - path: /
            backend:
              serviceName: miniapi
              servicePort: 8080
Having everything in place, go ahead, and create the desired Kubernetes namespace. Then, deploy the resources with kubectl apply. (Instead of referencing every single file, you can also provide the path to the folder that contains a bunch of YAML manifests.) Acquiring the SSL certificate takes some time. Use kubectl to double-check the process. Consider looking at the Certificate instance, the underlying CertificateRequest, and the generated Order as shown in the following snippet:
					# get CertificateRequests
kubectl get certificaterequest

# see the state of the request
kubectl describe certificaterequest some-certificaterequest-name

# check the Order
kubectl get order

kubectl describe order some-order-name

# check Challenge
kubectl get challenge

kubectl describe challenge some-challenge-name
Verify SSL Certificate Metadata
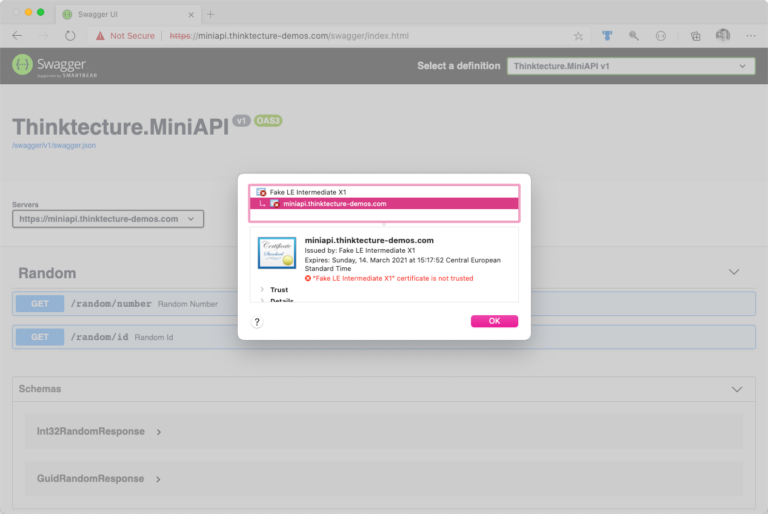
At this point, your exposed service should already use an SSL certificate issued by Let’s Encrypt. However, browsers will flag that certificate as invalid or mark your service as insecure because of SSL certificates issued by the staging API of Let’s Encrypt lack a trusted issuer. Nevertheless, you should take a look at the issued certificate and verify if its properties match your requirements.
If everything looks good, you can move on and switch to the production API of Let’s Encrypt. However, if something needs to be aligned with your requirements, you should have modified the underlying Certificate resource, which you created earlier. In the following picture, the invalid staging certificate is displayed. You can inspect a certificate in your browser by clicking on the Certificate button from the lock (🔒) menu (which is located next to the address bar):

Query Let's Encrypt Production API to Acquire Valid SSL Certificate
Having all metadata exposed as requested, it is time to move your certificate request from staging API to production API. Although this step is fairly easy, it is mandatory to acquire a valid SSL certificate. Create a new Issuer which targets Let’s Encrypt production API:
					# prod-issuer.yml
apiVersion: cert-manager.io/v1
kind: Issuer
metadata:
  # different name
  name: letsencrypt-prod
  namespace: mini-api
spec:
  acme:
    # now pointing to Let's Encrypt production API
    server: https://acme-v02.api.letsencrypt.org/directory
    email: yourname@email.com
    privateKeySecretRef:
      # storing key material for the ACME account in dedicated secret
      name: account-key-prod
    solvers:
    - http01:
       ingress:
         class: nginx
Having the production issuer in place, create the production Certificate:
					apiVersion: cert-manager.io/v1
kind: Certificate
metadata:
  # different name
  name: miniapi-prod
  namespace: mini-api
spec:
  # dedicate secret for the TLS cert
  secretName: miniapi-production-certificate
  issuerRef:
    # referencing the production issuer
    name: letsencrypt-prod
  dnsNames:
  - miniapi.thinktecture-demos.com
Finally, update the Ingress resource and link it to both: production issuer and production certificate:
					apiVersion: extensions/v1beta1
kind: Ingress
metadata:
  name: ingressrule
  namespace: mini-api
  annotations:
    kubernetes.io/ingress.class: "nginx"
    nginx.ingress.kubernetes.io/ssl-redirect: "true"
    nginx.ingress.kubernetes.io/force-ssl-redirect: "true"
    # reference production issuer
    cert-manager.io/issuer: "letsencrypt-prod"
spec:
  tls:
  - hosts:
    - miniapi.thinktecture-demos.com
    # reference secret for production TLS certificate
    secretName: miniapi-production-certificate
  rules:
    - host: miniapi.thinktecture-demos.com
      http:
        paths:
          - path: /
            backend:
              serviceName: miniapi
              servicePort: 8080
Apply the changes to Kubernetes (kubectl apply). Again, requesting and issuing the certificate may take a few seconds.
Verify SSL Certificate Validity
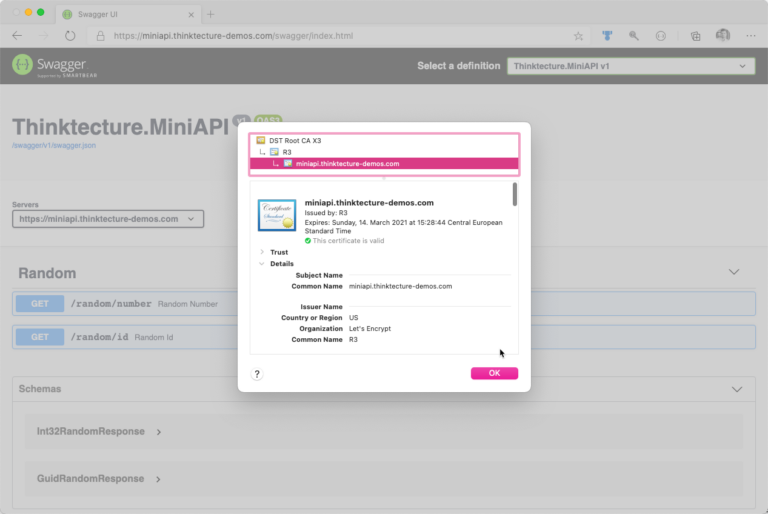
At this point, you should receive a valid SSL certificate for your domain from Let’s Encrypt. Fire-up your browser and verify that your SSL certificate is shown as valid and all metadata is provided as expected. Again, click the lock (

Troubleshooting Let’s Encrypt SSL Certificate Acquisition
Knowing what to do when something goes wrong is essential. Things will go wrong. Although I mentioned both URLs already, bookmark the great guide on troubleshooting in the context of ACME certificates, and the general troubleshooting guide, which also provides a good explanation of the certificate acquisition workflow.
Conclusion
Having Let’s Encrypt as a well-known, trusted certificate authority made SSL certificate acquisition easy. In combination with cert-manager, developers can ensure proper transport encryption and integration with pre-existing components such as NGINX Ingress in almost no-time. On top of the scenario demonstrated here, cert-manager can also assist when it comes to more complex scenarios such as
- wildcard SSL certificates, and
- certificates for secure in-cluster communication with mTLS.
We published the sample code on GitHub. If you have any further questions, file an issue, or reach out to me directly.


