
Today not every platform-native API is available to the browser and therefore not available for a web application. That is where additional frameworks like Capacitor and the Ionic Framework take over and close the gap between native applications and web applications. In this article, we will use these frameworks to create a hybrid app from an existing web app written in Angular – closing the gap to get access to native APIs and get access to the different app stores on all platforms.
Hybrid App vs. Progressive Web App (PWA)
A hybrid app can be defined as a web application that runs on native systems, like mobile or desktop platforms, and uses a bridge or shell technology to access platform-specific features.
Further, a hybrid app usually will be installed using platform-specific tools, but there are cases where you can, for example, start the application via an executable.
In comparison to Progressive Web Apps, a hybrid app runtime provides access to all platform-native APIs and unique features. An installed PWA is still limited by the browser and its provided and implemented feature set.
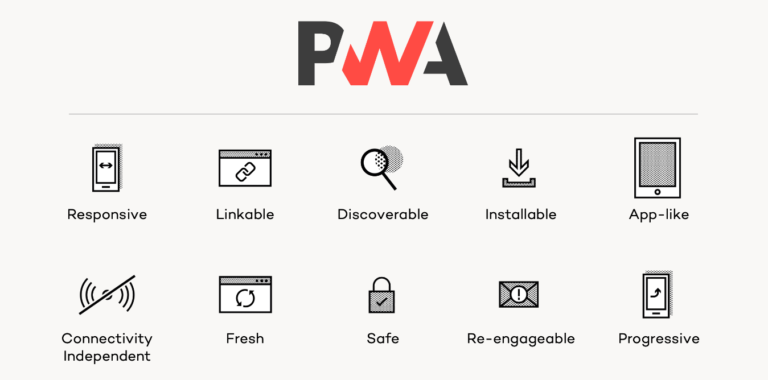
Not all platforms provide APIs for PWAs at all; there are no PWAs on iOS. The Apple mobile systems only offer an alternative with fewer features named “Home Screen Apps”. These “Home Screen Apps” are web pages that can be added to the home screen and are placed there with a custom icon. They only support a subset of the shown key features – for example, a Home Screen App is not installable via the App store and is not “re-engageable” via push notifications.
The question here is: do you need a hybrid app, or is a PWA sufficient? That is something only you can answer, but here are some points that might help you decide the right solution for your use case.
- Do you need access to native APIs like Bluetooth or battery status on all platforms?
- Do you want to be in Apple’s App Store and fulfill all its requirements?
- Note: Microsoft and Google allow PWAs in their stores.
- Do your users expect you to have an app in the stores?
- Visit What Web Can Do Today to see the capabilities of your browser (may vary) and compare them to your requirements.
In any case, Ionic Framework and Capacitor can help us to create or prepare our app for such a use case. It comes at almost no cost, and we can easily pick what parts of it we want to use and which we don’t want.
Today’s web APIs and technologies enable us to build all kinds of applications without learning new technologies and frameworks. With Ionic Framework, Capacitor, and Angular, it is possible to re-use the learned skills and extend or create an app with selected native features to meet all possible requirements.
So, what are those tools: Capacitor and Ionic Framework?
What is the Ionic Framework?
The Ionic Framework is an open-source UI framework to create hybrid apps for mobile platforms based on existing web technologies – backed and developed by Ionic. The framework started historically by extending Angular, but now all major SPA frameworks (Angular, React, Vue) are supported; it also works without any underlying framework using plain Web Components.
The UI framework comes packed with two parts:
- Web Components as UI elements
- Capacitor
All UI elements coming with Ionic Framework are Web Components created with Stencil and are designed to reflect either the Android or iOS style. Stencil is an Ionic product, too – this way, everything connects seamlessly and works well together.
What exactly is Capacitor, and how does it fit into the picture?
What is Capacitor?
Capacitor is an open-source runtime to bring hybrid apps to Android and iOS and is designed to be used with any web app. It comes with different APIs and plugins to access native platform features, such as Bluetooth or file access.
Capacitor works by encapsulating the web app inside a native app and providing an API or bridge between the web app part and the native app shell. The shell also serves the app’s resources with a secure connection to an internal and locally running web server.
Capacitor is Ionic’s successor of the Apache Cordova project. It supports Apache Cordova and Ionic Native plugins and is well supported and in active development by Ionic.
You must note that PhoneGap, Adobes’s business product on top of Cordova, is discontinued, and so is Adobe’s support for the Apache Cordova project and its investment. Ionic compared the projects.
Before we start, I’ve applied the following guides to an existing demo project of mine, effectively creating a hybrid app from an existing Angular web app. The chosen demo project demonstrates how to integrate Babylon.js – a powerful 3D graphics engine – into an Angular application.
You can find the different steps and results here:
- The existing demo application Angular combined with Babylon.js
- The first result: Added Capacitor
- The second result: Added Ionic Framework
Now, let’s see how we can transform an Angular web app to a hybrid app step-by-step in this article with (almost) no effort and overhead using Capacitor.
Minimal Hybrid App Setup Guide with Capacitor and Angular
We can use Capacitor without Ionic Framework. This way, it’s a lightweight extension for our existing project and becomes a build-time dependency without side effects for the web app if we don’t want to use Capacitor’s plugin system.
Adding Capacitor to our project: Navigate into the project root directory and execute
$ npx ng add @capacitor/angular
This command will add and execute schematics that do all required changes. It will also ask you for an app id (required by different platforms), add all required dependencies to the package.json, and create necessary config files like the capacitor.config.json.
You can configure the path to the build output of your application and other options like the app id, plugins, and much more.
					{
  "appId": "com.thinktecture.demo.myAppName",
  "appName": "My app's name",
  "bundledWebRuntime": false,
  "npmClient": "npm",
  "webDir": "dist/my-app-name",
  "plugins": {
    "SplashScreen": {
      "launchShowDuration": 0
    }
  }
}
The important parts here are appId, appName, and webDir.
The app id is used to identify your app on different platforms like Android and iOS. Capacitor uses the name and dir to identify the location and configuration of your web app. The dir should point to your app’s build output, as it is copied to the platform-specific build.
A full list of Capacitor’s configurations can be found in the official documentation here.
Next up, we have to have at least one build in our target directory (webDir). That is necessary because Capacitor adds the app content directly into the newly created platform. Then we install a platform of our choosing.
					$ npm run build
# cap add Android
$ npx cap add ios
Again, the command does all the heavy lifting for us. It adds Capacitor’s platform dependencies to the package.json and creates standard files for us to use (icons, configs, and platform files like Android’s manifest or IOS’s plist). All those files and configurations will be nicely nested inside a platform’s folder (ios or android).
In the end, your file system should look like this if you installed iOS as a platform.

We can deploy the built app into an emulator on a real device via a platform-specific IDE. Capacitor itself does not provide a direct way to do so. Instead, it provides us a handy helper command for that – it opens the platform-specific IDE at the current project’s path. From there on, we can start an emulator or deploy the app directly to a real device.
					# By default, XCode is used for iOS Apps and Android Studio for Android Apps.
# cap open android
$ npx cap open ios
As you can see, adding Capacitor to an existing project can easily be managed. It does not add side-effects to the existing web application.
Now, let’s explore another way, including the Ionic Framework into our angular app.
Making the Most of a Hybrid App with Ionic Framework, Capacitor, and Angular
Instead of adding the Capacitor CLI to the project, we can add the CLI for Ionic Framework. It allows using the UI elements as well as Capacitor CLI. The Capacitor CLI is baked into Ionic Framework and extended in some excellent ways – which we will see later after adding Ionic Framework to the project.
We start by initializing a new Ionic Framework project in our existing Angular project and installing some dependencies.
					$ npx ionic init the-project-name --type=angular
$ npm install --save @ionic/angular
$ npm install --save-dev @ionic/angular-toolkit
@ionic/angularprovides all modules, services, and components that we might use in our Angular app.@ionic/angular-toolkitprovides us with Angular Schematics and Builders to create a good development experience and integration into the CLI.
The packages are not automatically installed by the ionic init because they are optional for the CLI to work. In fact, we could use the Ionic CLI to start and deploy the app without including the Ionic Framework into the frontend.
The ionic init command creates an ionic.config.json, which we have to edit.
The file should look somewhat like this before we edit it:
					{
  "name": "the-project-name",
  "integrations": {},
  "type": "angular"
}
By default, Ionic Framework expects the project to be named app. Therefore, we add a default project and move the project configuration to a map and point it to our project. The defaultProject and its mapped value must match a project name that is defined in the angular.json file.
					{
  "defaultProject" : "the-project-name",
  "projects": {
    "the-project-name": {
      "name": "the-project-name",
      "integrations": {},
      "type": "angular"
    }
  }
}
If done correctly, the project can now be started via the Ionic Framework CLI.
					$ npx ionic serve
# ng run the-project-name:serve --host=localhost --port=8100
However, some critical parts are still missing. The Ionic Framework’s CLI is not yet integrated entirely, and we want to automatically copy source files from the installed packages into our build target.
Start by adding and replacing the missing configuration parts to the angular.json corresponding fields on the JSON object’s top-level.
					{
  "cli": {
    "defaultCollection": "@ionic/angular-toolkit"
  },
  "schematics": {
    "@ionic/angular-toolkit:component": {
      "styleext": "scss"
    },
    "@ionic/angular-toolkit:page": {
      "styleext": "scss"
    }
  }
}
Note that, by default, component and page generated with the schematics use scss. You can change that to your project style settings.
Now include SVG icons and SCSS source files into your project to have them copied automatically into the build output.
					{
  "assets": [
    {
      "glob": "**/*",
      "input": "src/assets",
      "output": "assets"
    },
    {
      "glob": "**/*.svg",
      "input": "node_modules/ionicons/dist/ionicons/svg",
      "output": "./svg"
    }
  ],
  "styles": [
    "src/theme/variables.scss",
    "src/global.scss",
    "src/styles.scss"
  ]
}
You can find a full list of configuration changes and the results in this commit.
The following image shows a part of the `angular.json` with all major changes applied.
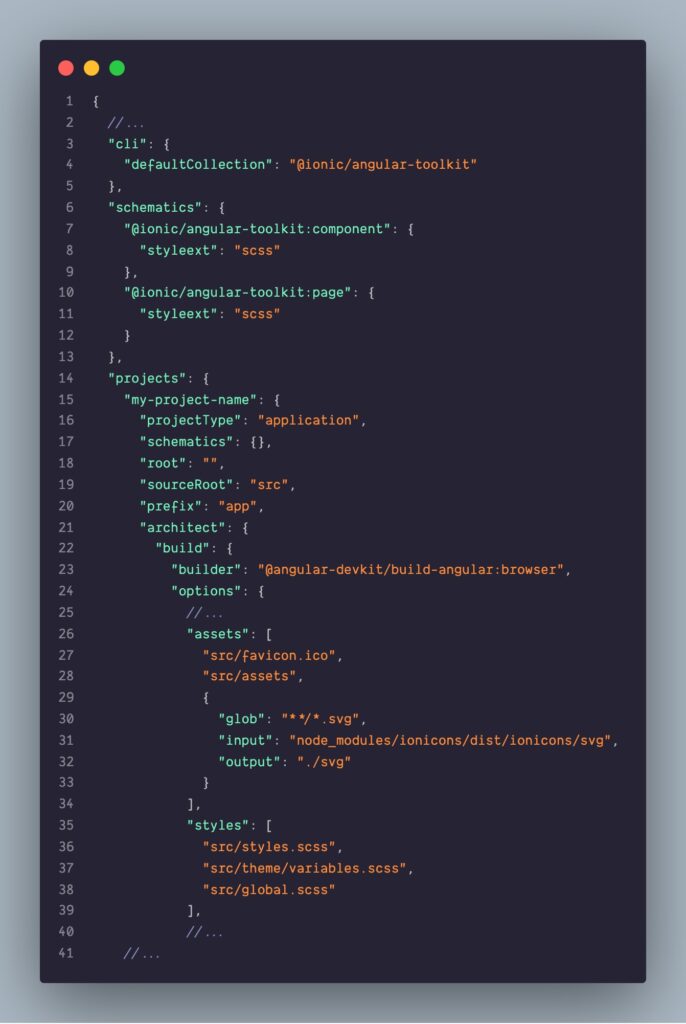
As you may have noticed, there are style files included in the project that does not yet exist.
The global.scss pulls Ionic Framework’s default and required styles into the project. The variables.scss contains light and dark theme information for the Ionic Framework components. Both files can be of any CSS preprocessor type; however, they should match your requirements and existing configuration.
Find a list of the things to include in the global.scss in the official documentation. If everything is imported, it should look somewhat like this.
					/* Core CSS required for Ionic components to work properly */
@import "~@ionic/angular/css/core.css";

/* Basic CSS for apps built with Ionic */
@import "~@ionic/angular/css/normalize.css";
@import "~@ionic/angular/css/structure.css";
@import "~@ionic/angular/css/typography.css";
@import "~@ionic/angular/css/display.css";

/* Optional CSS utils that can be commented out */
@import "~@ionic/angular/css/padding.css";
@import "~@ionic/angular/css/float-elements.css";
@import "~@ionic/angular/css/text-alignment.css";
@import "~@ionic/angular/css/text-transformation.css";
@import "~@ionic/angular/css/flex-utils.css";
The documentation about all available theming variables.
Now Ionic Framework is added to the existing project; all that is left is to enable Capacitor.
$ npx ionic integrations enable capacitor
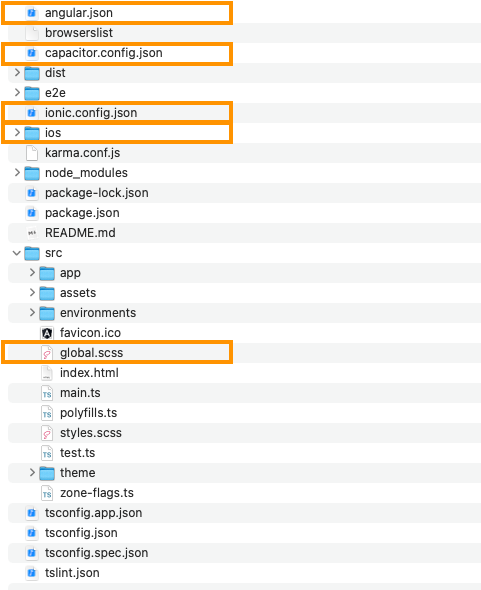
In the end, your files and folder should be similar to this.
Afterward, we make the same changes to the capacitor.config.json as described earlier and add a platform.
					$ npm run build
$ npx ionic capacitor add ios
That is all there is to do. We added Ionic Framework and Capacitor to our existing Angular application.
We can now generate framework-specific files, use all its services and the CLI, and of course, run the web app as a hybrid app on mobile platforms.
The last part is one of my all-time favorite CLI features.
My Favorite Ionic CLI Feature
Ionic’s CLI brings us useful features like this command.
					# -l = live reload
# --external = load sources from host machine
# ios as my platform
$ npx ionic capacitor run ios -l --external
It opens the matching IDE to start an emulator or run the app on a device and serves the original host machine’s web app with live reload enabled – all in one convenient and hassle-free command. That way, we can test our (web) app on any device with live-reload, enabling fast development iterations without a large configuration overhead – like we love and are used to from web development.
Conclusion
Adding Capacitor or Ionic Framework to an existing project is not complicated and can be done with little to no overhead. You can test and evaluate if a hybrid app fits your requirements and decide what approach you want to use to tackle the problem. You can choose how many dependencies you want to add to your base and what features are required by your use case.
Overall creating a hybrid app from your existing Angular web app is a customizable process and fits most of the existing projects out there. Ionic Framework and Capacitor do not require you to change much of your setup but extend it in some handy ways.
My recommendation is to evaluate how much native-looking UI and UX you need for your project and decide, depending on that, which way you want to go creating a hybrid app from your existing code-base.
Creating such an app can be done quickly if the UI and UX are well designed for mobile devices – UI and UX problems for a native-looking design can be solved with the Ionic Framework.
You can find even more information and discussion on this and other topics in our knowledge base. We also got more articles and webinars on Capacitor and Ionic.