Version Information:
- .NET SDK: 6.0.201
- ASP.NET Core Blazor WebAssembly: 6.0.2
- Entity Framework Core: 6.0.2
- MudBlazor: 6.0.6
You can find the sample code for this article here.
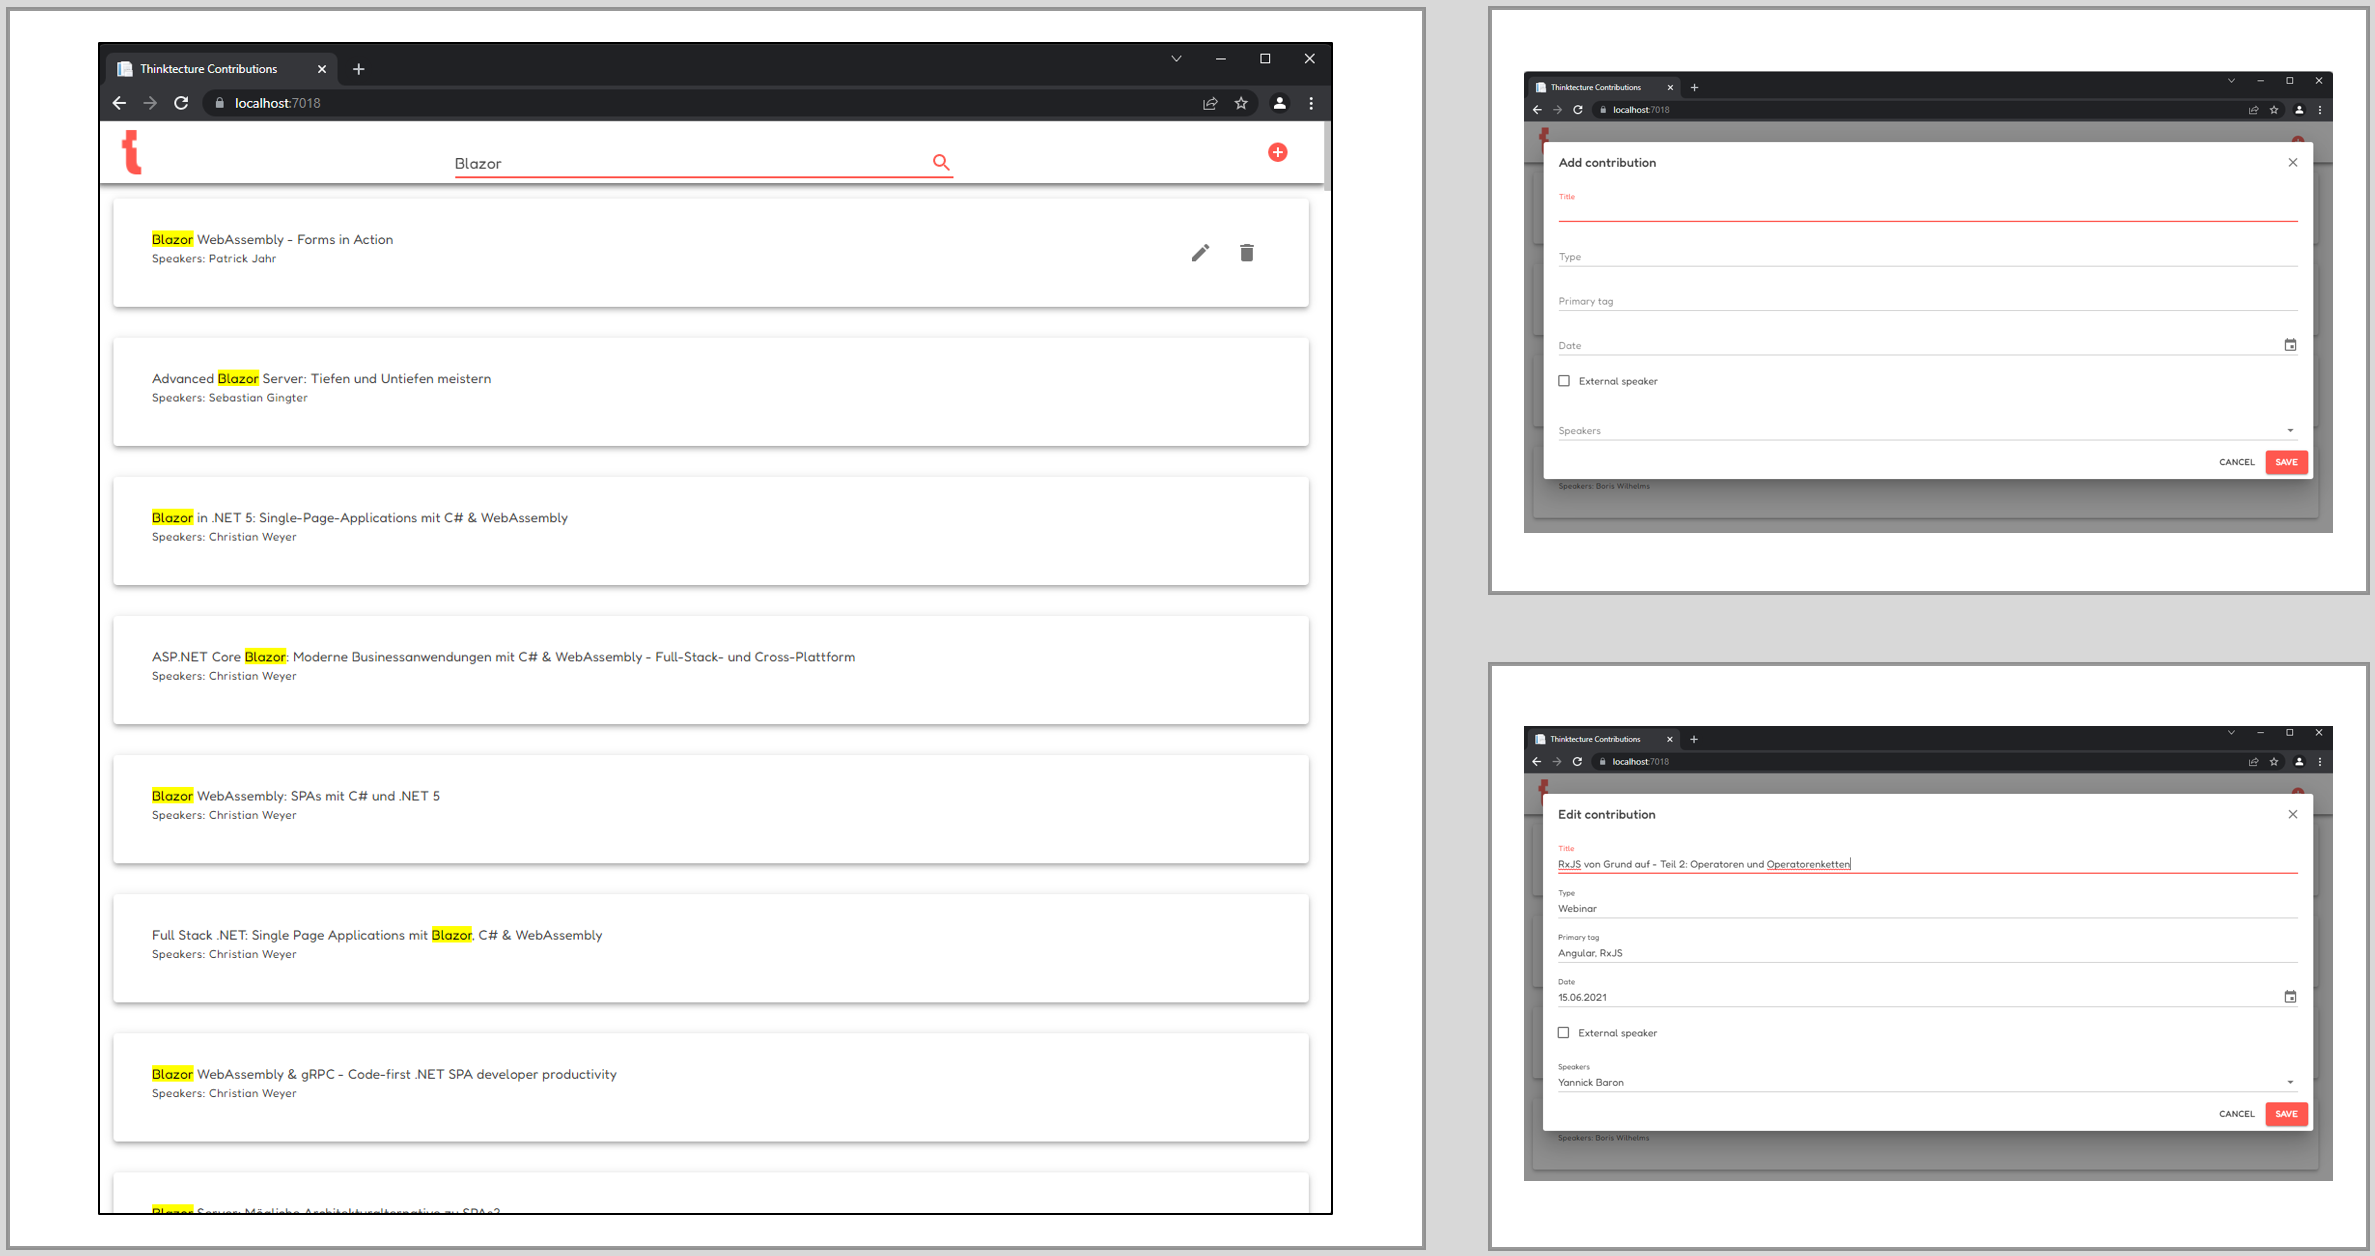
The sample application is a simple searchable list in which entries can be added, edited, or deleted. And all these actions run on a ‘real’ database in the browser.
NOTE: This article previews how SQLite currently works in Blazor WebAssembly. For this purpose, some pre-releases are used, features and APIs might (and surely will) change in the future until released.
Using a 'real' database with a powerful API in the browser
In popular SPA frameworks such as Angular or React, the IndexedDB is often used to store client-side data. IndexedDB is more or less the de-facto database of the today’s browsers. Since the common SPA frameworks are JavaScript-based, they can communicate directly with the browser’s database. Blazor WebAssembly is different. In the case of Blazor WebAssembly, we have to add a JavaScript interop (JSInterop) wrapper to communicate with the database and thus persist data.
But is that really necessary? Since we are in the .NET world, using the Entity Framework (EF Core) as the database access approach & technology of our choice would be great. With this scenario, we have the power of EF Core to execute fast and complex SQL queries on a database without having to build the bridge to the IndexedDB.
In this article, we will see a sneak preview of using EF Core and SQLite in the browser. And almost without any JavaScript.
The power of SQLite and EF Core in the browser
Installation & dependencies
We can use SQLite with EF Core in the client by installing the following packages:
- For EF Core, we need
Microsoft.EntityFrameworkCore.Sqlitepackage - For SQLite, we use the pre-release package
SQLitePCLRaw.bundle_e_sqlite3
The library SQLitePCLRaw.bundle_e_sqlite intents to supply a complete embedded version of SQLite for applications. As it is a portable class library and wants to provide support for all sorts of different platforms (i.e. iOS, Android, Windows, macOS, etc.), it will provide or even build the correct native SQLite library specific to the target platform of an application. This is essentially the same as if you would manually ship a platform-specific sqlite3.dll for Windows and a sqlite3.so for Linux with your application. As we are targeting WebAssembly, the C implementation of SQLite needs to be compiled to this platform.
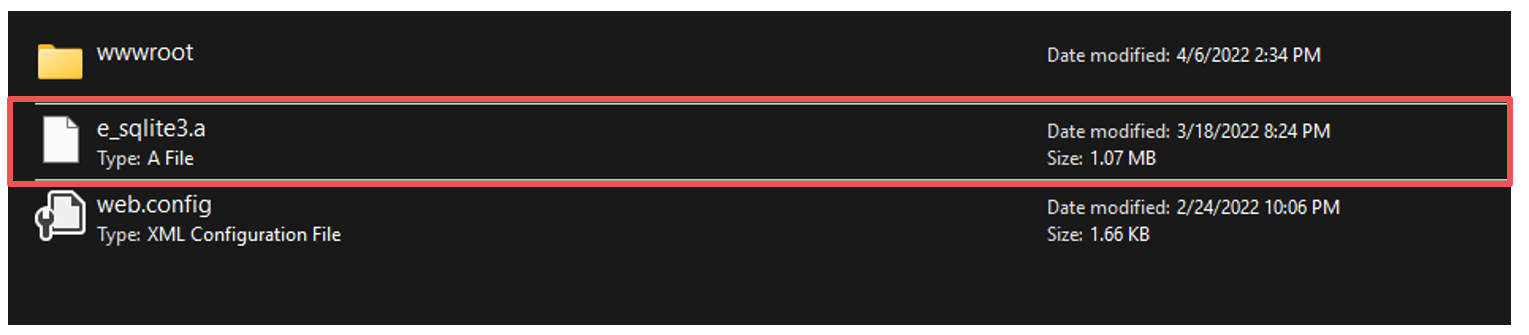
Note: As of today, this pre-release package does only provide this WASM compilation step when you publish your application with dotnet publish (or use the publish option in Visual Studio). The publishing process of our whole Blazor WASM application will result in compiling all native dependencies – in this case our SQLite database engine – to WebAssembly. Using the Emscripten tool chain, it will create a static library file e_sqlite3.a (embedded SQLite v3) in your publish directory.
This is a complete SQLite database engine, ready to be loaded into the browser and to be executed within the WASM runtime. With that, our Blazor WebAssembly application can use EF Core to directly talk to a real, embedded SQLite database in the browser!
The next step shows how to use this packages with a Blazor WebAssembly client.
EF Core DbContext as we know it
When we develop Blazor WebAssembly clients, we do this in C# with .NET. So, we can use SQLite with EF Core, as we know it. And that is awesome.
In order to better understand, please have a look at the following code, which is pretty much a standard DbContext class:
					public class ContributionDbContext : DbContext, IPersistingDbContext
{
    public DbSet Contributions { get; set; }
    public DbSet Speakers { get; set; }
    public DbSet ContributionSpeakers { get; set; }

    private readonly DatabaseService _databaseService;

    public ContributionDbContext(DbContextOptions options
        , DatabaseService databaseService)
    : base(options)
    {
        _databaseService = databaseService;
    }

    protected override void OnModelCreating(ModelBuilder modelBuilder)
    {
        modelBuilder.Entity()
            .HasKey(t => new { t.ContributionId, t.SpeakerId });

        modelBuilder.Entity()
            .HasOne(pt => pt.Contribution)
            .WithMany(p => p.ContributionSpeakers)
            .HasForeignKey(pt => pt.ContributionId);

        modelBuilder.Entity()
            .HasOne(pt => pt.Speaker)
            .WithMany(t => t.ContributionSpeakers)
            .HasForeignKey(pt => pt.SpeakerId);

        base.OnModelCreating(modelBuilder);
    }
}
With this, DbContext we can start to use EF-Core-backed data access in the browser. However, not so fast…
Dependency Injection
A small but subtle difference to the known dependency injection of a DbContext exists with Blazor WebAssembly: there is no significant difference between a scoped and a singleton dependency. More information about the Blazor WebAssembly dependency injection can be found here.
Unfortunately, since the DbContext is registered as scoped, it is necessary to register and inject the IDbContextFactory instead of the DbContext. With this factory, you can create an instance as soon as needed, and the instance can then be disposed after use.
To register an IDbContextFactory, you must use the extension method AddDbContextFactory instead of the known AddDbContext.
					// Program.cs
services.AddDbContextFactory(options =>
  options.UseSqlite("Filename=spp.db}"));
After registration, the IDbContextFactory can be provided to our DatabaseService implementation via dependency injection.
					// DatabaseService.cs
public DatabaseService(IJSRuntime jsRuntime , IDbContextFactory dbContextFactory)
{
    // ...
}

public async Task InitDatabaseAsync()
{
    try
    {
        //...

        // Create instance of DbContext, which will be disposed afer using
        await using var dbContext = await _dbContextFactory.CreateDbContextAsync();
        await dbContext.Database.EnsureCreatedAsync();
    }
    catch (Exception ex)
    {
        Console.WriteLine(ex.GetType().Name, ex.Message);
    }
}
We have now installed the necessary dependencies, created a DbContext class, and registered the factory. Therefore, we have completed the first steps to use EF Core and SQLite in a Blazor WebAssembly client.
Using EF-Core-based code in Razor components
In the following code, we can see a simple usage of EF Core in our client. Let’s create a service class first:
					public class ContributionsService
{
    private readonly IDbContextFactory _factory;
    private readonly HttpClient _httpClient;

    public ContributionsService(IDbContextFactory factory,
       HttpClient httpClient)
    {
        _factory = factory;
        _httpClient = httpClient;
    }

    //...

    public async Task<List> GetContributions(int skip = 0,
      int take = Int32.MaxValue, string searchTerm = "",
      CancellationToken cancellationToken = default)
    {
        await using var dbContext = await _factory.CreateDbContextAsync();

        var query = String.IsNullOrWhiteSpace(searchTerm)
            ? dbContext.Contributions
               .Include(c => c.ContributionSpeakers).ThenInclude(cs => cs.Speaker)
            : dbContext.Contributions
               .Include(c => c.ContributionSpeakers).ThenInclude(cs => cs.Speaker)
               .Where(c => EF.Functions.Like(c.Title, $"%{searchTerm}%"));

        return await query.OrderBy(
          c => c.Title).Skip(skip).Take(take).ToListAsync(cancellationToken);
    }
}
This is the UI markup for the contributions page (Contributions.razor).
<div class="d-flex justify-space-between mud-elevation-4 py-8 px-10 mb-8 rounded white item-row">
<div class="d-flex flex-column flex-start">
<div>
@contribution.Title
</div>
Speakers: @SpeakerString(contribution)
</div>
<div class="d-flex edit-action">
CreateOrUpdateContribution(contribution)">
DeleteContribution(contribution.Id)">
</div>
</div>
And this is the code-behind for the page (Contributions.razor.cs).
					public partial class Contributions
{
    [Inject] private ContributionsService _contributionsService { get; set; } = default!;

    //..

    private async ValueTask<ItemsProviderResult> LoadCollection(
    ItemsProviderRequest request)
    {
        try
        {
            var count = await
              _contributionsService.GetContributionCount(request.CancellationToken);
            var totalCount = Math.Min(request.Count, count - request.StartIndex);
            var result = await
              _contributionsService.GetContributions(request.StartIndex,
                totalCount, _searchTerm, request.CancellationToken);
            return new ItemsProviderResult(result, count);
        }
        catch (OperationCanceledException)
        {
            Console.WriteLine("Current request was canceled.");
            return new ItemsProviderResult(new List(), 0);
        }
    }

    //...
}
Alright! That looks good.
In the next section, we will see how we can persist the data in the browser with native WebAssembly APIs.
Persisting data with the WebAssembly File System API
SQLite works on a database file. We already learned that we use a version of SQLite compiled to WebAssembly (Wasm). The Wasm runtime in the browser, however, does not directly provide access to a persistent file system (yet). As of today, all file IO operations that are compiled to Wasm using Emscripten, will be mapped to a virtual file system that only exists in-memory (MEMFS, see also here).
So while SQLite is storing our data in a file, this is currently only available in the memory of the current browser tab. When we reload the tab, the file – and with it all of our precious data – will be lost. This is inconvenient for a database that should keep our data, and so we need to make sure that we actually save the in-memory file to a secure and persistent location.
To really persist that database file, we have the option to use the WebAssembly-related File System API from Emscripten to store our file in the IndexedDB of our browser.
Before we start with the implementation, let’s look at how initialization of and persisting the database with the File System API works in our code.
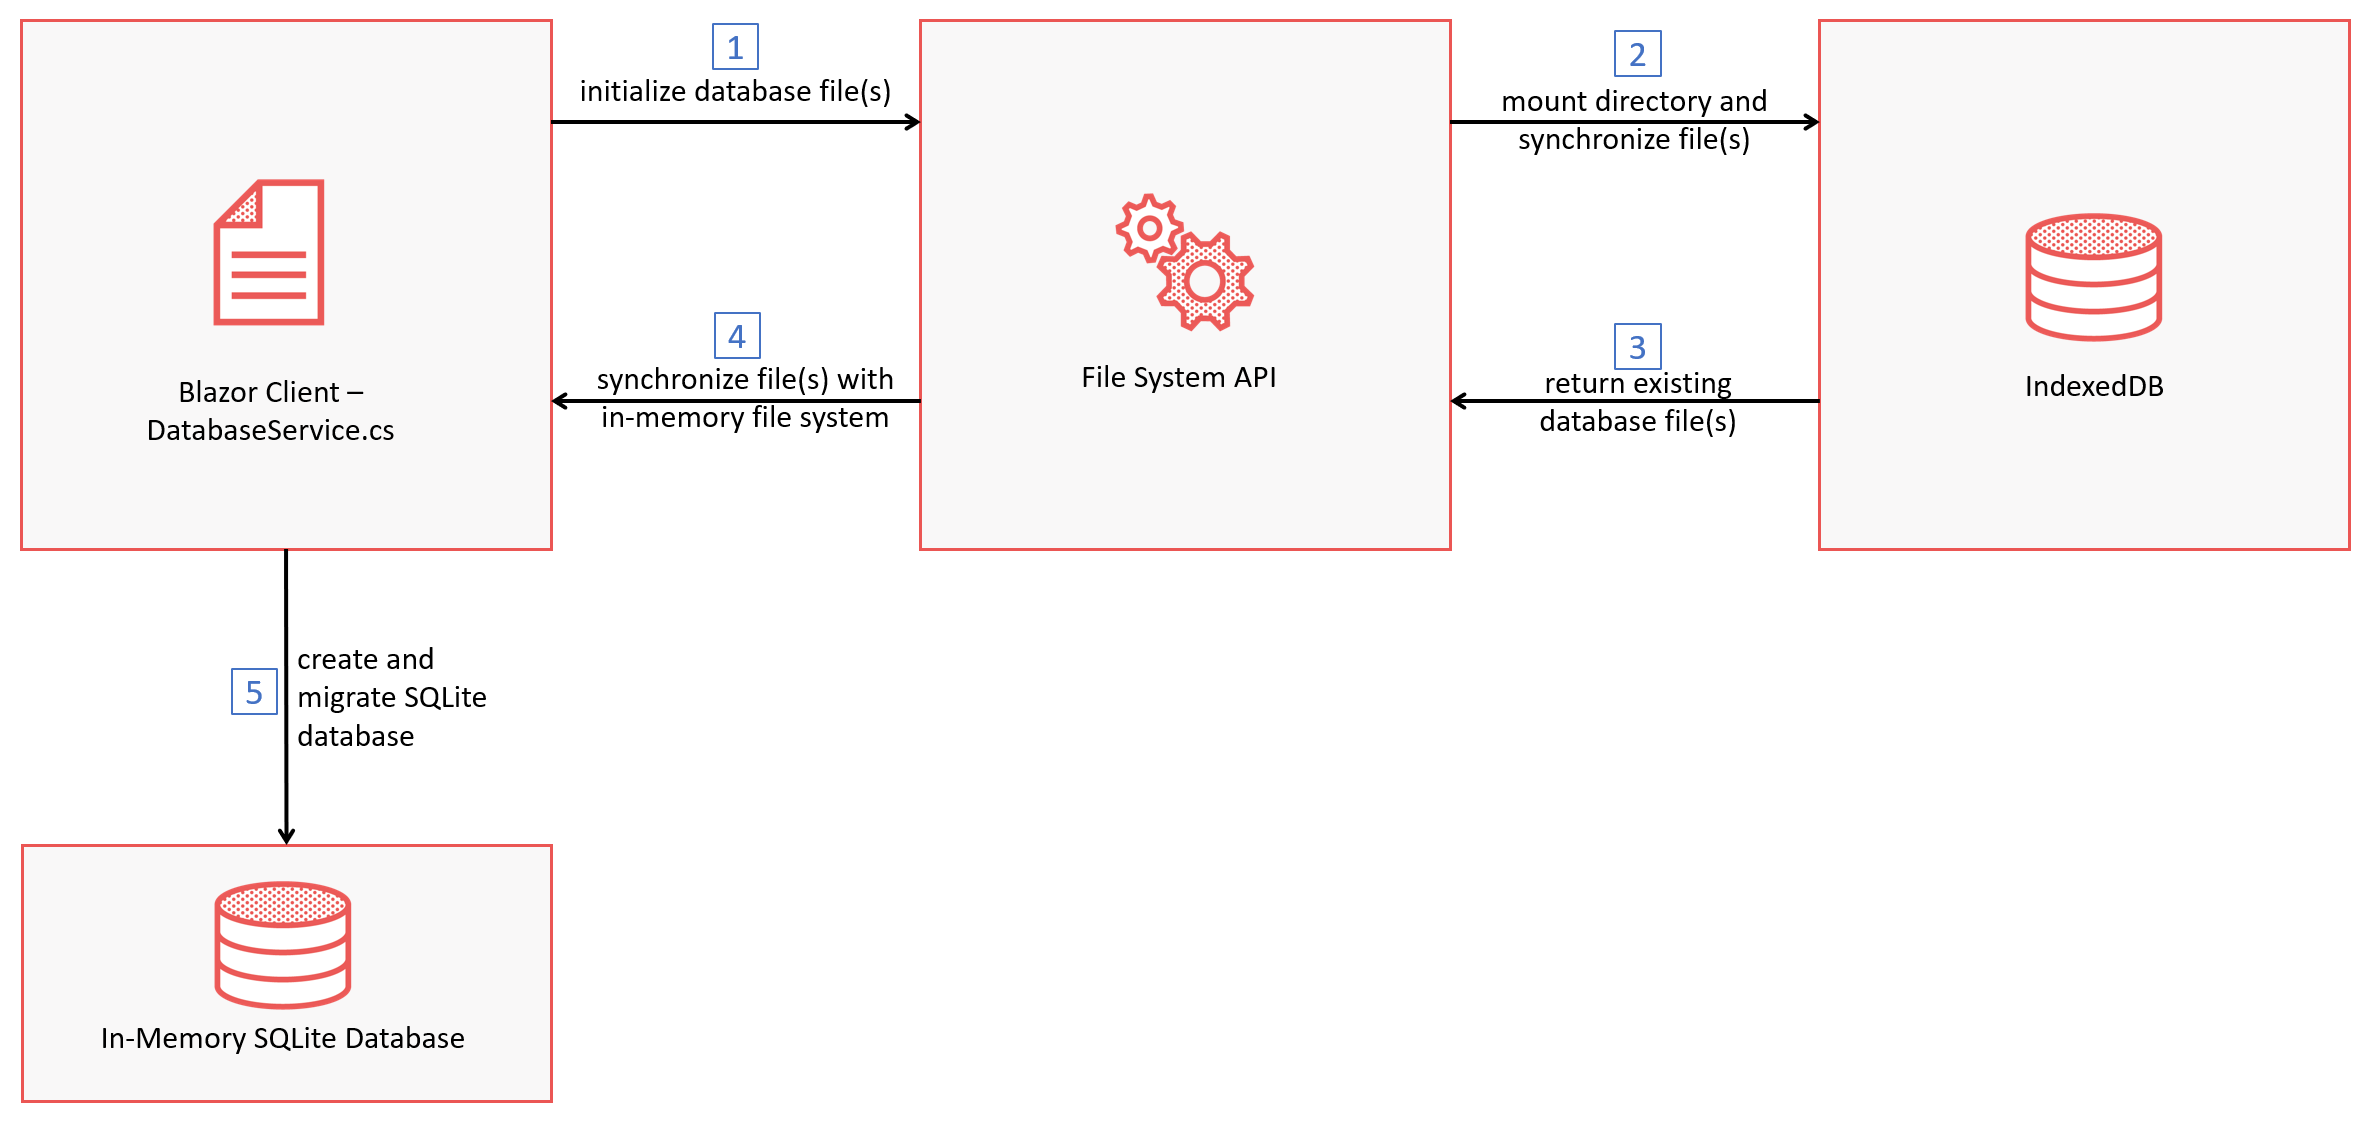
- First, the
DatabaseServiceclass, which will be explained in more detail later in the article, triggers the initialization of the database. - After that, the File System API loads the directory in the browser’s database (IndexedDB). We use the directory path to persist the SQLite database file there.
- If the directory already exists and contains files, these are returned to the File System API.
- The possible files are then synchronized with the in-memory file system of a Blazor WebAssembly client.
- Finally, the SQLite database will be initialized, and the migrations are executed.
Note: In the future, Emscripten wants to provide a full-featured persistent file system abstraction for Wasm (see here), but this is not yet available today. To overcome this problem, we can use the IndexedDB File System or short IDBFS (see here).
This allows us, to map (or “mount”) parts or all of the in-memory file system to binary objects in the IndexedDB. This is, however, not an automagical mapping: We need to call a synchronization method every time we want to copy changes that were written to the in-memory files to the persistent storage and, at every application startup, also copy the persistent storage to our in-memory files before we use them.
So, as of now, we sadly still have to resort to moving our data to the IndexedDB, with all of it shortcomings in terms of storage space and performance, but since we only move byte arrays from one side to the other, it’s not as bad as moving a lot of small objects with the serialization and deserialization overhead around.
The following sections will now look at how we configure and implement these five steps.
Configuring the File System API
First, what is the File System API? The File System API is a WebAssembly-related API, which synchronizes the files between the in-memory and the IndexedDB file systems. To use this WebAssembly-related API, we have to modify the project file of our Blazor client.
					<PropertyGroup>
    ...
    <EmccExtraLDFlags>-lidbfs.js</EmccExtraLDFlags>
</PropertyGroup>
In the sample above, we add the EmccExtraLDFlags tag. We enable the IndexedDB file system (IDBFS) with this flag, essential for the File System API. More details about this can be found here.
Warning: This setting runs ONLY IN PUBLISHED mode at the moment.
Persisting the SQLite database file in the client
To store the files from the in-memory file system, the File System API uses the IDBFS, which we just added. The IDBFS file system implements the FS.syncfs() interface, which will persist any operations to an IndexedDB instance.
Initializing SQLite database file
Let’s now look deeper into the initialization of the SQLite database file with the following diagram.
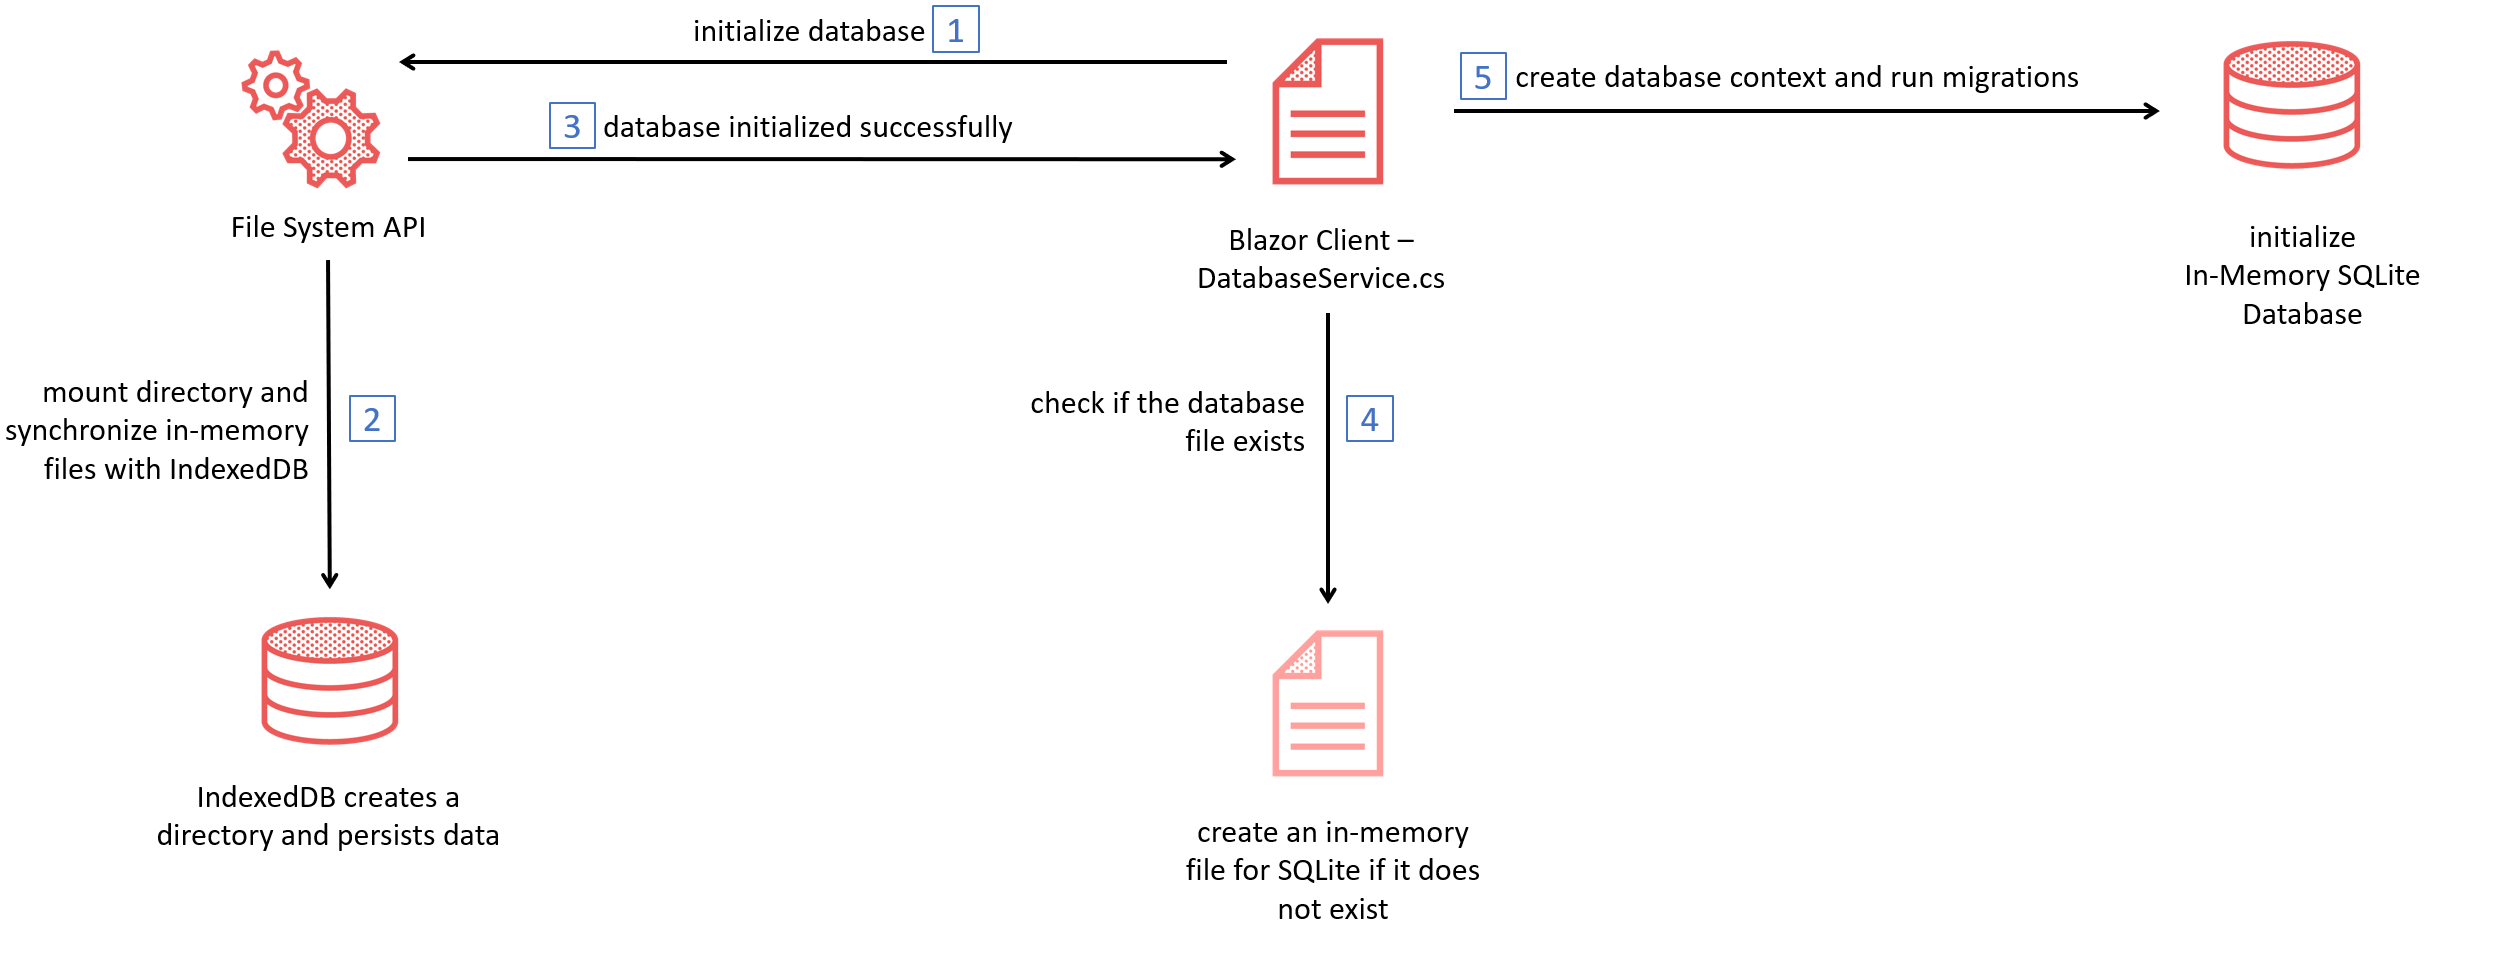
In the first step, the DatabaseService class triggers the initialization to create a new directory to put our files into this.
					// DatabaseService.cs - Initialization method in C# code
public async Task InitAsync()
{
    try
    {
        // Initialize database
        var module = await _moduleTask.Value;
        await module.InvokeVoidAsync("mountAndInitializeDbFile", _selfReference);
    }
    catch (Exception ex)
    {
        Console.WriteLine(ex.GetType().Name, ex.Message);
    }
}
After that, the File System API creates and mounts the directory for the database file in the IndexedDB file system. To do this, we call the FS.mkdir({path}) method to create the directory if this does not exist. After that, we can call the FS.mount() method, which opens the directory.
					// Initialize method in JavaScript code
export function mountAndInitializeDbFile() {
    FS.mkdir('/database');
    FS.mount(IDBFS, {}, '/database');
    return syncDatabaseFiles();
}

export function syncDatabaseFiles() {

    return new Promise((resolve, reject) => {
        FS.syncfs((err) => {
            if (err) {
                console.log('syncfs failed. Error:', err);
                reject(err);
            }
            else {
                console.log('synced successfull.');
                resolve();
            }
        });
    });
}
If the directory is created and the possible files are synced, the DatabaseService class checks if the SQLite database file exists. If not, it will create the file.
					// DatabaseService.cs - Initialization method in C# code
public async Task InitAsync()
{
    try
    {
        // ...

        // Check if the file already exists
        if (!File.Exists(filename))
        {
            // Create database file
            File.Create(filename).Close();
        }
    }
    catch (Exception ex)
    {
        Console.WriteLine(ex.GetType().Name, ex.Message);
    }
}
Last, the database will be initialized with the EnsureCreatedAsync method from the DbContext.
					// DatabaseService.cs - Initialization method in C# code
public async Task InitAsync()
{
    try
    {
        // ...

        // Create database context
        _db = await _dbContextFactory.CreateDbContextAsync();
        await _db.Database.EnsureCreatedAsync();
    }
    catch (Exception ex)
    {
        Console.WriteLine(ex.GetType().Name, ex.Message);
    }
}
To ensure that the initialization starts before the application is running, in the sample application the initialization is carried out before the host starts.
					// Configure Service
//....

// Build Host
var host = builder.Build();

// Initialize database
var dbService = host.Services.GetRequiredService();
await dbService.InitDatabaseAsync();

// Start Host
await host.RunAsync();
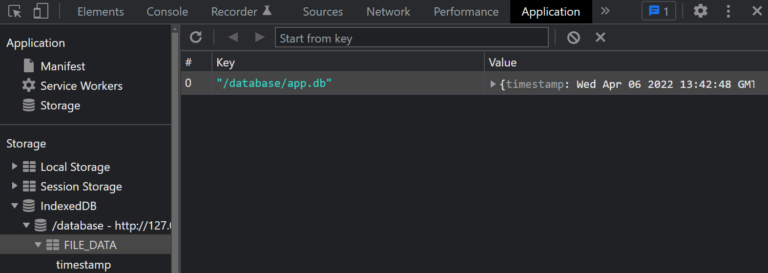
If the initialization is successful, both the path and the file are displayed in the browser’s IndexedDB file system.
After creating the file, we have to synchronize the database file so that the data is persisted and not all data is lost after reloading or restarting the app.
Synchronizing DbContext
Like in the last step first, we will look deeper into the synchronization of the SQLite database file with the following diagram, that we can start the implementation.
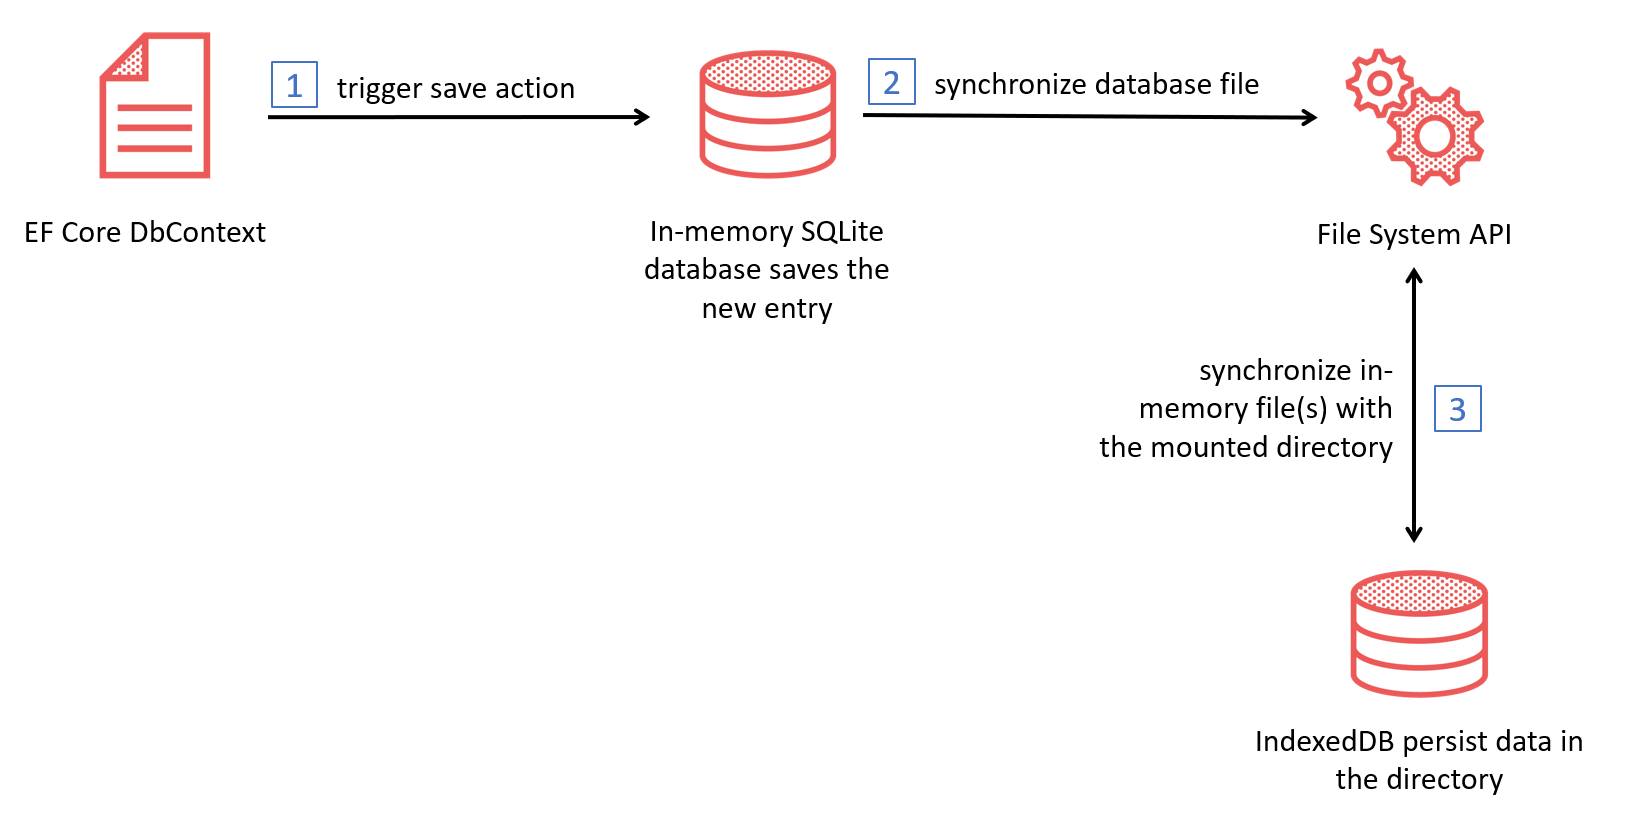
The SaveChangesAsync method is finally called when the database is changed. We override this method in the ContributionDbContext class of the sample application.
					public override async Task SaveChangesAsync(
  CancellationToken cancellationToken = default)
{
    var result = await base.SaveChangesAsync(cancellationToken);
    var module = await _moduleTask.Value;
    await module.InvokeVoidAsync("syncDatabase", false, cancellationToken);
    return result;
}
In the code above, we call the JavaScript method syncDatabaseFiles, which we see in the JavaScript code for the initialization, to trigger the synchronization of the SQLite database file. After the synchronization, the SQLite database file is persisted in the IndexedDB file system. But this is only one option to persist the database file.
Another option, which is not implemented in the sample, is to trigger the sync manually via a button or an event that calls a SaveDbAsync method to persist the database. This would look like this:
					//Contributions.razor.cs

private GridItemsProvider<Contribution>? _contributionsProvider;
private PaginationState pagination = new PaginationState { ItemsPerPage = 100 };

protected override async Task OnInitializedAsync()
{
    _contributionsProvider = async req =>
    {
        var count = await _contributionService.GetContributionCountAsync(req.CancellationToken);
        var response = await _contributionService.GetContributionsAsync(req.StartIndex, req.Count ?? 100, req.CancellationToken);
        return GridItemsProviderResult.From(
            items: response ?? new(),
            totalItemCount: count);
    };
    pagination.TotalItemCountChanged += (sender, eventArgs) => StateHasChanged();

    await base.OnInitializedAsync();
}

private async Task GoToPageAsync(int pageIndex) =>
    await pagination.SetCurrentPageIndexAsync(pageIndex);

private string? PageButtonClass(int pageIndex)
    => pagination.CurrentPageIndex == pageIndex ? "current" : null;

private string? AriaCurrentValue(int pageIndex)
    => pagination.CurrentPageIndex == pageIndex ? "page" : null;
					// Component.razor.cs
private async Task SaveDbAsync()
{
    await DatabaseService.SaveChangesAsync();
}

// DatabaseService.cs
public async Task SyncDatabaseAsync()
{
    var module = await _moduleTask.Value;
    await module.InvokeVoidAsync("syncDatabase");
}
And that’s it!
We can create a database file, persist it in our browser, and use EF Core’s power with these few steps. And that is awesome 😊.
Summary
With the power of Blazor WebAssembly and .NET, we now have the ability on the web to not only use the browser’s database to persist our data. We have the full power of EF Core and SQLite that we can use natively in our application. This gives us fast access to our data and, for .NET developers, a familiar approach to building and using databases in our web application.
But be careful, because the data is currently still stored in the IndexedDB, there may be performance problems with large amounts of data and complex queries. Therefore, the native File System Access API is another option to persist the data. It is possible to load and store data on the native device with this. Currently, however, the API is only available on desktop browsers like Chrome, Safari or Chrome-based Edge (see here).
NOTE, ONCE AGAIN: This article previewed how SQLite currently works in Blazor WebAssembly. For this purpose, some pre-releases are used, features and APIs might (and surely will) change in the future until released.