Article Series
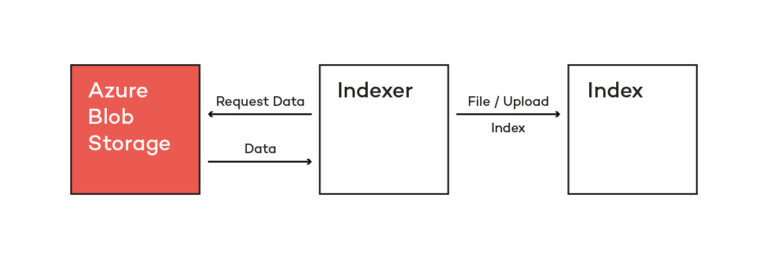
If you want to search your data, the index we created in the last article has to be filled with information first. Azure Cognitive Search offers different ways to bring data into an index. If you have your own data source, you have to push data into the index programmatically using, for instance, the .NET SDK or the REST API. However, if you have a data source on Azure, you are able to use indexers. Think of the indexer as a microservice that runs on Azure and pushes data into your index actively. This indexer can read data from different data sources like Azure Blob Storage or Azure SQL.
If you look at the architectural diagram from the introduction article, you can see how index and indexer rely on each other. The indexer grabs the data from the data storage and puts it into the index based on the defined fields.

Create an Indexer
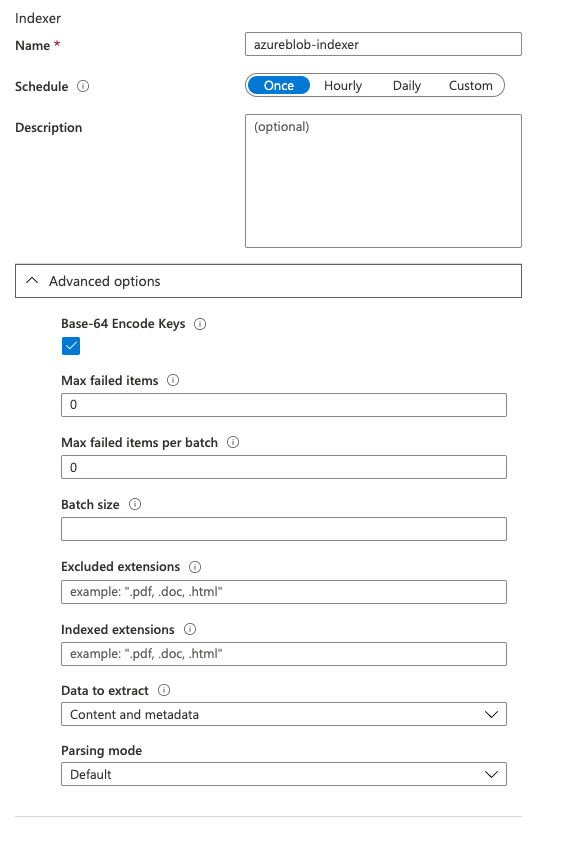
Like the index, there are also different ways to create the indexer. Using the Azure Portal, you can create an indexer when importing data from an Azure Storage service. However, using the import wizard also forces you to create a new index. There is no way to create an indexer for an existing index in the Azure portal. Therefore, you have to use an SDK or the REST API. Building it in the Azure portal offers nearly the same options as creating the indexer with the SDK:

The only required parameter to create an indexer is the name, which has to be unique in your search service. There are additional parameters, like the schedule for execution or a description. For advanced configuration, there are more options like the parsing format or excluded items.
If you do not want to create the indexer in the portal, you can also do so in the .NET SDK in your own code. Before we start creating an indexer, we need an Azure data source where the indexer can access the data he has to index. To create a data source, the SearchServiceClient offers methods to create and delete data sources. With DataSources.CreateAsync we can pass a AzureBlobStorage which we created in the last article.
					// Delete data source if existing
if (await serviceClient.DataSources.ExistsAsync(searchIndexerConfig.DataSourceName))
		await serviceClient.DataSources.DeleteAsync(searchIndexerConfig.DataSourceName);

// Create data source
await serviceClient.DataSources.CreateAsync(
	DataSource.AzureBlobStorage(
		searchIndexerConfig.DataSourceName,
		"<AzureBlogStorageConnectionString>",
    "<IndexContainerName>"));
To create an indexer, you need a configuration that describes it. I created a Json file that includes all needed information to create an indexer that can fill our index with the data from the PokeApi that is stored in the Blobstorage we made in the last article.
					{
	// name of the index
  "name": "pokeapi-indexer",
	// Azure data source
  "dataSourceName": "pokeapi-datasource",
  // name of the index that has to be filled
  "targetIndexName": "pokeapi-index",
  "disabled": null,
  "schedule": null,
  "parameters": {
    "configuration": {
	    // Specify which data will be used to fill the index
      "dataToExtract": "contentAndMetadata",
      // Format of the data that has to be parsed.
      "parsingMode": "json"
    }
  }
}
Defining the indexer allows us to specify which data has to be indexed and which parsingMode should be used. For the dataToExtract, we can specify that the content and the metadata should be indexed. But it is also possible to only use the metadata so the storage item’s content will not be used for filling the index. If you are using Azure Blob storage, you can also define the parsingMode if you want to use the content to fill the index. So it is possible to choose a parsing mode like JSON or only plain Text. The dataSourceName is the name of your Azure data source we have created earlier. This is necessary for the indexer to know where to get the data from.
Before you can work with indexers, you need a SearchServiceClient instance. This may be the same client object you have created to use the index (see “.NET SDK” in the index article).
					// Check if the indexer exists
if (await serviceClient.Indexers.ExistsAsync(indexerConfig.Name)) {
    // Delete the indexer
    await serviceClient.Indexers.DeleteAsync(indexerConfig.Name);
}

// Create the new indexer
await serviceClient.Indexers.CreateAsync(indexerConfig);
The SearchServiceClient has a property called Indexers, which you can use to access operations dedicated to indexers. Before creating a new indexer, we check if an indexer with the same name exists by calling the ExistsAsync method. If there is an existing indexer, we delete it before creating a new one. We create a new indexer by invoking the CreateAsync method, passing the indexer-configuration.
Start an Indexer-run
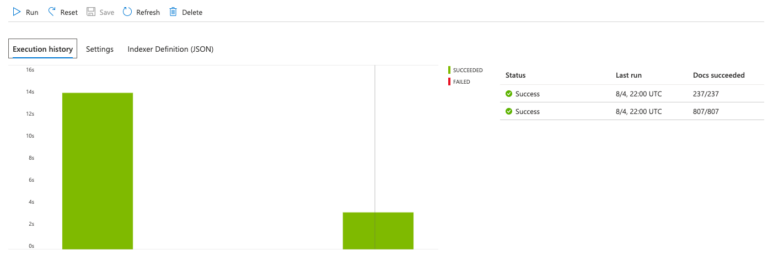
When you have created your indexer, you can schedule it to run periodically, or start the indexer manually. As with all other functions for the indexes or indexer, you can run the indexer in the Azure portal or with the REST API/SDK. For every indexer, you have an execution history in the Azure portal where you can see if the indexer was successful or has failed.

You can also see how many documents have been indexed in the last indexer runs. If you want to run your indexer in your own code, you just have to call the RunAsync method with the indexer name as a parameter. The method is available on the Indexers property on your SearchServiceClient instance.
await serviceClient.Indexers.RunAsync(indexerConfig.Name);
Important to know:
If you run your indexer, an exception is thrown based on the lowest pricing tier if you run the indexer more often than every 180 seconds.
Based on your data source, the indexer might not delete data that is deleted on your data source. If you are using Blob Storage, the indexer does not recognize if a blob is deleted. It only registers new/updated blobs. So it is necessary to delete the index entry separately or to rebuild the entire index. In my demo application, I entirely recreate the index (delete -> create), so it is not necessary to delete the items.
I run my code in an Azure Function as an easy-to-get-started-API directly running in Azure. This function combines the import of the data from the PokeApi into the BlobStorage, creating the index and creating the indexer to fill the index. You can find the complete Azure function in the GitHub Repository.
Upcoming
We have filled the index that we created in the last article with data. Now we want to search through this data. In the next and final article, I will show you how you can query the search service from your JavaScript frontend and how to include the search into your application.


