Article Series
Introduction to the Azure Cognitive Search Index
One of the essential parts of Azure Cognitive Search is the index. The index describes and contains all data that can be searched. Every data field you want to search gets its own field in the search index. Each field also has a data type and different properties – as if the field is sortable or facetable. The index reflects the data you want to search without the unnecessary fields you do not need and is precisely customized for your search case. This means that the data can be searched a lot faster than your non-optimized data.
Sample Data
To provide some data that I can index and search, I use the PokeApi. The PokeApi is a public HTTP API that offers information about different Pokemon characters (little comic monsters). Although the restful API exposes detailed metadata about each Pokemon, we will use only a subset within our Azure Cognitive Search example. If you are curious about the level of detail, open https://pokeapi.co/api/v2/pokemon/25 in your browser and review all information about Pikachu – the most famous Pokemon.
Bottom line, we will push the following metadata per Pokemon into the index of our Azure Cognitive Search instance:
id: Unique identifier of the Pokemonname: The name of the Pokemonweight: Weight of the Pokemonheight: Height of the Pokemontypes: Types associated with the Pokemonsprite: An image of the Pokemon
Creating an Index for Azure Cognitive Search
As a customer, you can choose from different options when it comes to the creation of a new Azure Cognitive Search index. As an example, we will look at creating an index using the Azure Portal and sneak in management capabilities of the Azure Cognitive Search SDK.
Azure Portal
Creating new indexes using the Azure Portal is a guided experience and also smooth if you are new to Azure Cognitive Search. However, there are two approaches that lead to a new index. The first one would be a manual approach, where the definition for all fields is customized using an editor, like the following:
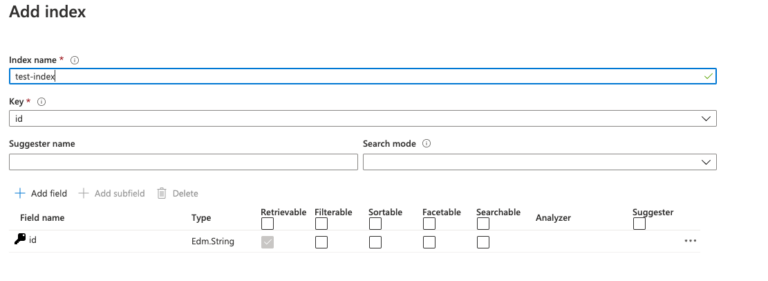
Every field in the index has a data type and different additional meta-information fields. These carry the information on whether the field is sortable, searchable, or groupable. So each field can have another purpose for the search request.
The other way to create an index from the Azure Portal is to import data and let the Azure Cognitive Search suggest your index fields. Therefore, it is necessary to have some data in some Azure storage service. This is necessary because the data will be imported with an indexer, and indexers can only access Azure Storage services.

This way, the indexer will also be created, and the index will be filled automatically from the Azure data source.
As you can see in the architectural diagram from the introduction article, the data from the PokeApi is imported into a BlobStorage so the indexer can grab it and fill the index.
To create the blob storage (required by the following parts of the series) where we can store the data from the PokeApi open a terminal and use the following commands:
					# login to Azure
az login

# list and select a proper Azure Subscription
az account list -o table
az account set --subscription <SUBSCRIPTION_ID>

## create storage account
az storage account create --name <STORAGENAME> \
    --resource-group <RESOURCE-GROUP> \
    --kind BlobStorage \
    --location westeurope \
    --access-tier Hot \
    --sku <PRICING-TIER-NAME>
After the storage was created, the Azure CLI will show information about the created Azure Blob Storage. For demonstration purposes, I only specified the most important arguments as part of az storage account create. You can ask Azure CLI for all available arguments using az storage account create –help.
To write data from the PokeApi into the BlobStorage, I used the .NET SDK. Therefore I iterate over the PokeApi https://pokeapi.co/api/v2/pokemon/ and add an index beginning with 1 and ending with a number lower than 899 (the number of the existing Pokemon in the API). So I get a lot of detailed information about Pokemon and can store them into the BlobStorage as a JSON file. With a BlobContainerClient, you have access to a BlobStorage and can access data that is stored in it. To create such a client, you have to pass the connection string of your blob storage and a container name where the data should be stored. After creating a client, you can store data by using the UploadBlobAsync method.
					// Create a list with all needed data urls
var pokemonDataUrls = Enumerable.Range(1, 899).Select(num => $"https://pokeapi.co/api/v2/pokemon/{num}");

// Create BlobContainerClient
var blobContainerClient = new BlobContainerClient(
		"<AzureBlogStorageConnectionString>"),
    "<IndexContainerName>");

// Iterate over the data urls and get the Pokemon details
pokemonDataUrls().ForEach(async dataUrl =>
{
	// Get data from the data url
	var response = await httpClient.GetAsync(dataUrl);

	// Write data into the blob storage
	await blobContainerClient.UploadBlobAsync(
			$"{Guid.NewGuid()}.json",
			await response.Content.ReadAsStreamAsync()
	);
}
If you don’t want to create an index within the Azure Portal, you can also use one of the programmatic ways for that (REST API, .NET SDK).
.NET SDK
For my demo project, I use the .NET SDK (version 10) to create my index. You can find the .NET SDK on NuGet. New features will be implemented only in version 11 of the API. There will also be a change of the package name: It will be released with the name Azure.Search.Documents instead of Microsoft.Azure.Search. Moreover, the API has changed with version 11, so it has breaking changes if you want to update from version 10 to 11.
I created a configuration file that I can use in .NET to create my index. Our manual configuration in JSON represents nearly the same index configuration as the index, which you can create with the Azure Portal wizard. The index configuration looks like the following:
					{
  "name": "pokeapi-index",
  "fields": [
    {
         "name": "id",
         "key": true,
         "type": "Edm.String",
         "facetable": false,
         "filterable": false,
         "retrievable": true,
         "searchable": false,
         "sortable": true,
         "fields": []
    },
    // ... Additonal fields here
  ],
  "suggesters": [
    {
      "name": "pokeapi-name-suggester",
      "searchMode": "analyzingInfixMatching",
      "sourceFields": ["name"]
    }
  ],
  "corsOptions": {
    "allowedOrigins": [
      "*"
    ],
    "maxAgeInSeconds": 300
  },
}
The name of the index has to be unique inside your search service. The most important part of the index configuration is the fields property. This array contains all fields that should be indexed and available for search:
name: Source name of the field in your data.type: Data type of the field. Available data types.facetable: Used if the field should be group-able.filterable: The field is searchable but no full-text search.retrievable: If a field is not retrievable, it will not be available for the search result.searchable: Define if the field should be available for full-text search. If set, the field value will be split for search.sortable: The field is available for sorting.fields: If the field is a complex data type (like JSON object), you can define nested fields here.key: At least one field has to be the propertykeyset totrueso it is defined as the primary key for your search.
There is also other information you can set in the index configuration. So-called suggesters are definitions for suggestion searches. It needs a unique name, source fields for the suggestion search, and a search mode. At the moment, only one search mode is available:
The strategy used to search for candidate phrases. The only mode currently supported is analyzingInfixMatching, which performs flexible matching of phrases at the beginning or in the middle of sentences.

In the index’s configuration, you can also define CORS options to prevent accessing the index from non-allowed URLs. For our demo, I allow all origins to access the search service, which, of course, is not a good practice for your production project.
With those configuration options in place, you have a lot of possibilities to configure your search request. You can search through fields that are not visible or search groups of your data. That makes the Azure search service very flexible to create your search request.
After we have configured our index, we are now able to create it. Therefore you need a SearchServiceClient. The client offers different methods to work with Azure Cognitive Search. You not only have access to the indexes. You also have access to the other components you need to work with your search service like indexers or Azure data sources. To create an index with the SearchServiceClient, two parameters are required:
SEARCH_SERVICE_NAME: Name of your search serviceSEARCH_API_KEY: An API key you have created to access your application’s search index.
You can find your API key in your created search service in the “Keys” setting in the Azure Portal. You also need one key later to query the index from your application.
					// Create SearchServiceClient object
var serviceClient = new SearchServiceClient("SEARCH_SERVICE_NAME",new SearchCredentials("SEARCH_API_KEY"));

// Check if index exists
if (await serviceClient.Indexes.ExistsAsync(indexConfig.Name)) {
   // Delete index
   await serviceClient.Indexes.DeleteAsync(indexConfig.Name);
}

// Create index
await serviceClient.Indexes.CreateAsync(indexConfig);
When you have created the SearchServiceClient you have access to an Indexes property. On this property, you can call several methods to work with indexes. Before we create our index, we check if the index exists. If an index exists with the same name as our index, we delete this index. After the old index is deleted, we create our new index. However, in order to call the Create method, we need an index configuration first.
Upcoming
In the next article of this series, you will see how to create and fill your index with data from an Azure storage service through an indexer.