Article Series
- Part 1: Integration Basics
- Part 2: Performance Optimization ⬅
- 🇩🇪 Part 3: Architekturlösung: Demo und Integrationsbeispiele
What to expect in part 2
A picture tells more than a thousand words. Take a look, this is what we are discussing in the next paragraphs. We see the effect of each optimization discussed in this post.
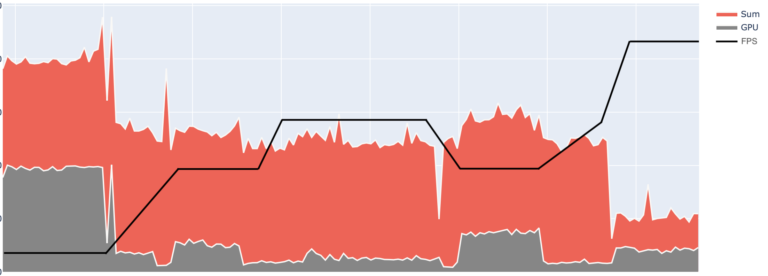
We will take a closer look at how we can use the graphics engine and Angular to increase the performance of our application. We will see easy ways to measure the efficiency and I will demonstrate different approaches to achieve our target. Note: I won’t focus on physics here, this is an entire multi blog post topic on its own.
Performance Demo, try different setups, with BabylonJS and Angular
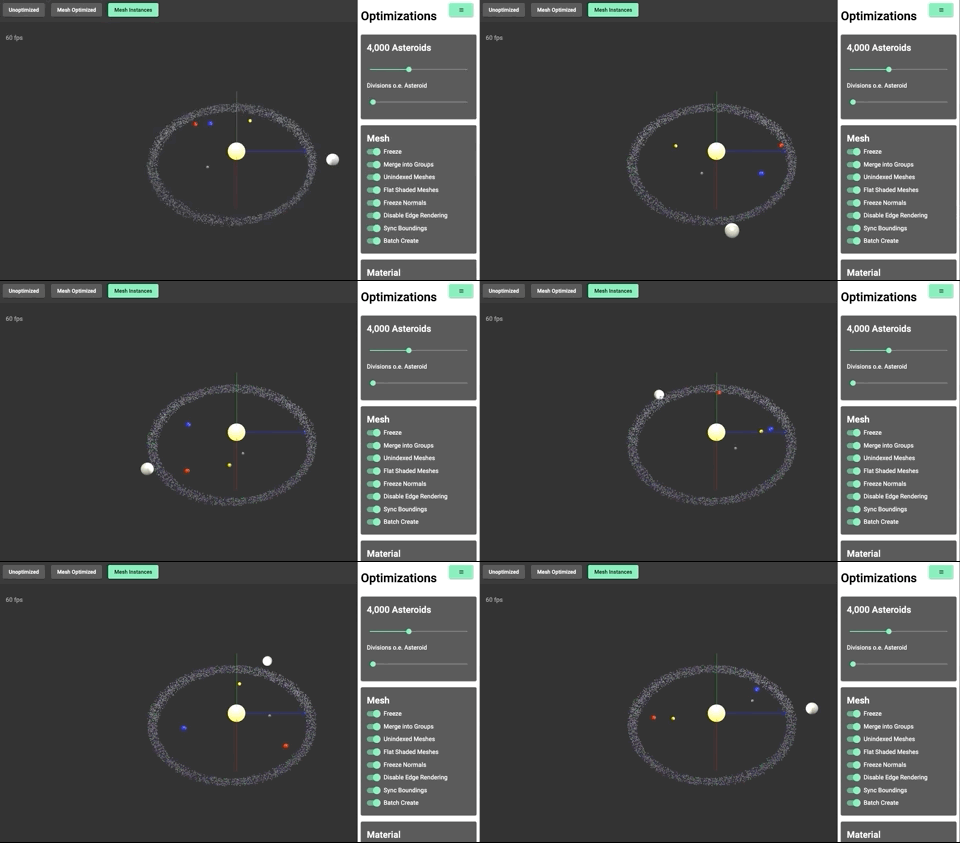
In this demo you can see different optimization states of an integrated Angular-BabylonJS app. Each of those states unoptimized (see part 1), optimized, and instances corresponds to a topic discussed in this article below. You can even toggle different optimizations while exploring the demo.
How to measure Performance of the Application
The most significant and best observable performance indicator are the FPS, or frames per second, that we reach.
An Engine works by swiftly rendering single images. That said, we want at least 60 images/frames per second rendered to create a good UX.
The second indicator for a good performance is a minimum load on the CPU and GPU.
Since we don’t use physics here, the most significant perfomance consumers are probably objects or meshes that we put in our scenes.
A primer on Meshes
But what is a Mesh? For the sake of simplicity, let us assume:
- Every object that we want to display is a mesh
- A mesh can be very complex and detailed, like a car, or it can be a simple box
- We can manipulate meshes by their form, color, and texture
- The more complex a mesh becomes, the more expensive it becomes to handle it
Keep Integration Side Effects minimal
Angular, as your framework of choice, got powerful tools included. One of these tools is zone.js or in a more specific case, the NgZone. Put simply, NgZone does monitor your application and watches for changes. With each change, it checks what part of your project might be affected by it. It is the nature of an interactive 3D / 2D-Engine to fire many changes. To be clear, it changes every frame (!), that makes at best (or worse) 60 changes a second or one change every 16 ms! In the worst case (e.g. ChangeDetectionStrategy.Default) the complete tree is traversed in every cycle. Summed up, this are a lot of unnecessary checks. We can reduce the change events drastically by moving the render loop outside of the NgZone and therefore reducing the unnecessary calculations.
					this.ngZone.runOutsideAngular(() => {
    this.engine.runRenderLoop(() => this.scene.render());
});
Run the engine outside of ngZone, move it out of Angular’s focus Further information on Angular change detection cycle can be found in this presentation by Christian Liebel.
Angular and BabylonJS Performance Pitfalls
We have to be careful to write performant source code, handling a high number of complex objects with 60 FPS is a difficult task. Calculations on the CPU have the most significant impact on our FPS. Therefore we try to utilize the Engine and a smart application architecture to move computation-intensive tasks to the GPU.In the next paragraphs, we see how to implement this – also including a list of common performance pitfalls for Angular and BabylonJS. I also demonstrate you how to avoid them and where to find further information on the topic.
Minimize the CPU Load
As we all know, the browser provides us with a single thread to work, but we can utilize the GPU. It provides us with many threads and the marvelous optimizations in all its cores and shaders. In comparison to the GPU, calculations in this context on the CPU are extremely costly. Therefore, we try to minimize the amount of operations the CPU has to do. One way is to turn off functionality and minimize side effects, the other way is to move everything possible to the GPU. A well known way to utilize the GPU in browsers, is the CSS transform property, Likewise an engine provides us with similar possibilities to utilize the GPU.
Let the Engine utilize the GPU
We don’t have to do anything magical to move our calculations to the GPU. We just have to use the tools the engine provides us. Take a look at this line:
const sphere = MeshBuilder.CreateSphere('someNiceName', {segments: 32, diameter: 1}, scene);
Creating a scene object
The sphere is created on the CPU, nearly everything that happens afterwards (in the Scene) is handled by the GPU, as long as we use the engine to transform our objects. We just provide it with all the information needed. For example, let us take a look at an animation:
					const FPS = 60;
// parameters: name, object property, length, speed, value type, animation loop type
const rotationAnim = new Animation('rotate', 'rotation.y', FPS, Animation.ANIMATIONTYPE_FLOAT, Animation.ANIMATIONLOOPMODE_CYCLE);

// ...

mesh.animations = [];
// add the animation "plan" to the mesh
mesh.animations.push(this.rotationAnim);

// parameters: object, start, stop, loop, speed
scene.beginAnimation(mesh,  0, FPS, true, 0.25)
Adding an animation to a scene object
We create a animation plan that is stored in the Scene and executed by the Engine. We want to rotate our object around its y axis, with the animation starting at the beginning till the end.
The calculations to display this object at the correct position at a given time are done on the GPU. This is an easy task for the GPU, and can drastically ease the load on the CPU.
Okay … what else can the engine do for us, what tools and tweaks are there to make our life easier?
Tools from BabylonJS or other engines
It is possible to tweak every aspect of a scene and even of an engine, but it is not always wise to change standard configurations. In some cases, it is better to change the code structure or to rethink the approach entirely. That said, **Modern 3D engines offer a good performance out of the box **and BabylonJS provides an excellent overview of well-documented behavior and use cases.

You can try those tweaks in my demo. Observe the increasing or dropping FPS, just by flicking a switch as displayed in the image above. The scene updates on change, the effect can be seen by an increased or decreased FPS as well as on your CPU load.
Most of these tweaks are just a flag that is set, or a simple function call. Basically it all reduces to a discussion what functionality you need and what can be disabled. Here are just two examples of the various possibilities provided by BabylonJS.
					// freezing the materials to reduce unwanted calculations
scene.freezeMaterials();
Freezing materials globally to disable update checks on them
					const sphere = MeshBuilder.CreateSphere('someNiceName', {segments: 32, diameter: 1}, scene);
// disabling bounding info sync if no collisions must be calculated
sphere.doNotSyncBoundingInfo = true;
Disabling a redundant functionality on an object
In the following paragraphs, I want to focus on how to improve the performance by taking a closer look at mesh usage.
How and when to use different mesh “types”
There are at least three different Mesh types, normals meshes, clones and instances. Meshes can be very expensive if they are complicated or large in number. We can turn off unused functionality like demonstrated above, but we can also change the object type from a full Mesh to a clone or instance of another mesh.
The first approach, mesh cloning is done this way:
					const baseSphere = this.getBaseSphere();

this.loading.message$.next('Adding Asteroids ...');
for (let i = 0; i < amount; i++) {
    const asteroid = baseSphere.clone('instance' + i);
    this.solarSystem.makeAsteroid(asteroid, i);
    this.asteroids.push(asteroid);
    asteroid.isVisible = true;
}
Creating a base sphere and creating clones of it
Reducing some of the computational load by cloning an existing mesh instead of creating a new one, can be a handy tool if the Meshes differ only a bit. The shape (Box, Sphere, etc.) must be the same, but they differ in color or texture; that way, the meshes can share some of the inner structure to ease the calculation load.

As you can see in the image above, this simple tweak reduced total CPU / GPU load by 50%, while increasing the FPS by ~10 per second. The first spike you see is the scene switch, creating the scene on the CPU. The second spike is the GPU loading and parsing everything it get provided.
					const baseSphere = this.getBaseSphere();

this.loading.message$.next('Adding Asteroids ...');
for (let i = 0; i < amount; i++) {
    const asteroid = baseSphere.createInstance('instance' + i);
    this.solarSystem.makeAsteroid(asteroid, i);
    this.asteroids.push(asteroid);
    asteroid.isVisible = true;
}
Create a base mesh and then create instances of it.
If you have to reduce the load even further, we can let the objects share everything except their scale, rotation, and position. By utilizing instances of a mesh, we can make use of the full GPU power. This way, the mesh has to be created only once and is mirrored or referenced at different positions.
When using instances, it is crucial to keep in mind that manipulating other aspects than scale, position, and rotation is more complicated. None the less it is still possible to change instance attributes. With custom buffers, BabylonJS provides us with a convient way to do so.
instance.instancedBuffers.color = new BABYLON.Color4(Math.random(), Math.random(), Math.random(), 1);
Example taken from: Instance documention, section Custom Buffers
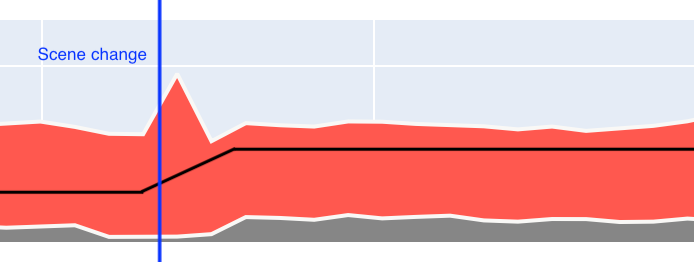
Again, switching the usage from clones to instances increases the FPS by ~15 images per second. While not reducing the load, we see that the second peak is missing. This time the GPU has to parse only a few objects and can instantiate them afterwards.
Improving our Application Code
Improving your application code for performance reasons is highly depending on the application use case in place. You can find one example for it by looking at the demo code: Instead of displaying a lot of single meshes, I combined thousands into a handful of meshes.
					const groupSize = 300;
const merged = [];
for (let i = 0; i < amount; i += groupSize) {
    const upper = i + groupSize > this.objects.length
        ? this.objects.length
        : i + groupSize;
    const mergedMesh = Mesh.MergeMeshes(this.objects.slice(i, upper) as Mesh[], true);
    if (mergedMesh) {
        mergedMesh.parent = this.engineSerivce.rootObject;
        this.engineService.addRandomMaterial(mergedMesh);
        merged.push(mergedMesh);
    }
}
Merge meshes into groups of 300

In this image you see what all tweaks provided by BabylonJS can do for you performance-wise. The FPS increase from ~30 t0 60 FPS at the end, and the huge drop in CPU **and **GPU load is caused by grouping meshes. The grouping is done with the code above.
That is just one example where we can make huge differences on the performance side of our application.
Rules of Thumb
- Use Meshes, Mesh-Clones, Mesh-Instances depending on the use-case
- Performance: Instance > Clone > Mesh
- Group/Merge meshes if possible
- Keep your good Ng-Architecture
- Keep Calculations on the GPU
Conclusion
- Modern 3D engines offer a good performance out of the box
- Disable redundant functionality
- Think about the best solution for your problem, the correct path isn’t always a straight line
- Encapsulated systems should stay that way (aka ngZone)
- Find the full source code on GitHub
- View and try yourself, here is the demo on Stackblitz (caution: Stackblitz might got problems with Chrome’s new cookie policy)
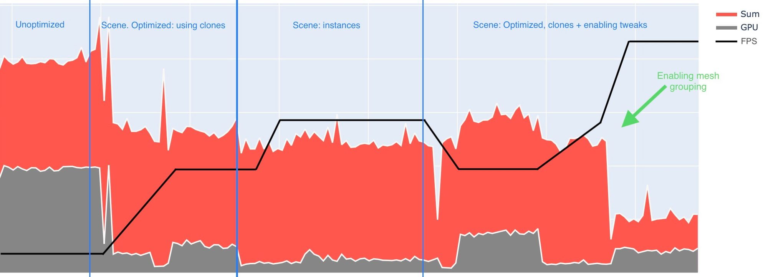
We started with the result from post 1 of this mini series and significantly increased the performance of our business application. Starting with 100 – 200% cpu load and ~13 FPS I demonstrated how you can decrease the load by 80% while increasing the FPS by ~450% to its maximum of 60 FPS. There is no magic involved, each little tweak does its part and a clever code optimization does the rest.
Thank you for staying with me! I hope my tips in both blog posts might help you to improve your application performance-wise.
Cheers to the Community:
I like the community and devs behind BabylonJS. The Documentation is great, and the people are nice and very helpful. A special thanks to the users here, this is what I used to create the rotational camera behavior: Source, Playground


