
This is the second article of the mini-series “Condensed Angular experiences”. We are exploring concepts in Angular that seem simple but are very powerful and critical for the application architecture.
- Understanding Angular’s Async pipe
- What is the hype with Angular’s OnPush change detection?
- Interlude: About smart and representational components
- Smart and presentational components with Angular
- Different approaches to complex and advanced forms in Angular (coming soon)
Version information: The data and code in this article are based on Angular: 10+
What is Change Detection?
Angular, or any other SPA framework, must have a way to synchronize its internal model state to the view. Imagine displaying some user data – it does not matter what kind of data exactly. At first, we perform a network request to fetch such data, store it in some variable or state, and display it somehow to the user. The last part is where the change detection kicks in. Once fetched, data is often not available when rendering the page for the first time, or it changes over time. Since HTML is a static markup language, we need Angular to replace or display the values we want to change. Angular’s change detection keeps the HTML view and our internal state in sync. It registers when an object or value is bound in the template and observes its changes. Then on different occasions, it compares the bound value to the displayed value and updates it if necessary.
Angular catches some events by monkey patching the browser APIs with the zone.js framework, effectively creating the NgZone. Other changes are registered internally by using @Inputs(), directives, binding to DOM events, and @Outputs(). You can configure the observed events, set the corresponding flags in a zone-flags.js file, and import it into your polyfills.ts before importing zone.js itself.
					(window as any).__Zone_disable_requestAnimationFrame = true; // disable patch requestAnimationFrame
(window as any).__Zone_disable_on_property = true; // disable patch onProperty such as onclick
(window as any).__zone_symbol__UNPATCHED_EVENTS = ['scroll', 'mousemove']; // disable patch specified eventNames
					import './zone-flags';
import 'zone.js/dist/zone';
Keep in mind that you only turn off features you are not using in your application. For example, requestAnimationFrame() is used by some charting libraries.
Now, let’s take a look at how the changes are detected.
How Does Angular’s Default Change Detection Work?
Angular checks all components for changes on different occasions, even if some components did not change at all. These occasions include Network requests, mouse clicks, mouse scrolls, mouse moves, keyboard events, component events, timeouts, intervals, and more. You can also mark a component as changed manually by calling the markForCheck() function on the ChangeDetectorRef to check the next cycle. In general, all components are checked. One after another, once per cycle. It does not matter how often a component is marked for a check between two cycles. It is only checked once. The Angular team spent a lot of effort on highly optimizing the change check internally.
Many events can fire rapidly, resulting in the change detection (CD) being run at some point for all components in view.
But how can we define the performance of our application in this context? Let’s try this simplified approach: The measurement indicator results from times we have to check for a change and the time it takes to perform the check.
change detection performance = (time to check a change) * (number of changes) or short P = N * C
As mentioned above, the time to check a change is optimized by Angular internally. It is on us to optimize the number of changes that are being checked.
Following, you find the Angular source code that is used to determine if an update is necessary. It accesses the bound value directly through a map and index, no need to iterate through all bindings. Afterward, the object’s identity is directly compared, the view is updated if necessary, and the method returns if a view update must be made or not while updating the binding with the new value.
					export function bindingUpdated(lView: LView, bindingIndex: number, value: any): boolean {
  // ...
    const oldValue = lView[bindingIndex];

    if (Object.is(oldValue, value)) {
        return false;
    } else {
        // run some additional checks and dev mode logic
    }

    lView[bindingIndex] = value;
    return true;
}
By default, Angular walks the application’s component tree, an array, from start to end.
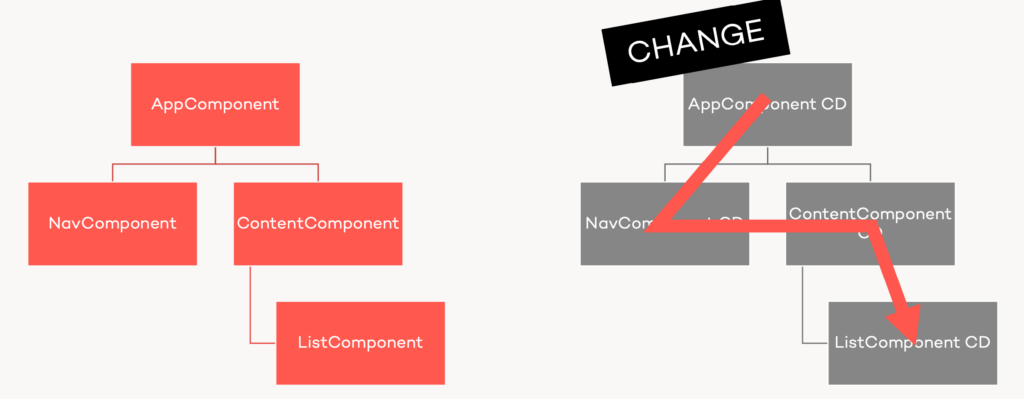
On its way, it searches for children and values that have to be compared and checked (e.g., @Inputs(), @Outputs(), and other template-bound references).
As seen in the code above, the check itself is straightforward. It compares the previous value with the current (or the current with the next one) and updates the component accordingly. Since we can pass mutable objects, the change detection has to check every binding in every template every time – Angular cannot know which of the values is bound at some point. Allthough, because we, as developers, know when values change and what value in an object changes, it becomes possible to tackle that last issue – and this is where the OnPush change detection strategy kicks in.
Let’s take a closer look at how to call the change detection. Bear with me just before we finally explore the effect of the OnPush change detection strategy. We start by detaching a subtree from Angular change detection.
Detaching from Change Detection
It can be a good idea to detach a subtree from the change detection in some rare cases. Angular’s ChangeDetectorRef provides the method detach() for that.
					export class SomeComponent implements OnInit {
    constructor(private readonly cdRef: ChangeDetectorRef) {}

    ngOnInit(): void {
        this.cdRef.detach()
    }
}
That way, a complete subtree is ignored, disregarding any change detection strategy or marked for check state. We can still run the change detection on such a detached tree if we want by using the detectChanges() method.
					export class SomeComponent implements OnInit {
    constructor(private readonly cdRef: ChangeDetectorRef) {}

    someFunction(): void {
      // react to some event
      // run change detection on this subtree
      this.cdRef.detectChanges()
    }
}
The Difference Between markForCheck() and detectChanges()
As explained above, the change detection walks the DOM until the marked components are found.
In some cases, we pursue different behavior. It can become necessary to check all components below a specific host. In contrast to markForCheck(), the method detectChanges() on the ChangeDetectorRef also works if a subtree is not included in the change detection if it is detached from change detection.
It checks all the DOM from that component downwards. It does not wait for the next cycle but instead checks immediately – that’s also why it works in a detached state.
The Effect of OnPush
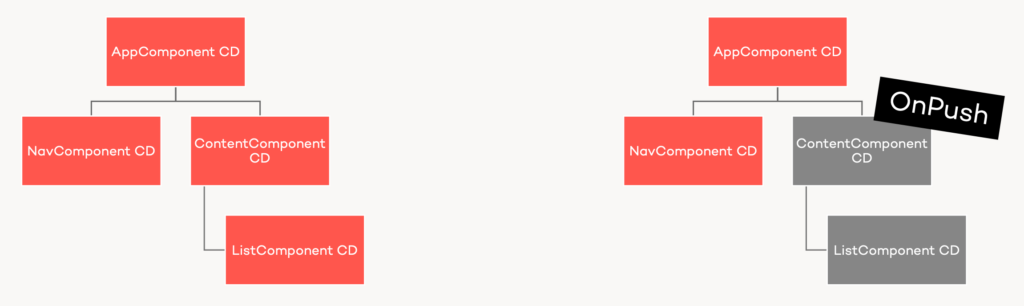
The OnPush strategy changes Angular’s change detection behavior in a similar way as detaching a component does. The change detection doesn’t run automatically for every component anymore. Angular instead listens for specific changes and only runs the change detection on a subtree for that component. It runs for the subtree if an @Input() changes – or a component is marked for a check – until that component is reached. Remember, the comparison for a @Input() change is done by comparing identities (Object.is()).
If we pass a mutable object and only change the values of that object and not the object itself, the view would become out of sync with the model.
The strategy can be applied to one or more components in the tree at any place. The detection tree is optimized as soon as a component uses that strategy. The default change detection is only run to that point where it meets an OnPush component.
					//Contributions.razor.cs

private GridItemsProvider<Contribution>? _contributionsProvider;
private PaginationState pagination = new PaginationState { ItemsPerPage = 100 };

protected override async Task OnInitializedAsync()
{
    _contributionsProvider = async req =>
    {
        var count = await _contributionService.GetContributionCountAsync(req.CancellationToken);
        var response = await _contributionService.GetContributionsAsync(req.StartIndex, req.Count ?? 100, req.CancellationToken);
        return GridItemsProviderResult.From(
            items: response ?? new(),
            totalItemCount: count);
    };
    pagination.TotalItemCountChanged += (sender, eventArgs) => StateHasChanged();

    await base.OnInitializedAsync();
}

private async Task GoToPageAsync(int pageIndex) =>
    await pagination.SetCurrentPageIndexAsync(pageIndex);

private string? PageButtonClass(int pageIndex)
    => pagination.CurrentPageIndex == pageIndex ? "current" : null;

private string? AriaCurrentValue(int pageIndex)
    => pagination.CurrentPageIndex == pageIndex ? "page" : null;
How does Angular know where to traverse the tree and where to stop?
Angular must be notified about changes when the OnPush strategy is used. Some notifications are built into the system – that is one reason for the immutable objects. By default, the @Input() decorator and the async pipe mark the component to be checked if the object changes.
I’ve prepared a simple demo where you can explore the effect of the OnPush change detection yourself.
Explaining the Demo Application
You can explore the difference between the default change detection strategy and the OnPush strategy in the demo below. The components are structured to be most easily modified if you want to change something or apply your use case. The demo allows you to generate differently nested components with different @Input(), HTML input elements, and buttons to explore how the change detection works and when a performance impact might be expected with which strategy.
Further, you can highlight all components affected by the change detection. However, enabling those highlights impacts the performance – that might be a clue or even more realistic compared to a real application.
When to Use OnPush
As demonstrated above, the OnPush change detection strategy enables Angular to reduce the change detection cycle time dramatically. It does so by only checking the necessary application parts. The test also shows a tipping point for every application or part of an application where it makes sense or is necessary to use the OnPush change detection. That tipping point is application and device-dependent, every device got a different threshold where it begins to stutter, and the frame rate drops below 60 FPS.
You can find the tipping point for your application by modifying the bootstrapping and run ng.profiler.timeChangeDetection({ record: true }). The lower the msPerTick result is, the better is the result.
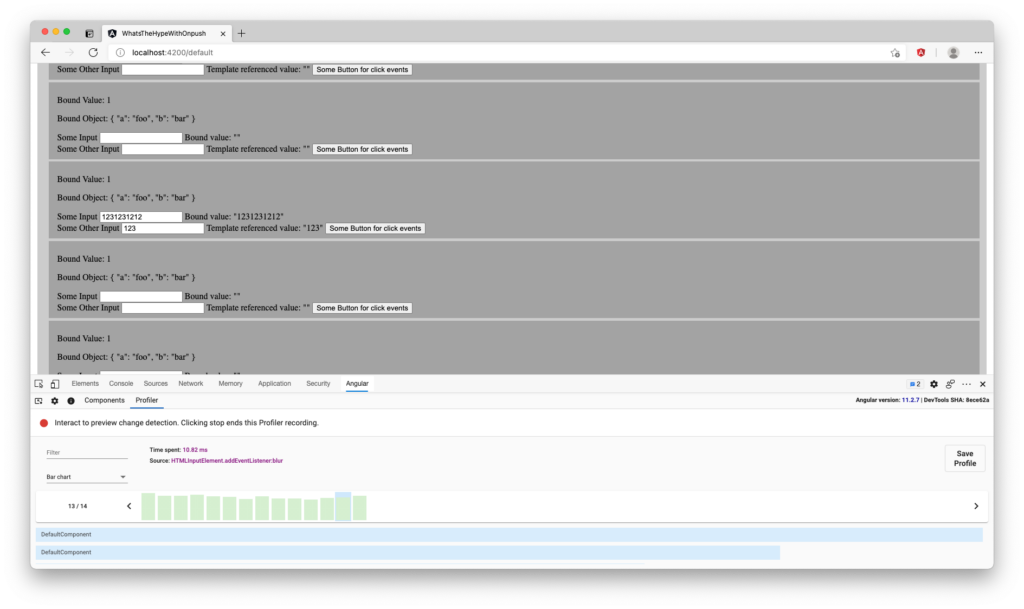
However, there is also a new alternative to this. The Angular team introduced in this Blog the Angular DevTools extension for Chrome. With it, we can profile our application without modifying it. Furthermore, we can inspect the change detection cycles while profiling our application.
You should consider using the OnPush change detection strategy if you run into FPS or other performance problems in your application.
There is also another benefit: Due to the reduced time and computations it takes to check the app, the OnPush strategy can also reduce your application’s battery consumption, even if the application runs smoothly.
You can see a difference as soon as you use the OnPush strategy. Every component not checked reduces the duration of the CD cycle.
On my machine, a 2019 MBP 15”, it took 5500 Components without animation to make the CD cycle take more than 16ms. That means the application can’t reach its ideal performance of 60 FPS anymore, and we must use OnPush to reduce the CD cycle time. Keep in mind that my test application does nothing and is very simple – any other computation, animation, interaction, or complex design could increase the time it takes to run a change detection. You can see this effect by enabling the change detection highlight.
Conclusion
Understanding the change detection and OnPush in Angular is crucial to writing fast applications on every platform and device. We, as developers, tend to think it runs fast on our machine, so it runs fast on every device – in reality, that rarely is the case. Every device and every application is different. We are not forced to use OnPush in every app – and it is not a good idea to do so blindly. However, it is good to know exactly when it makes sense and how to use it properly. In any case, some apps require us to do so. Some performance issues are only solvable by using the OnPush change detection strategy.
Performance-wise and from an architectural point of view, it can make sense to remove conflicting parts of Angular. Creating a micro frontend with multiple Angular apps is challenging. Only one NgZone can be available at a time. One solution to this is to remove the NgZone from an Angular app. If everything is properly using OnPush – and we are handling edge cases ourselves by calling the markForCheck() and detectChanges() methods if needed – we could, in theory, remove the NgZone altogether. There would be no more events that must be caught by the NgZone and, therefore, no more requirement to use it. Removing the NgZone can also be a part of tuning your application’s performance. There are multiple ways and techniques to do so.
You can find more on performance tweaking angular apps here. And subscribe to our monthly dev newsletter and make sure not to miss other articles, talks, and videos by our experts.