
Setting the Scene
In the previous article, Visual Testing Of Angular Components With Storybook & Chromatic, I described how to use visual tests to test Angular components with Storybook and Chromatic by creating image snapshots. Chromatic tests visual regression on components that are described in Storybook’s stories.
This is both an advantage and a disadvantage. On the one hand, you can write stories with components that use mocked dependencies to develop in isolation and to use visual tests based on those components. On the other hand, you can use all required dependencies (i.e. no isolation) like in the real Angular application. As a result, these stories’ configuration becomes more complex, and some kind of micro applications arise.
As you can see, testing all application views with Storybook and Chromatic may not be trivial. That is why I would only implement and visually test the core components as well as simple views, the integration of multiple components, in Storybook. But if other complex views are to be covered by a test with less effort for mocking, then we need to test views from one end (the UI) to another end (the database) in our real Angular application, end-to-end.
End-to-End Testing
With end-to-end (e2e) testing, you try to replicate real user scenarios/workflows and interactions. These e2e tests require a running Angular application and a test runner. The test runner visits a specific route of the application and executes functional and visual regression tests.
Functional Testing
The functional e2e tests test a whole workflow, e.g.:
- 🚀 Start application
- 👤 Login
- 🧭 Navigation to a specific application route
- 📝 Work with forms and controls
- 🧪 Validate the result
- 🧭 Navigation to a specific application route
- 📝 Work with forms and controls
- 🧪 Validate the result
Visual Regression Testing
Visual e2e tests create a snapshot (DOM or image) after a specific workflow and compare them against the baseline, which is an older snapshot.

The small green area in the above image shows the difference between the baseline and the current snapshot.
Protractor or Cypress
There are several frameworks with which you can do e2e testing. The Angular CLI generates new applications per default with the e2e framework Protractor, which was originally developed for AngularJS.
However, if you look at the Angular Roadmap, you can see that the e2e test tool strategy is currently being updated:
To ensure we provide a future-proof e2e testing strategy, we want to evaluate the state of Protractor, community innovations, e2e best practices, and explore novel opportunities.
Cypress in Action
Cypress is a frontend tool to set up, write, run, and debug tests. It consists of a test runner and a dashboard service, and it supports e2e, integration, and unit tests.
The current browser support includes Chrome, MS Edge, Firefox, and Electron.
Demo Project
Before we start with the setup and how to write tests, let me introduce the demo application. It contains two routes, the home and the form route. I will demonstrate how to test the user workflow between both routes with Cypress.
The source code for the sample used in this article is available in this GitHub repo.
The user workflow could look like this:
- Visit home route
- Click on the add button
- Check the URL. It should be /form
- Focus on the form control
- Enter title: 🚀 test
- Click on the floating action button (FAB) to save and navigate back to the home route
- Check the URL. It should be /home
- Check the items list if the new item with the title 🚀 test is available
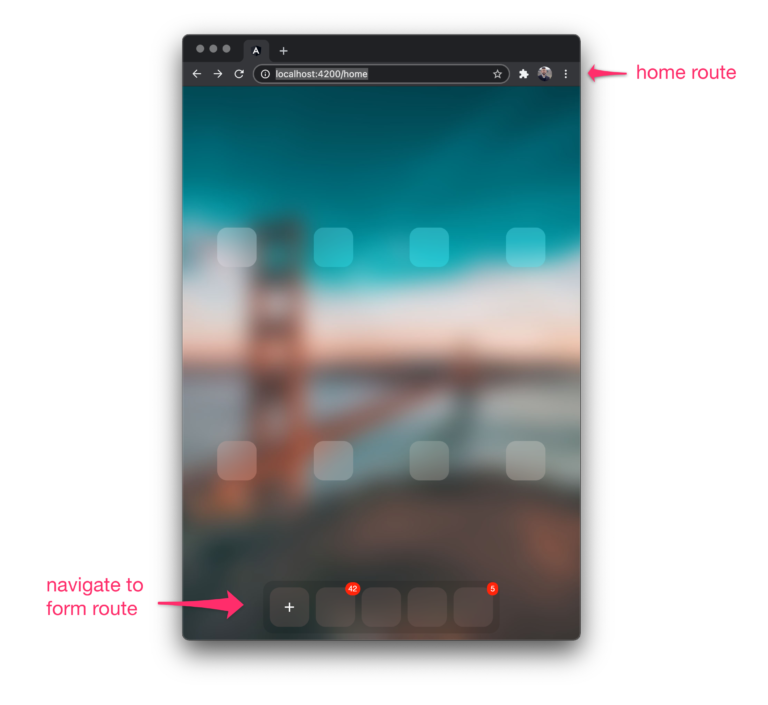
The default route is the home route with the HomeComponent:
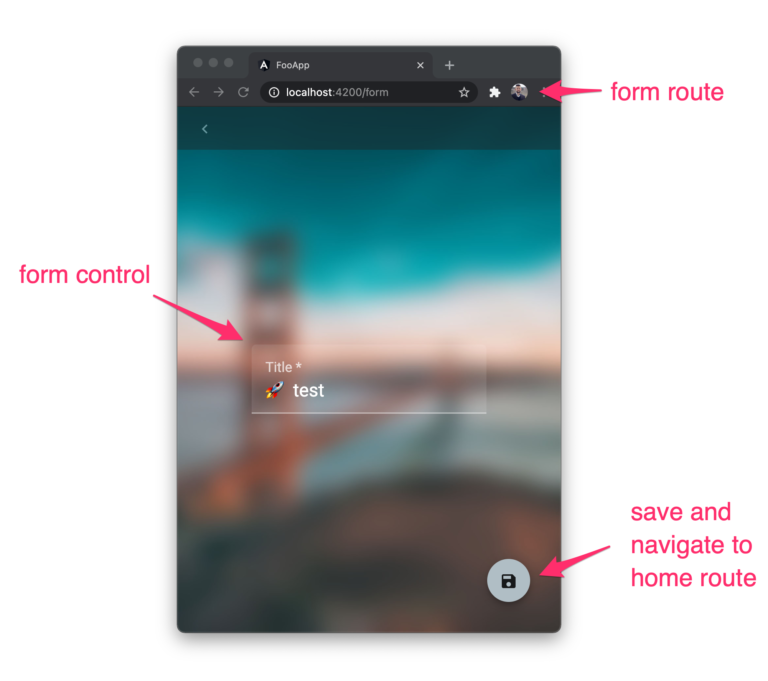
The form route:
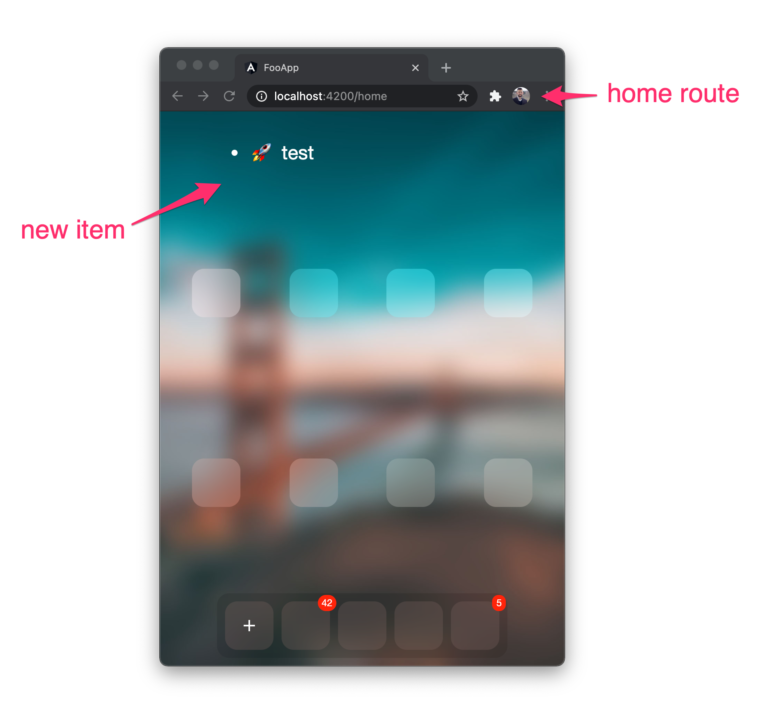
The home route with a new item:
Setup
The Cypress setup in an Angular workspace is easy to do because of the available Cypress schematic library. The @briebug/cypress-schematic project adds Cypress to your workspace and configures the angular.json file.
I created some pull requests during my recent Hacktoberfest contributions to enable workspace (multiple projects) support in the @briebug/cypress-schematic project. Here you can find my merged pull requests.
Run this command to add Cypress to your Angular workspace:
npx ng add @briebug/cypress-schematic
The schematic library generates a spec.ts file. This is the first e2e test:

Run
Now we can start the runner (an Electron application) for our foo-app demo application:
npx ng run foo-app:cypress-open
You should now see the test runner with the default spec.ts test:
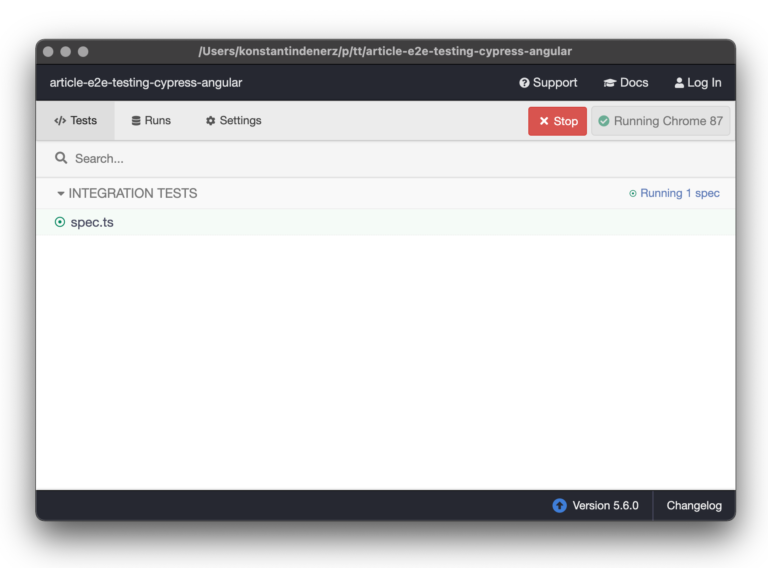
The runner starts a browser and visits the application URL if you click on the spec. The generated test failed because it expected the Replace me with something relevant string on the home screen. Let’s take a look at the Cypress API before we rewrite the test with something more meaningful.
API
The spec.ts uses the global cy variable that contains the Cypress API. I will use these commands to navigate, interact, and validate the application: Some commands like visit, get, or contains wait a while and try again if the execution failed because e.g., DOM elements are not available yet.
Implement the User Workflow to Test
To resemble the user’s interactions with our app, I changed the generated spec.ts to the following:

- Line #3 changes the viewport before each test
- #8 visits the home screen and throws an error if the path is not available
- #9 query the first element with the given attribute selector and click it
- #10, #13 assert the URL
- #11 enter the title in the input field
- #14 validate the home screen
The test result looks like this:
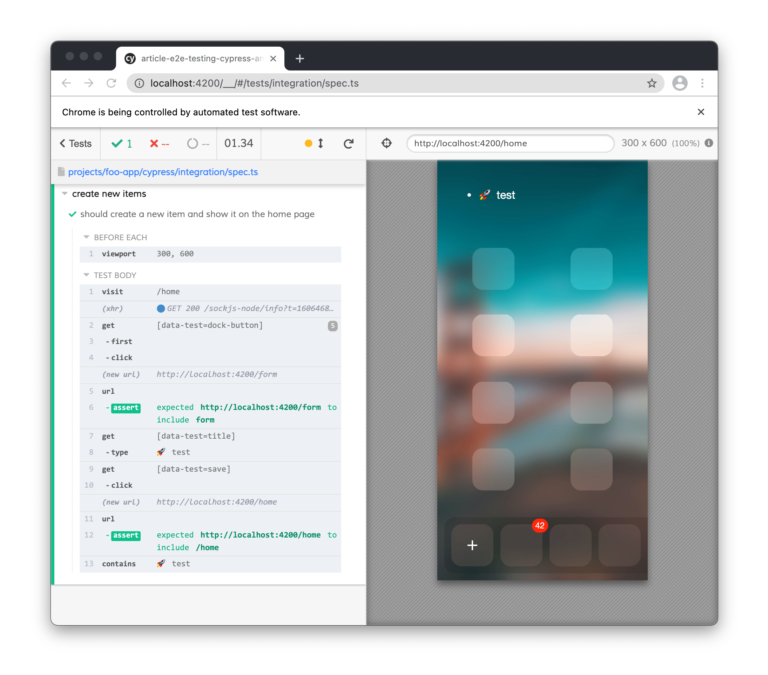
You can see the command log on the left. Click on the log item to get more log information on the console or to see the DOM snapshot associated with the command. Feel free to read more about the test runner on the Cypress page.
Continuous Integration
If you want to add Cypress into your CI, use this command to run the test runner in your continuous integration environment:
npx ng run foo-app:cypress-run
The test runner can create a screenshot on failure or record a video of the test run for debugging purposes. Both features are interesting in continuous integration environments because you obviously don’t see the visual progress during the test run on the remote server.
Visual Testing
Sometimes you want to check the visual state of your component in your workflows. For example, whether a component is visible or not. Further visual tests could relate e.g., to size and color.
Of course, you could extend the existing functional end-to-end test and check your DOM elements’ visual state. This would result in complex tests, but there is a better way. Instead, you could create some image snapshots of your components or application and compare them against the baseline snapshots.
Setup
There is a snapshot plugin for Cypress that we can install with this command:
npm i --save-dev cypress-image-snapshot @types/cypress-image-snapshot
Register and configure the image snapshot plugin in cypress/plugins/index.js:
					const cypressTypeScriptPreprocessor = require("./cy-ts-preprocessor");
const {
  addMatchImageSnapshotPlugin,
} = require('cypress-image-snapshot/plugin');

module.exports = (on, config) => {
  on("file:preprocessor", cypressTypeScriptPreprocessor);
  addMatchImageSnapshotPlugin(on, config); // configure plugin
};
Register the command that should be available on the global cy variable in the cypress/support/index.ts:
					import { addMatchImageSnapshotCommand } from 'cypress-image-snapshot/command';

addMatchImageSnapshotCommand();
Create and Match Image Snapshots
Now you can update the spec with the following statement:
					// cypress/integration/spec.ts

describe('create new items', () => {

  beforeEach(() => {
    cy.viewport(300, 600);
  });

  it('should create a new item and show it on the home page', () => {
    const expectedTitle = '🚀 test';
    cy.visit('/home');
    // ...more commands...
    cy.matchImageSnapshot(); // create image snapshot and compare with baseline
  });
});
After the first run, the snapshots are generated in the cypress/snapshots folder. This is the baseline now.
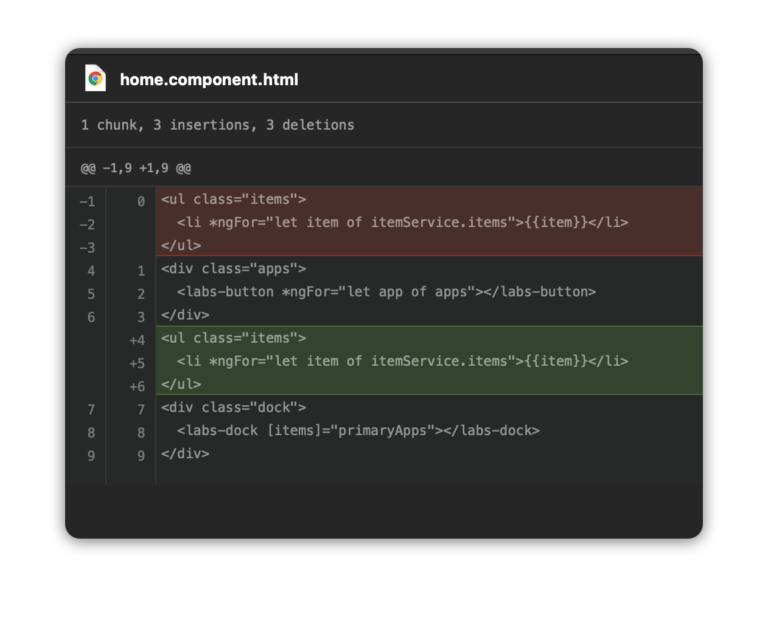
In the next step, I will change the template of the home component to demonstrate a visual change. This change could be a part of a new feature you have to implement in your project.
The CI build, that depends on the feature branch, could run Cypress again and would retrieve this error:
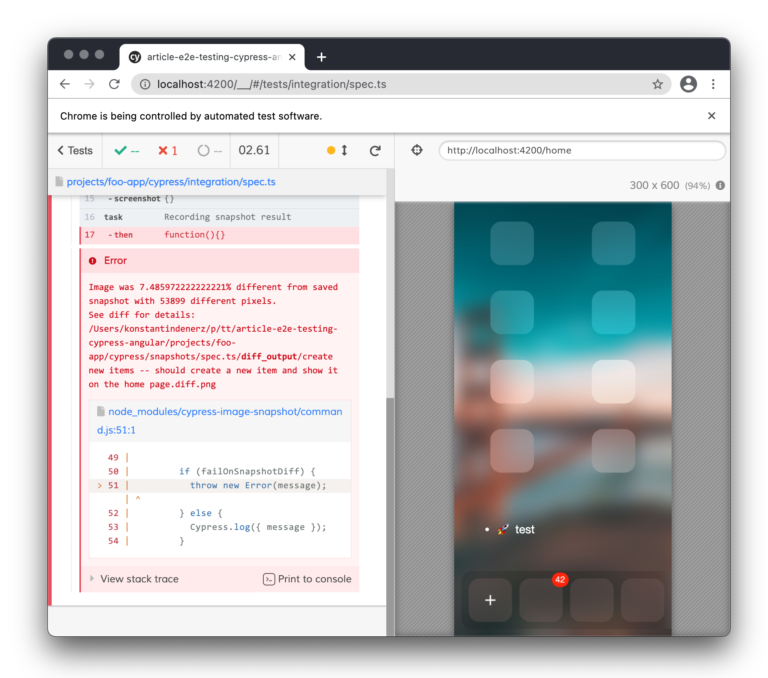
The test runner generates the diff images in the cypress/snapshots/{spec file name}/diff_output folder. Take a look at my change. The part in the middle shows the difference. The red pixels in the image below visualize changes.
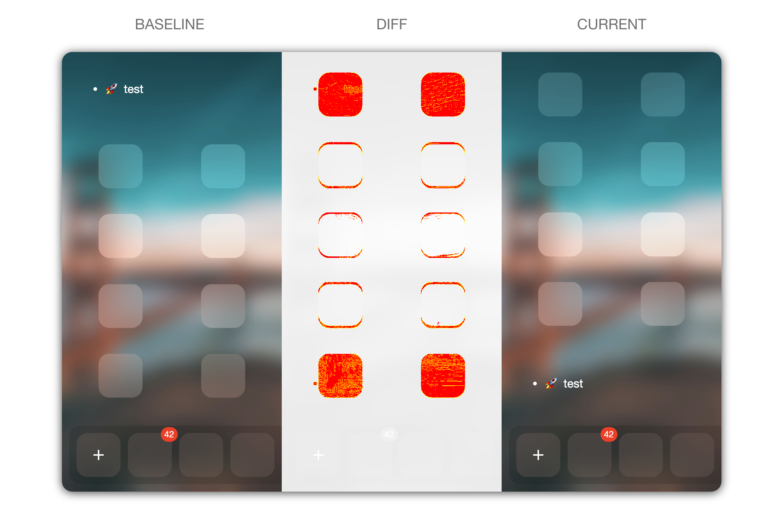
Now you can decide whether it is a bug or a feature. You can run the test runner with an additional --env updateSnapshots=true parameter to update snapshots if the visual change is wanted.
Some Advice
To get started with Cypress, I have two pieces of advice for you:
- Write tests only for your application. Do not test external applications or systems, like an identity provider, because they can (unnecessarily) change and break your tests.
- Do not use complex DOM selectors to find elements. Use data-* attributes to specify identifiers. Use this
[data-test=title]instead of this selector.mat-form-field > .mat-form-field-wrapper > .mat-form-field-flex > .mat-form-field-infix > #mat-input-0
More best practices are available on the Cypress documentation page.
Summary
In this article you have seen, how to enrich your test suite with functional and visual end-to-end tests for your Angular applications. These tests cover user workflows and help to find visual issues at an early stage. Cypress is a viable and well-known tool for building end-to-end tests. The tests’ execution time is longer than e.g. for unit tests, so it is advisable to run them on a build server. Feel free to contact me if you want to know more about e2e testing with Cypress. For example, to test your application with an external identity provider.