Article series
- Introduction
- Charles Proxy Setup & Configuration
- Charles Proxy in Action
- Fiddler Setup & Configuration
- Fiddler in Action
For Windows, you have to download the setup file and follow the instructions.
For macOS and Linux, you need to have the Mono framework installed on your machine. Make sure to install Mono version 5.18 as Fiddler cannot decrypt SSL connections on newer versions. Telerik is currently re-implementing Fiddler’s features in a new project called Fiddler Everywhere, which is not yet rich enough of features as we would need it.
To execute Fiddler on macOS, you have to follow two steps:
- Accept the xcodebuild license by executing on the terminal:
sudo xcodebuild -license - Start Fiddler with the 32-bit command:
mono --arch=32 Fiddler.exe
The first run can take a couple of minutes. Once Fiddler starts, you will be prompted for your password so that Fiddler automatically sets up your system proxy.
On Linux, you have to set up your system proxy settings manually. You can either
- set your
$http_proxyand$https_proxyenvironment variables tolocalhost:8888or - install a browser add-on for easy toggling between proxy on/of just for browser traffic.
SSL Decryption
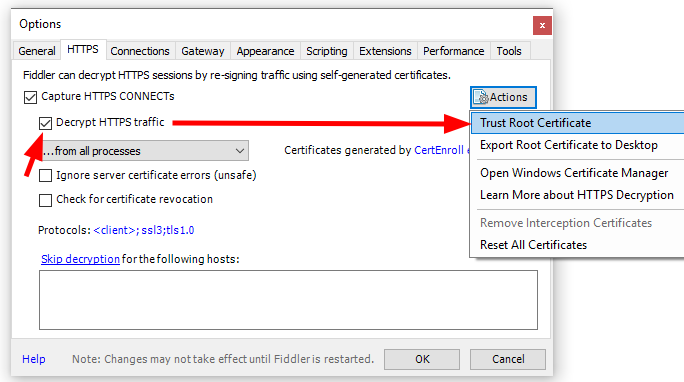
For HTTPS traffic inspection, you need to set up SSL decryption in an extra step. When enabled, Fiddler opens encrypted channels on its own and acts as a middleman. Fiddler’s certificate has to be trusted to avoid security errors.
On Windows, click “Tools” → “Options” → “HTTPS”. Check “Decrypt HTTPS traffic” and then select “Actions” → “Trust Root Certificate”.
On Linux, this option creates an error. Instead, you have to trust the certificate manually. To do so, select the action “Export Root Certificate to Desktop”. Then execute the following commands:
					$~ sudo mv Desktop/FiddlerRoot.cer /etc/ca-certificates/trust-source/anchors/FiddlerRoot.cert
$~ sudo trust extract-compat
Then restart Fiddler and your browser.
On macOS, please follow this guide.
Recording Your Traffic
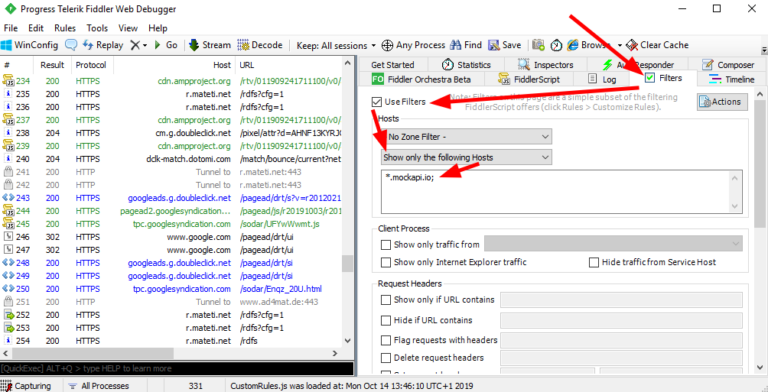
Fiddler has the recording feature turned on by default, so you will probably see much recorded traffic already.

To get rid of the noise, you can activate a filter to focus completely on your project’s traffic. On the right side, select the tab “Filters”. Then check “Use Filters”, select “Show only the following Hosts” and enter your API’s domain.
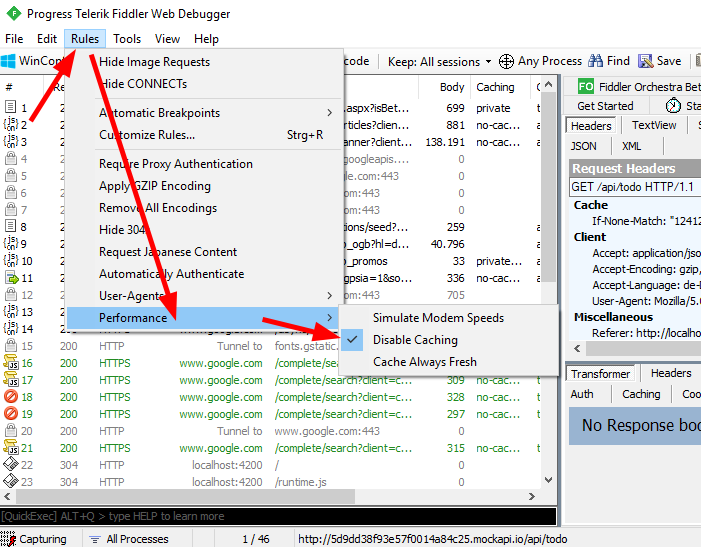
Deactivate Caching
Like in Charles Proxy, you need to disable caching to get any response bodies. In the menu bar, click “Rules” → “Performance” → “Disable Caching”.
The next and final article of this series will show you Fiddler in action.