
In the blog series about Web Components, we talked a lot about the perks and flaws of Web Components (or: the current state of Web Components) and how their integrability in modern SPA frameworks looks like. But we only took a short look at Web Components being integrated as a single stand-alone component into other environments.
Even with all the flaws, Web Components provide a good-enough foundation to write full applications. For example, our colleague Christian Liebel implemented a web version of Microsoft Paint with Web Components and the help of LitElement.
Especially in the last part of the above-mentioned blog series, we addressed sharing data and common services. If you have a good sense of software architecture, your first thought might be that you can solve sharing data and services via the dependency injection (DI) approach. That is why we want to explore the idea of DI and Web Components in this blog post.
Disclaimer: This blog post describes a pure technical idea, accompanied by a sample repository. It is an explorative proof-of-concept approach and is not meant to be production-ready in any case. The sample is a base for discussing the idea of DI and Web Components and which alternatives exist.
The Idea Behind Dependency Injection
If you are familiar with DI, you can skip this section.
As a little reminder, let’s talk about dependency injection in general, without going too deep into this (because many great blog posts out there are describing DI). See the following, non-DI approach:
					class WordDocument {
  constructor() {
    this.spellChecker = new GermanSpellChecker();
  }

  spellCheck() {
    this.spellChecker.perform();
  }
}
In this example, we have a class WordDocument that itself creates a GermanSpellChecker. By that, they are strongly tied together. If you create an instance of WordDocument, you will always have a GermanSpellChecker. As you can guess, that’s not what you want to have all the time.
To change that, we have to invert the control, like this:
					class WordDocument {
  constructor(spellChecker: SpellChecker) {
    this.spellChecker = spellChecker;
  }

  // ...
}

// Example
const germanDocument = new WordDocument(new GermanSpellChecker());
const englishDocument = new WordDocument(new EnglishSpellChecker());
const frenchDocument = new WordDocument(new FrenchSpellChecker());
If someone wants to create an instance of WordDocument, they also have to provide a spell checker. The big difference is that the caller now can decide which kind of spell checker they want to have, thus we are inverting the control here. That makes our class much more flexible, and you can implement any language for spell checking.
The more dependencies the WordDocument has, the more cumbersome it gets to create each of the dependencies (which also could have dependencies on their own). At this point, you normally introduce a dependency injection container, that, as a straightforward explanation, has a list of classes and automatically creates the instances for you:
					container.register(WordDocument);
container.register(GermanSpellChecker);
// ...

const document = container.resolve(WordDocument);
Web Components & Dependency Injection
In general, all components share the concept of having inputs and outputs. According to Web Components, we can use HTML attributes and JavaScript properties as inputs and dispatch custom events as outputs. If you want to stay 100 % compatible with the Web Components specification, there is no other possibility to communicate with the Web Component’s surroundings. If you plan to embed your Web Components on any page, you should also follow the specification.
But if you plan to build a whole application with Web Components, you can think of other possibilities to communicate and develop your Web Components. Creating an entire application means that you have everything under control. You know your components, your data, your services, and your use cases. And you can create all your classes in a way that they fit together perfectly. Under such circumstances, it is possible to create a dependency injection system that works kind of well with Web Components. And it can even be a hierarchical DI system, that allows a child component to override a parent component’s container registry.
Disclaimer: Please have in mind that the following discussion and code samples only make sense if you build a controllable application and not stand-alone Web Components distributed for 3rd-party usage. Also, this is just an experiment about a DI system.
At Thinktecture Labs you can find all of the code. In this blog post, we will show the most important lines of code for discussion.
The Initial Problem of Web Components Dependency Injection
Let’s take a look at the following Web Component:
					const template = document.createElement('template');
template.innerHTML = `
  <span>Hello World!<span>
`;

class MyWebComponent extends HTMLElement {
  logger: Logger;
  translations: TranslationService;
  shadow: ShadowRoot;
  span: HTMLSpanElement;

  constructor() {
    super();

    this.shadow = this.attachShadow({ mode: 'closed '});
    this.shadow.appendChild(template.content.cloneNode(true));

    this.span = this.shadow.querySelector('span');
  }

  connectedCallback() {
    this.logger.log('Connected MyWebComponent into DOM.');

    this.translations.addEventListener('language-change', () => this.render());

    this.render();
  }

  private render() {
    this.span.innerText = this.translations.get('HELLO_WORLD');
  }
}
Assume that the Logger and TranslationService are two existing classes with an API like shown in the code sample. In the connectedCallback we use logger.log to log a message. Additionally, we register an event listener for the TranslationService‘s language-change event. In a real-world scenario, we would need to remove the event listener in disconnectedCallback, which we left out in this demo code. Whenever a language-change event occurs, we call render. The render method will set the text of the span element and gets the translation from the TranslationService by calling get and an identifier. It is like ngx-translate in Angular, if you like.
The big question is: where do you get the dependencies logger and translations from? One thing you could do is that the component using MyWebComponent could set them, like this:
					// parent component, pseudo-code
const myWebComponent = querySelector('my-web-component');
myWebComponent.logger = logger;
myWebComponent.translations = translations;
Now we simply shifted the problem to the next component. We still do not have a clue where to get the dependencies from.
We just talked about constructor injection. Are we able to do the following?
					// ...

class MyWebComponent extends HTMLElement {
  // ...

  constructor(logger: Logger, translations: TranslationService) {
    super();

    this.logger = logger;
    this.translations = translations;
  }

  // ...
}
Unfortunately, that is a big No-No. Per specification, when an element gets upgraded to a custom element, the constructor is called without arguments. We could work around that a bit with factory functions and using a monkey patch for document.createElement. This idea works as long as you only create Web Components via JavaScript and not directly in your HTML. But for real-world, that does not make any sense, since you want to be able to place Web Components via HTML. In that case, your monkey patch will never be executed. Thus no injection is possible.
There is also another flaw with the approach above. Executing document.createElement does instantiate the Web Component, so its constructor is called, but it is not inserted into the DOM yet. If you want to do hierarchical dependency injection, you need to wait until the component is placed into the DOM. In that case, the connectedCallback will be called. So basically, we have to wait for connectedCallback before we can inject the dependencies.
A Possible Solution
To solve the issue of injecting a service into a Web Component, we have to leverage the connectedCallback. Only then do we have the correct hierarchy of the component to use hierarchical dependency injection. For getting the dependencies itself, we can use the event system already built into our browsers. Fortunately, events in the browser work synchronously. By that, you can do the following:
					// in a Web Component
const event = new CustomEvent('request', { detail: { type: 'something' }});
this.dispatchEvent(event);
console.log(event.detail.instance); // <-- (1), logs "my-instance"

// ...

// Event Listener somewhere in the code
this.addEventListener('request', ({ detail }) => {
  if (detail.type === 'something') {
    detail.instance = 'my-instance';
  }
});
If you look at mark (1), you will notice that the console.log outputs my-instance which is set during the event listener’s callback. After using dispatchEvent, all event listener callbacks will be invoked, before returning the code execution after dispatchEvent.
If you now think a bit further, you may know that when dealing with events in the browser, they have common behavior:
- they bubble up the document tree
- you can cancel them
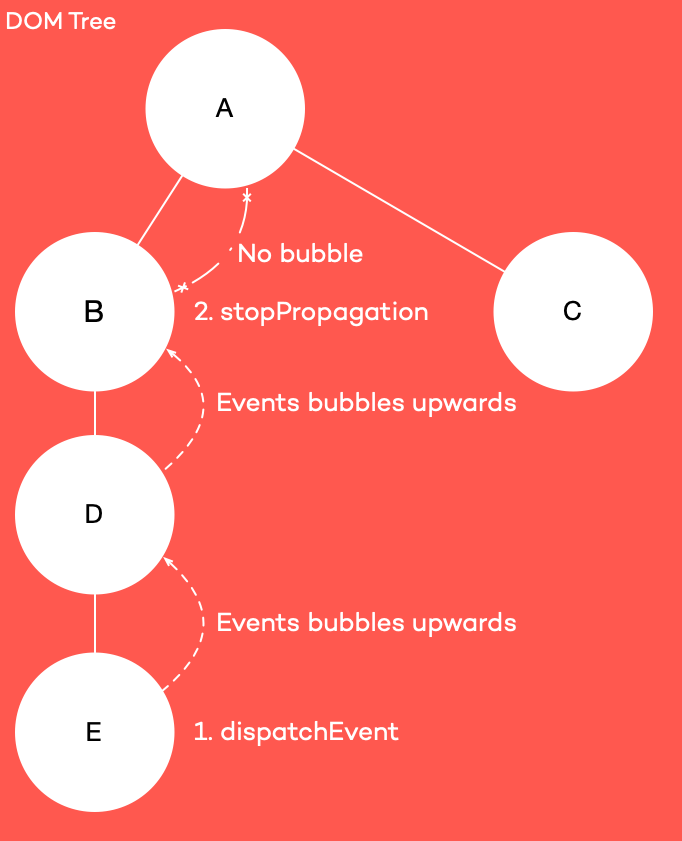
With that in mind, we could design a system to use the events to request an instance of a specific type. We simply create a CustomEvent and let the event bubble up the DOM tree. If someone can fulfill the request, the detail with an instance can be set, and the event can be stopped. If the request is not fulfillable, just let it bubble upwards.
Now, we have all the essential building blocks to start. We know that we have to use connectedCallback for the correct hierarchy. And we know that we can leverage CustomEvent for requesting dependencies.
Our goal is that our classes finally will look like that:
					// ...

class MyWebComponent extends HTMLElement {
  @Inject() logger: Logger;
  @Inject() translations: TranslationService;

  // ...

  connectedCallback() {
    // This should work now due to depenency injection.
    this.logger.log('Connected MyWebComponent into DOM.');

    this.translations.addEventListener('language-change', () => this.render());

    this.render();
  }

  private render() {
    this.span.innerText = this.translations.get('HELLO_WORLD');
  }
}

// ...

// Some other component
@ContainerProvider([
  { provide: Logger, useClass: ConsoleLogger },
  // ...
])
class MyParentWebComponent extends HTMLElement {
  // ...
}
We want to use a decorator @Inject to mark specific fields for injection. Additionally, we want to use a decorator @ContainerProvider to create a DI container where the instances will be resolved from. Let’s start!
The Dependency Injection Container
The first thing we are going to implement is the dependency injection container. Let’s take a look at its implementation first:
					import 'reflect-metadata';

const KEY_IS_INJECTABLE = Symbol('IS_INJECTABLE');

export interface Token<T> extends Function {
  new (...args: any[]): T;
}

interface Item<T> {
  clazz: Token<T>;
  instance?: T;
}

export class Container {
  private readonly container = new Map<Function, Item<any>>();

  provide<T>(token: Token<T>, clazz?: Token<T>) {
    const actualClass = clazz || token;

    if (actualClass.prototype.constructor.length && !this.isInjectable(actualClass)) {
      throw new Error(`${actualClass.name} is not decorated!`);
    }

    this.container.set(token, { clazz: actualClass });
  }

  get<T>(token: Token<T>): T {
    const item = this.container.get(token);

    if (!item) {
      throw new Error(`Nothing found for token ${token.name}`);
    }

    const { clazz, instance } = item;

    if (!instance) {
      const params = this.getInjectedParams(clazz);
      const newInstance = Reflect.construct(clazz, params);
      this.container.set(token, { clazz, instance: newInstance });
      return newInstance;
    }

    return instance;
  }

  // Check if target is decorated
  private isInjectable(target: Function): boolean {
    return Reflect.getMetadata(KEY_IS_INJECTABLE, target) === true;
  }

  // Read type information from metadata
  private getInjectedParams(clazz: Function): any[] {
    const argTypes = Reflect.getMetadata('design:paramtypes', clazz);
    if (argTypes === undefined) {
      return [];
    }
    return argTypes.map((token: any) => this.get(token));
  }
}
We want to use an @Inject decorator without further type definitions. To make that work, we need to use reflect-metadata. Otherwise, the decorator would look like @Inject(Logger).
The container then exports an interface called Token<T>. Our token is simply the definition of a class constructor, so we have better type checking possibilities.
Within the container class itself, we define a container map. That map maps a constructor Function to an Item. An Item contains the Token and instance, so we can cache them and provide a singleton throughout all requests of the same token.
With provide, we can set up the container and provide a Token and an optional class that is used for creating the instance. If no class is given, we assume that the token already is the class we can use for instantiation. With the help of reflect-metadata, we can check if a class has been decorated. This happens automatically if we used the @ContainerProvider decorator on a class. If all arguments have been checked, we can add the token and clazz to our container.
The next method is get: We can use get to resolve a token for an instance. The first thing is to check if we have a registration of this token in our container map. If the registration is available, we can check if we’ve already resolved the token. To do so, we simply check if an instance has been created. If not, we are going to create an instance.
To create the instance for us, we use reflect-metadata again. At first, we need to get the parameters of the constructor function. Relect.getMetadata('design:paramtypes') will return all arguments for a clazz.
For example, take a look at the following constructor function:
					class Foo {
  constructor(logger: Logger) {}
}
Reflect.getMetadata will return an array with Logger as the item. Then, we iterate through that array and resolve the tokens with instances.
You may wonder why we resolve the constructor parameters. Initially, we described that we could not use the constructor for injection. That is still true. However, the container itself is not tied to Web Components. It is a generic dependency injection container for TypeScript with reflect-metadata. We added the resolving of constructor arguments for the sake of completeness.
Back to our get method. After we have called getInjectedParams, we finally can use Reflect.construct to create an instance of our class with the resolved tokens. Notice that for Web Components, the result of getInjectedParams will always be an empty array. Then, we save the instance in our container and return the instance.
Nice! Now we have created a generic dependency injection container. We could use them in any TypeScript code or Node.js with TypeScript.
Let’s see how to create the decorators @Inject and @ContainerProvider.
The @Inject Decorator
Take a look at the code first:
					import { Token } from './container';

interface DiRequest {
  type?: any;
  instance?: any;
}

function makeRequestEvent(type: Token<any>): CustomEvent<DiRequest> {
  return new CustomEvent<DiRequest>('request', {
    detail: { type },
    bubbles: true,
    composed: true,
  });
}

export function Inject(type?: Token<any>): (target: any, name: string) => any {
  return (target: any, name: string): any => {
    const paramType = type || Reflect.getMetadata('design:type', target, name);

    const property = {
      get(): any {
        const event = makeRequestEvent(paramType);
        this.dispatchEvent(event);
        return event.detail.instance;
      },
    };

    Object.defineProperty(target, name, property);

    return target;
  };
}
We have a function makeRequestEvent that creates a CustomEvent. It is important to set bubbles and composed to true, so it crosses the Shadow DOM boundaries and bubbles upwards. If those properties are not set, the system will not work as expected!
Then, we implement the decorator itself. We can either set a type using @Inject(type) or let reflect-metadata do its magic by getting the type via Reflect.getMetadata.
Now comes the fun part. For the usage, we use a field definition like @Inject() logger: Logger. But the moment we use @Inject decorator on that field, we are going to convert it to a getter property. At first, we create a property and define a get method. If the getter is accessed, we’re going to dispatch the CustomEvent and request an instance of a specific type. Please note that this refers to the instance of the actual Web Component. After that, we return the resolved instance.
Please don’t forget that dispatching and handling events is a synchronous task! After dispatching the event, we will have the result available in the next line of code.
Last but not least, we use Object.defineProperty to override the field with a getter property.
Et voilà! Our @Inject decorator is ready. It won’t work without the @ContainerProvider decorator, so let’s take a look at that.
The @ContainerProvider Decorator
The @ContainerProvider decorator is the final missing piece to make our experiment complete. Here is the code:
					import { Container, Token } from './container';

interface Provider<T> {
  provide: Token<T>;
  useClass?: Token<T>;
}

export function ContainerProvider(providers: Provider<any>[]) {
  const container = new Container();
  providers.forEach(({ provide, useClass }) => container.provide(provide, useClass));

  return (target: any) => {
    const connectedCallback = target.prototype.connectedCallback;

    target.prototype.connectedCallback = function () {
      this.addEventListener('request', (event: CustomEvent) => {
        try {
          event.detail.instance = container.get(event.detail.type);
          event.stopPropagation();
        } catch {}
      });

      if (connectedCallback) {
        connectedCallback();
      }
    };

    return target;
  };
}
Whenever we use the @ContainerProvider, we create a new instance of Container, our dependency injection container we saw above. We iterate through the providers array and call container.provide to set up our container instance.
After that, we do monkey patching of our Web Component to implement some magic. We save a reference to the original connectedCallback method. After that, we override it with our code. Please note that this refers to the instance of the actual Web Component. We add an event listener via addEventListener and listen for the request event that is dispatched by @Inject. In our event handler, we simply try to resolve the requested type from our container. If that is possible, we stop the propagation of the event. It will not bubble the DOM tree upwards anymore, because our @ContainerProvider could fulfill the request. But, if we cannot resolve the type, container.get will throw an instance. We catch the exception and don’t do anything. Due to the nature of CustomEvent it will now bubble up the DOM tree to the next @ContainerProvider. Then, if the monkey-patched Web Component implemented connectedCallback itself, we are executing it.
Boom! We just created a hierarchical dependency injection.
Usage
To use our dependency injection system, we can create the following structure in Web Components:
					<my-root>
  <my-child></my-child>
</my-root>
The my-root Web Component could look like this:
					@ContainerProvider([
  { provide: Logger, useClass: Logger }
])
export class MyRoot extends HTMLElement {
  // ...
}
The my-child Web Component could look like this:
					export class MyChild extends HTMLElement {
  @Inject() logger: Logger;

  connectedCallback() {
    this.logger.log('Hello World!');
  }
}
Now, our system will handle the injection automatically, and we can simply use it. For a complete example, please take a look at the GitHub repository, e.g.:
- RootComponent, usage of
@ContainerProvider - AuthorizedComponent, overrides existing definitions from the
RootComponentvia@ContainerProvider - PokeListComponent, usage of
@Inject
Flaws of Web Components and Dependency Injection
We did it.
We have created a dependency injection system for an application built on Web Components. But it has some serious flaws, let’s talk about them a bit.
Script Ordering
All decorators are executed early after the class has been defined. There is no need to create an instance or access a property. They will always be executed.
Let’s assume the following DOM tree, where each tag is a Web Component:
					<body>
  <my-root>
    <my-child>
      <my-child-of-child></my-child-of-child>
    </my-child>
  </my-root>
<script src="https://www.thinktecture.com/core/cache/min/1/ab8a2491727d31d270211089d1d5755e.js" data-minify="1"></script></body>
Now, if the browser loads the script for the my-child-of-child Web Components first, that does define the class and executes customElement.define, it will instantly upgrade the HTML tag to be a Web Component. Thus, the browser will execute the connectedCallback. But now there is an issue because all the other components are not yet loaded. In the connectedCallback we try to get instances for our dependency injection, which will fail because the @ContainerProvider is not defined yet.
To mitigate this, you have several options:
- You can put all scripts into the
<head>segment of your document. However, scripts in the document head will block the rendering until all scripts are loaded. This ensures that theconnectedCallbacks are executed in the correct order. - No Web Component does register itself by calling
customElement.define. Instead, a single script at the end of the document body will register all Web Components in the correct order. - You ensure that all Web Component scripts are injected in the correct order into your HTML document via a build system.
All options only work if you are building an application and can ensure a correct order.
Portability
Building Web Components the way we have seen in this experiment is not portable to other third party systems. It would be possible, but the system using Web Components built that way needs to respond to the DI requests and fulfill them. Otherwise, it will crash. It eradicates the idea of why you would use Web Components in the first place. However, within your enclosed system, it could indeed work quite well.
Service Injection
Currently, the sample only has Web Components that get services injected. Services itself can not have other dependencies. “But our generic dependency injection container has support for constructor injection?” – you may ask yourself. Yes, that is right. But in our decorators, we use dispatchEvent, addEventListener, and connectedCallback. The first two methods are available on a global window level (which would break the hierarchical dependency injection). But the connectedCallback that resolved the instance is not available in a service class.
However, you don’t need that. In theory, you could check if the decorator is used within a Web Component or a service class. Within the service class, you use the default constructor injection, with the drawback of not having a hierarchical dependency injection for services. It will still work for the Web Component itself.
Monkey Patching
We can monkey patch document.createElement and, in theory, we would be able to implement real constructor injection, even for Web Components. However, for Web Components placed directly in HTML, the browser does not call document.createElement. So we have no possibility of hooking into the browser’s process of creating a Web Component. If we would be able to do so, we could implement working dependency injection with constructor injection.
Alternative
If you want your Web Component to be usable in any other system, the only real alternative is to rely on CustomEvent, HTML attributes, and JavaScript properties. Those things are available in all browsers, and you simply need proper documentation for your Web Component. With the documentation, the developer knows what features he can use. Any other possibility (e.g. store pattern) will rely on having some contract between the application and the Web Component.
Conclusion
In this article, we have experimented with the creation of a dependency injection system for Web Components. We saw that it is possible to create a hierarchical dependency injection in a few lines of code with custom decorators. We also discussed some flaws and why it may not be usable in a real-world project. However, if you have a very controlled environment, it may be usable for your project. It may be best to use built-in capabilities only, for a maximum of portability.
Happy Coding!