
Through web APIs, the browser gives you access to those features. Some API parts are easy to use; others require user permission and a secure context. This is where Ionic’s Capacitor comes into play. It provides you with unified access to those APIs. But how does Capacitor help you? What is its origin, and what does it want to achieve? You can find a full list of APIs and plugins here.
Capacitor - the great simplifier
Capacitor is a framework that provides developers a coherent API set to access various features on different platforms. By doing so, it also simplifies using those features. Especially for web APIs that are hard to use or require multiple steps to set them up, Capacitor provides an easy-to-use interface.
Capacitor’s origins lie in Ionic’s mission to provide a holistic framework for developing hybrid apps—apps that run on mobile devices, on desktops, and in the browser. It does not only replace Apache Cordova as a “bridge” to native platform access in new Ionic projects but also “provides a consistent, web-focused set of APIs”.
Add Capacitor to an Angular Web App
Although Capacitor is developed by Ionic, you can use it in combination with any framework and UI library you want. In fact, Capacitor itself promotes using it with whatever framework you want. The difference between starting an Angular-Ionic project and just using Angular and Capacitor is that the Ionic CLI uses different templates with common pre-configured features.
You can add Capacitor to both new and existing Angular projects—the steps are the same. The following command creates a new Angular project:
➜ ng new my-name --routing --style="less" --prefix="my-prefix"
Afterward, you just add the Capacitor dependencies and initialize them. The initialization and following configuration are optional; they are only required if you want to use your web as a hybrid app.
					➜ npm install @capacitor/core @capacitor/cli
// optional
➜ npx cap init
This will lead you through an interactive process to provide an app name and app id that will be used for building an Android or iOS app (if needed). Since Capacitor works with multiple platform frameworks and originates in Ionic, you have to perform a simple configuration change to match the standard Angular setup. Please open the capacitor.config.json file and replace the webDir value with your app’s build location. If you followed all of the steps above, the JSON file should look similar to this.
					{
  "appId": "de.myapp.me",
  "appName": "my-name",
  "bundledWebRuntime": false,
  "npmClient": "npm",
  "webDir": "dist/my-name",
  "plugins": {
    "SplashScreen": {
      "launchShowDuration": 0
    }
  },
  "cordova": {}
}
One of Capacitor’s advantages for web projects is that you hardly have to do any work to run your web app as a hybrid app on different platforms. You can add platforms (android, ios, electron) to the project by running the following command – without rewriting your web app. It creates all the necessary files and folders for you. Only in some cases, you have to manually configure the platform, for example, if you need to configure permissions for a plugin.
					// run this only after the first web app build
➜ npx cap platform
Setting up the PWA
Capacitor does not automatically add a PWA configuration to your project. This configuration is required to install your app and have it sit next to your native apps and to run it offline. In contrast, Capacitor is our bridge to platform features that give our app some features of a native app. But do not worry, Angular got you covered. It provides a clean way to add those PWA capabilities.
➜ ng add @angular/pwa --project my-name
This command adds all necessary requirements to turn your app into an Angular-based PWA. It adds files like manifest.webmanifest, ngsw-config.json, and a couple of default icons. It also modifies existing project files to support PWA capabilities. The Web App Manifest (manifest.webmanifest) is parsed by the browser and defines all essential information for installing the app, like its name, icon, display mode, and others. The ngsw-config.json is a special file for Angular, to create and configure a service worker for you. You can configure which HTTP calls and files should be cached and how to handle an offline state.
Find more information and in-depth knowledge on PWA, articles, and tutorials from our experts.
Capacitor’s simplified APIs and plugins for the web
Capacitor provides a wide range of APIs and plugins. Some of these APIs are only supported if your app is running as a hybrid app. In these cases, it gives you access to native features through a JavaScript/TypeScript binding. You can even extend these APIs or plugins, and there are already a couple of community plugins available.
While Capacitor can not provide features for a web app that is not supported by the browser, like creating an icon in the system tray or formatting the hard drive, it can give you nice and easy access to the browser-supported features and APIs.
Let us take a look at three example plugins in detail:
- Clipboard
- Camera
- Local Notifications
Each plugin has a different approach to “copy” its web API counterpart.
The clipboard plugin
Copying data to the clipboard is harder than it sounds. There are a lot of security implications that must be respected. Furthermore, there are two web APIs for clipboard access—the synchronous and the asynchronous clipboard API.
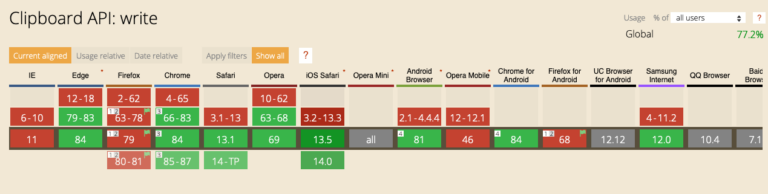
The Async Clipboard API is easy to use, but not yet supported by all browsers. As of August 2020, the browser support for the write() method of the API looks as follows:
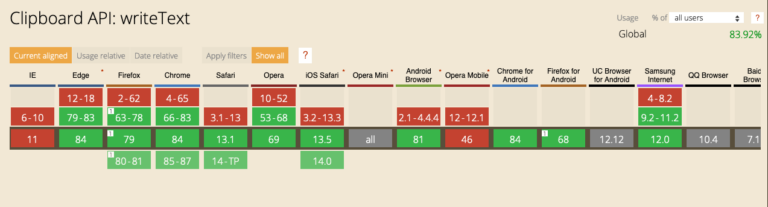
With it, it would be a simple one-line function call to copy something to the clipboard. However, the writeText() API (also from the async API set) is supported by more browsers, except Internet Explorer:
To solve this, we can use the synchronous API, which is older and even more supported. One common approach to implement this is to create an input element, select its content, and call the document copy command.
					copyToClipboard(text: string): void {
    const tempInput = document.createElement('textarea');
    tempInput.setAttribute('value', text);
    // move the input off-screen
    tempInput.style.position = 'absolute';
    tempInput.style.left = '-100vw';

    document.body.appendChild(tempInput);
    tempInput.select();
    document.execCommand('copy');

    document.body.removeChild(tempInput);
}
But this could have negative side effects, as you force all browsers into an unnecessary fallback. Layout shifts could happen, or the elements could flicker. This task quickly becomes complicated.
Let us take a look at how Capacitor handles this for browsers that support the clipboard API (or parts of it).
					import { Plugins } from '@capacitor/core';
const { Clipboard } = Plugins;

async copyToClipboard(string: string): void {
    await Clipboard.write({string});
}
It encapsulates all the necessary steps and takes care of the caveats. Furthermore, you could easily replace it with the async clipboard API—once it is supported by all required browsers. The more complicated the task, the better it gets. Imagine you have to read the clipboard, too. That is only allowed if the user gives their permission and if the app is active and in the foreground. Capacitor checks the permissions and the app’s visibility for you.
					async readFromClipboard(text: string): void {
    const {string} = await Clipboard.read({string: text});
}
This plugin does not try to replace all functionality for every browser. For instance, Internet Explorer is left out. For all the other browsers, it provides a single API that offers a similar but not the same interface.
The Camera Plugin
Similar to the Clipboard case, this plugin makes it much more convenient to use the web API. However, there are some differences in the UX and UI for the user compared to its HTML counterpart.
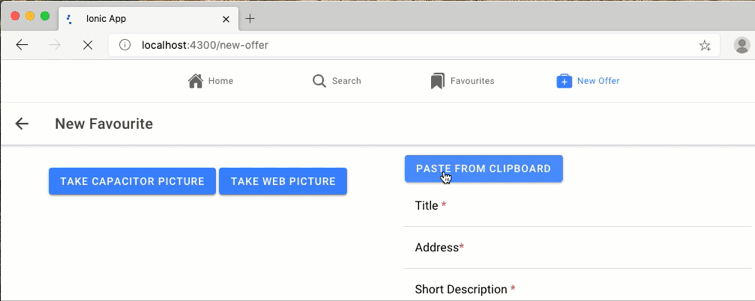
If you want to use the HTML method to retrieve an image from a user, you could do so by creating an input element with type="file" and restrict the accepted file type. This will open a file dialog to select images:
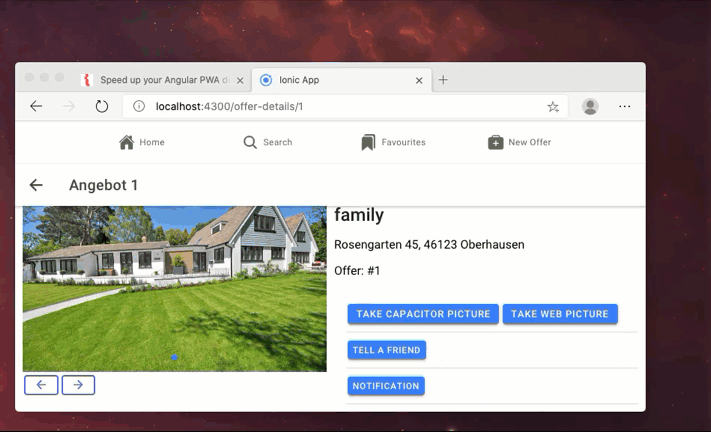
					<ion-button (click)="initPictureProcess()">Take Web Picture</ion-button>
<div style="height: 0; width: 0; opacity: 0;" hidden>
  <input type="file" id="pwaphoto" #photoRef accept="image/x-png,image/jpeg" (change)="handleInput()">
</div>
In the example above, the input is hidden and a button is displayed instead when the button is pressed, it just clicks the hidden input to open the file dialog. It is possible to get the selected file and its content by running the following code:
					async handleInput() {
    // get selected files
    const files: FileList = pwaphoto.files;
    if (!files && files.length === 0) {
      return;
    }
    try {
      const base64Photo = await convertToBase64(files[0]);
   catch {
      // notify user on error
    }
}

convertToBase64(image: File): Promise<string> {
    if (!image) {
      return;
    }
    const reader: FileReader = new FileReader();
    reader.readAsDataURL(image);
    return new Promise((resolve, reject) => {
      reader.onload = () => resolve(reader.result as string);
      reader.onerror = (error) => reject(error);
    });
  }
Note: You must convert the file contents to base64. This comes in handy when storing, processing, displaying, or transferring its contents.

Capacitor tries to simplify this. At first, you must install Ionic’s PWA elements. These elements provide a UI for the camera and toasts created by Capacitor.
➜ npm i --save @ionic/pwa-elements
Afterward, you add this to your main.ts:
					import { defineCustomElements } from '@ionic/pwa-elements/loader';

// ...content

defineCustomElements(window);
Then you can simply call the getPhoto() function from the camera plugin. We define the photo quality and the return type we want. This call opens a camera interface in the web app and returns the captured photo. In this case, we get a ready-to-use base64 data URL. Again: Capacitor handles the permission request for us.
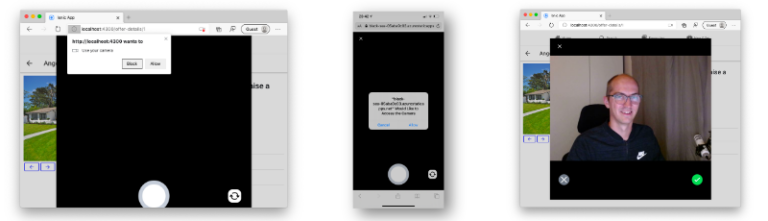
This plugin takes a completely different path than its HTML counterpart. It provides a UI and solves a challenging task—rendering the camera stream and taking a picture—but it is not a drop-in replacement for the native solution. Instead of providing a file dialog, it opens the camera stream.
The local notifications plugin
This plugin enables us to send system notifications to our users without much hassle. Due to the annoyance that unwanted notifications create, and how the browser handles this, we have to handle the user permission. More information on (Push) Notifications.
The plugin is an example for Capacitor trying to stay as close as possible to the official web APIs when it makes sense to do so.
It is effortless to create and schedule a Local Notification. Local Notifications do not require a server and will not get any content sent by anyone. Instead, they are application made notification for the user. With this plugin you could, for example, create a reminder or notify if some task completed. Capacitors Local Notification has many similarities to the Web-API notifications. The basics are the same, but because Capacitor also supports Android and iOS, it got a lot more configuration options for those platforms. For now, we compare the basic usage.
					// request permissions (must follow a user interaction) at an appropriate point
await LocalNotifications.requestPermission();

async notify() {
    const notifs = await LocalNotifications.schedule({
      notifications: [
        {
          title: 'Some Title',
          body: 'Some Content',
        },
      ],
    });
    console.log('scheduled notifications', notifs);
  }
}
The web API provides you with a similar way to do this. In the “web-native” context these notifications are called non-persistent. They do not require a server as well, but have a slightly different API:
					const result = await Notification.requestPermission();
if (result === 'granted') {
	const noti = new Notification('Hello!', {
		body: 'It’s me.',
	});
}
In this example, Capacitor does not replace the APIs, but enhances them or simplifies their usage. It is close to the web API implementation.
Capacitor plugins vs. web APIs
You do not have to choose between these two approaches. At any point, you can switch between them or change the way you handle an API or plugin. The only thing to bear in mind is that Capacitor could deliver much more than you need. Maybe you will never consider creating a hybrid app, or you just need one API and not all. Then it might be advisable to explore other, more specialized solutions, or just use the web API itself.
Conclusion
Capacitor is an extensive, easy-to-use framework for web apps to access platform features. It does support not only web apps but also hybrid apps with even more possibilities. While using Capacitor you will not lose any option but gain a nice and clean API. As Capacitor is extensive, it may provide features that are not required for your web app. If you only need a single API or two and only want your app to run on the web and as PWA, it may be easier to implement them directly. Many modern web APIs are already easy-to-use and clean. For a web-only project, Capacitor’s simplification may be redundant. This is even more significant as Angular provides you all PWA aspects by itself. But most importantly, Capacitor presents you with the possibility to create a hybrid app at little cost and with low development overhead. Capacitor could be your entry point to the mobile app market and new customers.