
Blazor uses a Mono-based WASM layer to interpret .NET Standard code/assemblies running on the CLR in the browser.
I believe that Blazor will surely have its audience. Especially when coming from a C# & .NET background and you have not yet found your way in the JavaScript-minded web world, Blazor can be an interesting candidate for you. Blazor is still very early, and it will (and has to) evolve, ideally together with the WebAssembly standards.
However, stemming from the nature of WebAssembly and Blazor, you will almost always have the need to integrate with JavaScript, nevertheless. Today – and for some time being – WebAssembly and JavaScript are two parallel universes. E.g. we do not have an API to access the browser DOM from WebAssembly. We only have a memory buffer which we can use to move data back and forth between JavaScript and WebAssembly and vice versa (over-simplified explanation).
Note: In this article I am not talking about Blazor Server-side, but only the Client-side hosting model based on WebAssembly.
Version information
The data and code in this article is based on these technology versions:
Angular: 8.2.14
ASP.NET Core Blazor: 3.1.0-preview4.19579.2
3 steps to integrate your Angular components in a Blazor WebAssembly application
What to expect:
- Define the scope of the Angular component – or application
- Create a standalone Angular Elements Web Component custom element from your Angular component / application
- Use the Angular Element Web Component in your Blazor application with JavaScript interop features
… yeah, those three steps are partly divided into some sub steps 😊
1. Your existing Angular components - or even entire applications
As an illustrative example I have picked to create a colorful charts component and built a very simple Angular application for it. The charts library used here is ngx-charts and the type of chart in action is the Advanced Pie Chart.
This is the barebones Angular application in action, we can e.g. hover over the pie elements to get a tooltip shown or click on them to get an event fired:
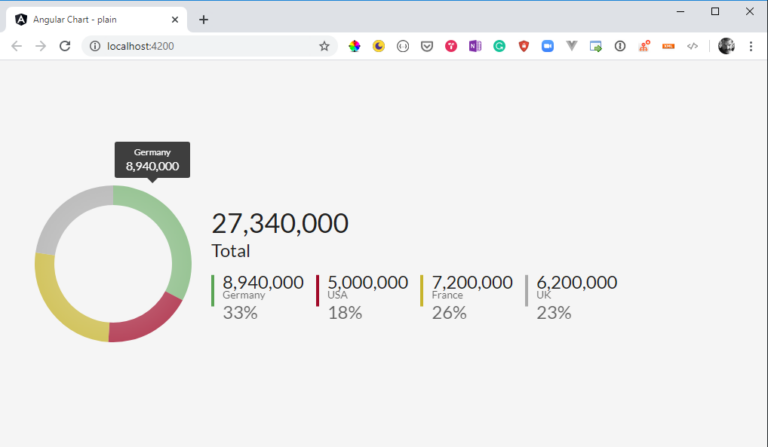
The app component hosts the pie chart with some sample data:
<app-pie-chart [data]="data"></app-pie-chart>
					import { Component, OnInit } from '@angular/core';

import { data } from './data';

@Component({
  selector: 'app-root',
  templateUrl: './app.component.html',
  styleUrls: ['./app.component.scss']
})
export class AppComponent implements OnInit {
  data: any[];

  ngOnInit(): void {
    this.data = data;
  }
}
The markup for the pie chart component is straight-forward and uses input bindings for connecting the important properties in a ngx-charts-advanced-pie-chart.
					<ngx-charts-advanced-pie-chart
    [view]="view"
    [scheme]="colorScheme"
    [results]="data"
    [gradient]="gradient"
    (select)="onSelect($event)"
    (activate)="onActivate($event)"
    (deactivate)="onDeactivate($event)">
</ngx-charts-advanced-pie-chart>
The accompanying TypeScript code in the PieChartComponent class is not really rocket science, either:
					import { Component, Input } from '@angular/core';

@Component({
  selector: 'app-pie-chart',
  templateUrl: './pie-chart.component.html',
  styleUrls: ['./pie-chart.component.scss']
})
export class PieChartComponent {
  @Input()
  data: any[];

  view: any[] = [900, 500];

  gradient: boolean = true;
  showLegend: boolean = true;
  showLabels: boolean = true;
  isDoughnut: boolean = false;

  colorScheme = {
    domain: ['#5AA454', '#A10A28', '#C7B42C', '#AAAAAA']
  };

  onSelect(eventData): void {
    console.log('PieChart - Item clicked',
      JSON.parse(JSON.stringify(eventData)));
  }

  onActivate(eventData): void {
    console.log('PieChart - Activate',
      JSON.parse(JSON.stringify(eventData)));
  }

  onDeactivate(eventData): void {
    console.log('PieChart - Deactivate',
      JSON.parse(JSON.stringify(eventData)));
  }
}
Just to point it out explicitly: we can use a single component or entire applications wrapped in a web component custom element – it really depends on your use case.
The source code for the plain Angular application can be found in the Web Component demo repo’s plain-no-webcomponents branch.
Alright, we now want to create a standalone Web Component custom element from the pie chart component by incorporating Angular Elements.
2. Create a Web Component custom element with Angular Elements
Please follow the official documentation for transforming an Angular component into an Angular Elements custom element. In addition, you might want to check whether your browsers already natively support custom elements or if you need a polyfill.
The major change in our module’s code is that we now define a custom element with a wc-pie-chart tag name in app.module.ts and use the PieChartComponent to bootstrap our Angular ‘application’. This way you can have a dedicated interface for your component which you then can use from Blazor.
					import { BrowserModule } from '@angular/platform-browser';
import { NgModule, CUSTOM_ELEMENTS_SCHEMA, Injector } from '@angular/core';
import { BrowserAnimationsModule } from '@angular/platform-browser/animations';

import { AppRoutingModule } from './app-routing.module';
import { NgxChartsModule } from '@swimlane/ngx-charts';
import { PieChartComponent } from './pie-chart/pie-chart.component';

import { createCustomElement } from '@angular/elements';

@NgModule({
  declarations: [
    PieChartComponent
  ],
  schemas: [CUSTOM_ELEMENTS_SCHEMA],
  imports: [
    BrowserModule,
    AppRoutingModule,
    BrowserAnimationsModule,
    NgxChartsModule
  ],
  entryComponents: [PieChartComponent],
  providers: [],
  bootstrap: []
})
export class AppModule {
  constructor(injector: Injector) {
    const el = createCustomElement(PieChartComponent,
      { injector: injector });
    customElements.define('wc-pie-chart', el);
  }

  ngDoBootstrap() {}
}
The dedicated interface of your Angular component: Custom element attributes & events with Angular inputs and outputs
In Angular input and output bindings are used to get data into a component and raise events when something relevant has happened (like data has changed) inside a component. Luckily, Angular Elements transforms @Inputs to custom element attributes and @Outputs to custom events.
Attributes
If we are living and staying in an Angular-only world, we can perfectly pass complex data between components.
However, in a Web Components world, we can only pass strings via a component’s attributes in markup. For our pie chart we want to pass in the chart data objects as a JSON object – or as a JSON string in our markup. In order to be fully usable in an Angular and a Web Components scenario, we are going to change the component’s implementation a bit.
					export class PieChartComponent implements OnChanges {
  @Input()
  dataValues: Object;
  data: any[];

  ...

  ngOnChanges(changes: SimpleChanges) {
    if (changes.dataValues.currentValue) {
      try {
        if (typeof changes.dataValues.currentValue == 'object') {
          this.data = changes.dataValues.currentValue;
        } else {
          this.data = (JSON.parse(changes.dataValues.currentValue));
        }
      } catch (e) { // We should have some better error handling
        console.log(e);
        return false;
      }
    }
  }
}
By implementing ngOnChanges we can check whether we are already receiving an object and try to assign it to the data input property – or we have a string and try to parse the JSON into the data property.
In the above code snippet we now have a dataValues input binding. Beware, this needs to be denoted as data-values in the custom element case, like this:
<wc-pie-chart data-values='[{"name": "Germany","value": 8940000},{"name": "USA","value": 5000000},{"name": "France","value": 7200000},{"name": "UK","value": 6200000}]'></wc-pie-chart>
Events
As we are also interested in changes and events in our custom PieChartComponent, we are adding an @Output to it. In this case we want to get notified when the user of the pie chart component clicks on one of the pie segments. This is implemented in the ngx-charts component via the activate event handler, so let’s subscribe to it and fire an EventEmitter accordingly.
					export class PieChartComponent implements OnChanges {
  @Input()
  dataValues: Object;
  data: any[];

  @Output()
  selected = new EventEmitter();

  ...

  onSelect(eventData): void {
    console.log('Item clicked', JSON.parse(JSON.stringify(eventData)));
    this.selected.emit(eventData);
  }

  ...
}
The final source code for the Angular Elements Web Components demo is here: https://github.com/thinktecture/angular-elements-chart-webcomponent
Okay, now it is time to move from the JavaScript / SPA world over to the WebAssembly-with-Blazor universe. We want to be able to re-use existing JavaScript code and libs, and we want to be able to re-use our existing Angular code there.
3. Integrate the Web Component into your Blazor WASM application
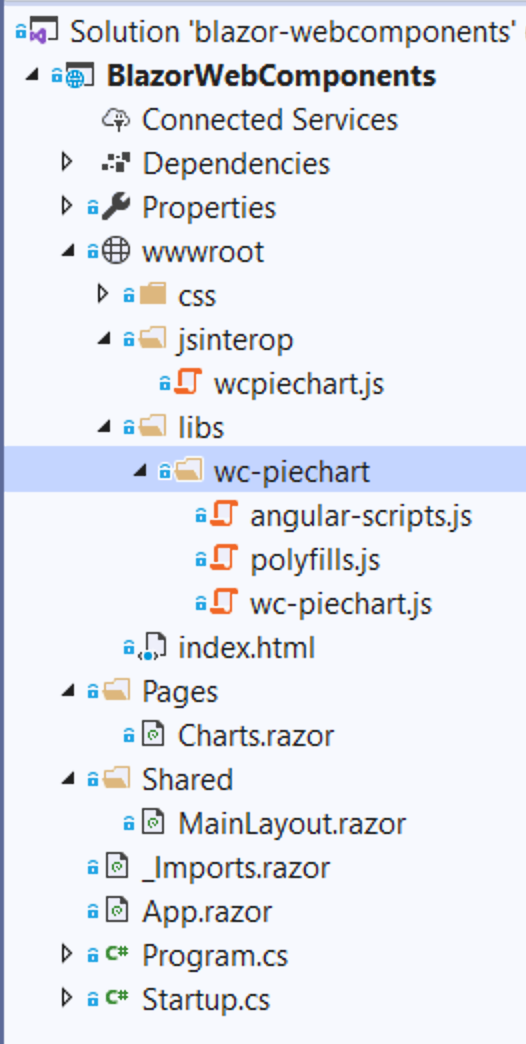
We are starting with a standard Blazor WebAssembly application created with the Blazor tooling installed into Visual Studio 2019. Based on the ngx-build-plus-based build process we have thee files coming out of our Angular Elements Web Components build pipeline which need to be added to our Blazor project, like this (see folder wc-piechart):
In order to use the custom element in our Blazor application we need to make sure to add the scripts into our index.html page. The same goes for the JavaScript interop script that we are going to build below:
					<!DOCTYPE html>
<html>

<head>
    <meta charset="utf-8" />
    <title>Blazor & Web Components</title>
    <base href="/" />

    <meta name="viewport" content="width=device-width, initial-scale=1.0" />

    <link href="css/bootstrap/bootstrap.min.css" rel="stylesheet" />
    <link href="css/site.css" rel="stylesheet" />
</head>

<body>
    <app>Loading...</app>

    <script src="_framework/blazor.webassembly.js"></script>
    <script src="_content/MatBlazor/dist/matBlazor.js"></script>

    <script src="libs/wc-piechart/polyfills.js" type="module"></script>
    <script src="libs/wc-piechart/angular-scripts.js" defer></script>
    <script src="libs/wc-piechart/wc-piechart.js" type="module"></script>
    <script src="jsinterop/wcpiechart.js"></script>
<script src="https://www.thinktecture.com/core/cache/min/1/ab8a2491727d31d270211089d1d5755e.js" data-minify="1"></script></body>

</html>
The following picture explains the integration of an Angular Element custom element into a Blazor application:
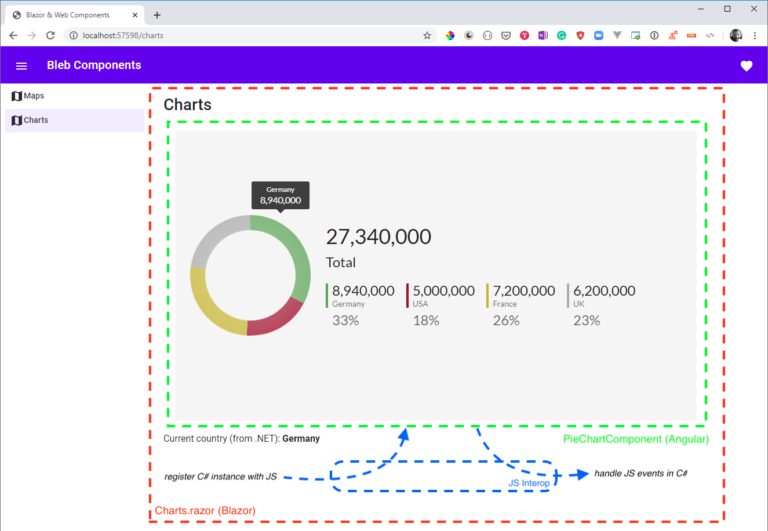
Let’s see how this works in detail.
JavaScript interop: subscribe to JavaScript events from .NET
There are plenty of examples on the web that show how to do basic JavaScript interop between Blazor and the JS part of your application. Here we are going to use JS interop to interact with our Angular Elements Web Component.
The code in the wcpiechart.js file in the ìnterop folder handles the JS interop interactions we need to register our .NET chart Razor component with the events fired by the Angular Web Component:
					var interopJS = interopJS || {}

interopJS.charts = {
    dotNet: null,

    register: dotNetReference => {
        dotNet = dotNetReference;
    },

    init: _ => {
        var chart = document.querySelector('wc-pie-chart');

        chart.addEventListener("selected", function (eventData) {
            console.log('### wc-pie-chart event fired!');
            console.log(eventData);

            dotNet.invokeMethodAsync("SetSelectedCountry", eventData.detail)
                .then(data => {
                    console.log("### wc-pie-chart was sent event to .NET.");
                });
        });
    }
}

window.interop = interopJS;
As you can see, when we catch the event form the Angular Element component we are going to call into the .NET code to invoke the SetSelectedCountry method in C#.
JavaScript interop: call .NET code from JavaScript event handlers
JS interop in Blazor has two faces: from .NET to JavaScript, and from JavaScript to .NET. The code in Charts.razor handles the registration of the Razor component with the JS world and also provides a method to be called from JS to update the _selectedCountry variable will is data-bound to a label in the Blazor world.
@page "/charts"
@using System.Text.Json
@implements IDisposable
@inject IJSRuntime JS
<h3>Charts</h3>
<div class="container">
<div class="row">
<wc-pie-chart data-values='@_data'>
</wc-pie-chart>
</div>
<div class="row">
<label>Current country (from .NET): </label>
<label><b>@_selectedCountry</b></label>
</div>
</div>
@code {
private string _data = @"[...]"; // JSON sample data not shown here
private string _selectedCountry;
private DotNetObjectReference<Charts> _objectReference;
protected async override void OnAfterRender(bool firstRender)
{
if (firstRender)
{
_objectReference = DotNetObjectReference.Create(this);
// Yes, this could be one single call
await JS.InvokeVoidAsync("interop.charts.register",
_objectReference);
await JS.InvokeVoidAsync("interop.charts.init");
}
}
[JSInvokable]
public void SetSelectedCountry(JsonElement selectedData)
{
_selectedCountry = selectedData.GetProperty("name").ToString();
// need to trigger change detection as we are coming from 'outside'
StateHasChanged();
}
public void Dispose()
{
GC.SuppressFinalize(this);
if (_objectReference != null)
{
_objectReference.Dispose();
}
}
}
In the OnAfterRender override of the Microsoft.AspNetCore.Components.ComponentBase class we are registering the component instance with the JS interop code shown previously. After that we immediately invoke the init JS function to set up the event handling from the Angular Element component.
The method decorated with the [JSInvokable]attribute is exposed to the JS interop layer and thus can be called from our JS interop code – here it is called when the selected event from the Angular component is begin fired and handled.
And please do not forget to properly clean up your .NET resources by implementing IDisposable, otherwise you code will cause memory leaks.
Summary
Well, these are the 3 steps to integrate Angular components in your Blazor application:
- Define the scope of the Angular component or application
- Create a standalone Angular Elements Web Component custom element from your Angular component / application
- Use the Angular Element Web Component in your Blazor application with JavaScript interop features
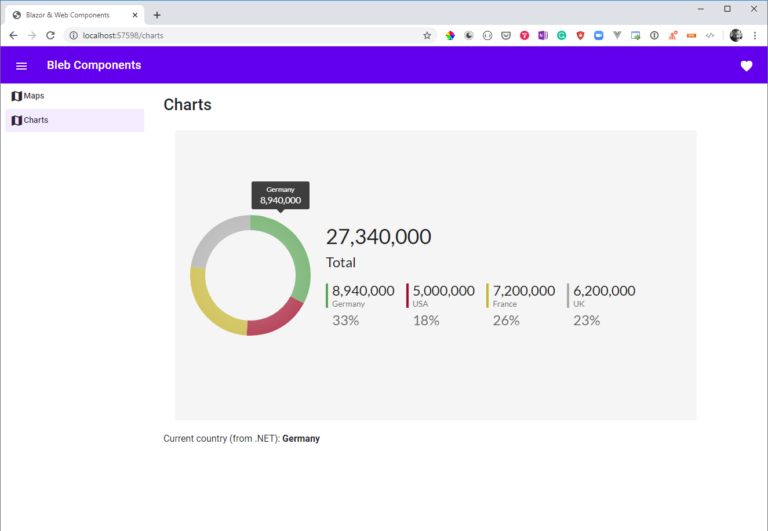
Et voila, the final result is your Angular component running inside you Blazor application, with bi-directional integration of data binding and event handling, with the help of Angular Elements and Web Components custom elements:
The source code for the Angular & Angular Elements demo application (with charts) is here: https://github.com/thinktecture/angular-elements-chart-webcomponent
The source code for the Blazor application with integrated Angular Elements component is here: https://github.com/thinktecture/blazor-integrations-angular-elements-web-components