
The included Ionic animations system is framework-agnostic, and it leverages the Web Animations API to create performant and resource-saving animations. It is available with the Ionic Framework version 5.0 and upward.
Version Information:
- Angular: 9+
- Ionic Framework 5.0
Differences Between Angular's and Ionic's Router
The Ionic Framework router extends the Angular router. You can use them next to each other, for example, in nested routes. However, some features are only available to the Ionic router, such as its page transition system and an internal history stack. The most significant difference between these two routers is that Ionic’s router does not remove loaded „pages“ from the DOM, but it tracks them in an internal state and hidden in the DOM. That enables us to reuse and animate once-loaded pages because components will not be reinitialized; instead, they become just visible again. It can also speed up the load time and responsiveness on specific mobile scenarios.
How does the Ionic router keep track of opened and closed pages?
Ionic’s Navigation State
Every time a page is visited, it is also added to the stack and later hidden in the DOM; Angular, in contrast, removes it completely. But it keeps them available and hidden until they are popped off their internal state. The stack and hidden DOM elements are critical for Ionics page transitions. It enables Ionic to pre-load pages offscreen and then start the desired animation. The pre-loading also makes it easy to manage the animation because all elements are available and freely manipulated.
You can observe the behavior by opening the dev tools and inspecting the DOM nodes containing the router. You should see something similar to this:
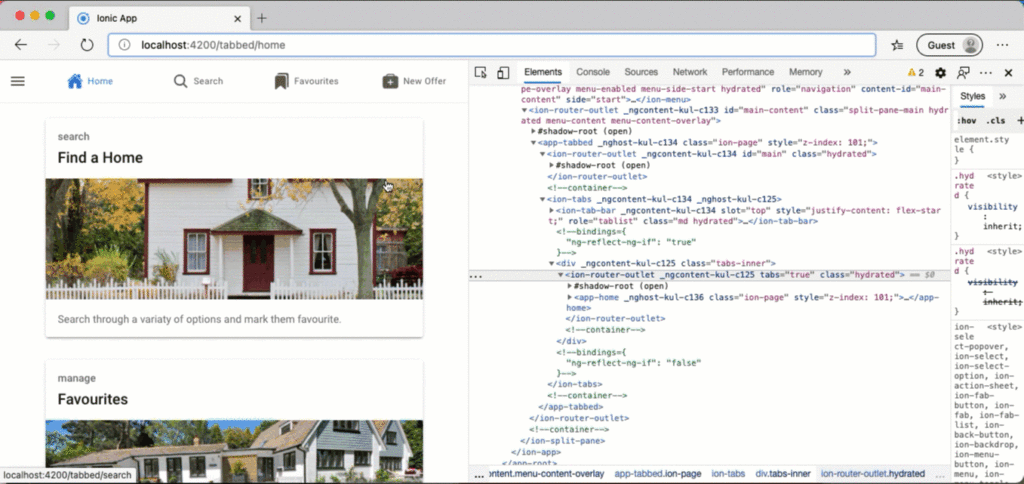
An element is only removed from the stack if it is actively cleared or popped; this can be done either by navigating back using methods provided by Ionic’s framework or navigating back with the browser. However, navigating „forward“ with the browser does not add the page back to the stack or plays its transition.
One method provided by Ionic is one of its UI elements, the back-button component or the routerDirection directive to remove the last element from the stack.
					<ion-back-button defaultHref="/"></ion-back-button>
<a routerLink="/path/to/page" routerDirection="back">Back to…</a>
Alternatively, you can invoke the pop or navigateBack method on the NavController class.
					import { NavController, Platform } from '@ionic/angular';

private navController: NavController,

this.navController.pop();
this.navController.navigateBack('path/to/page');
The pop is the recommended way to go back one step in history – in terms of the Ionic navigation stack and using the NavControler. The navigateBack method will go back in history and pop every state until the given path is found. Popping or going back in history will also display the back page transition to the target page and remove the page from the stack and the DOM.
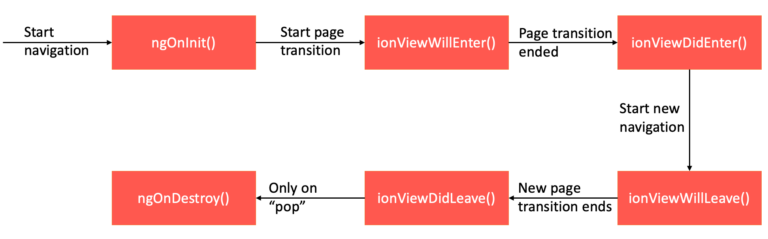
Since pages are not directly added or removed from the DOM anymore and the OnInit and OnDestroy are not called as expected, we need a new way to interact with their lifecycle.
New Lifecycle Callbacks
Ionic Framework also introduces new component lifecycle steps, and this is necessary due to the loading/offloading behavior of the router.
Removing a page from the view but not from the DOM renders it mandatory to provide interfaces for this new behavior. Angular does not call the OnInit or OnDestroy and other lifecycle methods as long as the component is not removed from or added to the DOM. This chart shows the new lifecycle methods by Ionic and on which events and in which order they are called:
Adding Navigation Animations with Ionic
Let’s define and handle the page transition animation on a global scope using Ionic’s animation system. We plan to create a page transition like shown below:
Let’s start with the function definition: We are receiving two inputs. The first one is the affected router outlet and can be ignored for this use case. The second one contains all the required information.
					export const customAnimation = (_: HTMLElement, opts: any): Animation {
  ...
}
Ionic does not export the type definition for the second import, but we can grab it from the sources (Source 1, Source 2, Source 3) our self. For the animation, we are interested in the entering and leaving DOM element and the animation configuration direction and duration.
This is how a typical options object looks:
					export interface AnimationOptions {
  mode: 'md' | 'ios';
  animated: boolean;
  direction: 'root' | 'forward' | 'back';
  enteringEl: HTMLElement;
  leavingEl: HTMLElement;
  baseEl: HTMLElement;
  progressAnimation: boolean;
  showGoBack: boolean;
  animationBuilder: (_, opts) => {}
  progressionCallback?: () => {};
  duration?: number;
}
Let’s use Ionic’s animation system to create the desired page transition effect. First, we create an animation controller with some default configurations for all transitions.
					export const customAnimation = (_: HTMLElement, opts: any): Animation {
  // create root transition
  const rootTransition = animationCtrl
    .create()
    .duration(opts.duration || 333)
    .easing('cubic-bezier(0.7,0,0.3,1)');
}
Afterward, we start defining the transitions for the elements we want to animate.
					const enterTransition = animationCtrl.create().addElement(opts.enteringEl);
const exitTransition = animationCtrl.create().addElement(opts.leavingEl);
}
We can define different animations, depending on the navigation direction. In this case, going forward shifts a page in from the left, and going back reverses the animation. We are doing so by defining key points for a property – where to start the animation and with what value it should end. The framework then tweens between these two points using the Web Animations API wherever possible.
					enterTransition.fromTo('opacity', '0', '1');
exitTransition.fromTo('opacity', '1', '0');

// handle animation depending on direction
if (opts.direction === 'forward') {
  enterTransition.fromTo('transform', 'translateX(-1.5%)', 'translateX(0%)');
  exitTransition.fromTo('transform', 'translateX(0%)', 'translateX(1.5%)');
} else {
  enterTransition.fromTo('transform', 'translateX(1.5%)', 'translateX(0%)');
  exitTransition.fromTo('transform', 'translateX(0%)', 'translateX(-1.5%)');
}
Last but not least, we add our transitions to the preconfigured root transition and return it.
					// add transition to root and return root
...
rootTransition.addAnimation([enterTransition, exitTransition]);
return rootTransition;
The complete function should look like the following code:
					export const customAnimation = (_: HTMLElement, opts: any): Animation {
  // create root transition
  const rootTransition = animationCtrl
    .create()
    .duration(opts.duration || 333)
    .easing('cubic-bezier(0.7,0,0.3,1)');

  const enterTransition = animationCtrl.create().addElement(opts.enteringEl);
  const exitTransition = animationCtrl.create().addElement(opts.leavingEl);

  enterTransition.fromTo('opacity', '0', '1');
  exitTransition.fromTo('opacity', '1', '0');

  if (opts.direction === 'forward') {
    enterTransition.fromTo('transform', 'translateX(-1.5%)', 'translateX(0%)');
    exitTransition.fromTo('transform', 'translateX(0%)', 'translateX(1.5%)');
  } else {
    enterTransition.fromTo('transform', 'translateX(1.5%)', 'translateX(0%)');
    exitTransition.fromTo('transform', 'translateX(0%)', 'translateX(-1.5%)');
  }

  rootTransition.addAnimation([enterTransition, exitTransition]);
  return rootTransition;
}
Finally, we can tell Ionic to use our custom animation for navigation. We are doing so by providing the method to the IonicModule configuration in our app module.
					@NgModule({
  ...
  imports: [
    ...
    IonicModule.forRoot({navAnimation: customAnimation})
  ]
})
Let’s take a look at the animation just created. It is the same as displayed above.
The leaving page fades away, and the incoming page fades in. We also see the movement matching the navigation direction, creating a smooth user experience. That way, the user can quickly grasp what happens and won’t lose focus on his task.
Source Code and Live Demo:
Stackblitz: https://stackblitz.com/edit/github-sxhycm-52soeu?
Conclusion
Using animations helps the user to understand changes. It eases cognitive load and can make complex changes comprehendible. Page changes can be hard to process, multiple parts can change, or an entirely new context is created. Ionic’s animation system and router make it easy to animate those changes and guide the user through the process without losing its focus. We can even write custom animations and pinpoint the user experience. Those animations are applied to lazy-loaded modules and pages, too. The produced custom animation code is easy to read and extendable, thanks to the provided animation API.
Ionic’s Router and animations API must not be feared. They provide a straightforward API and integrate well with Angular. Some challenging tasks even become easier using Ionic’s approach.